MiX16 Show Cue User Manual
![]()
![]()
Version: 7.0
Last updated: 2026-06-19
Platforms: Mac (macOS), iPad (iPadOS), iPhone (iOS)
Table of Contents
Introduction
MiX16 Show Cue is a professional application designed for live performances.
It allows you to create and trigger audio, video, image, lighting, text, and automation cues with advanced integration for MIDI, OSC, and Art-Net DMX lighting systems.
MiX16 Show Cue is available in Pro and Lite editions. Both editions share the same interface, functionality, and features. The Lite version is limited to 50 cues and does not support project management features such as New, Open, Save, Import, and Export Project. A single default project is used instead.
MiX16 Show Cue is built for theatres, concerts, bands, magic shows, weddings, schools, church services, solo performers, and any environment where precise cue control is essential.
Control your entire show with one button — as easy as it gets.
Key Features
MiX16 Show Cue includes a rich set of professional capabilities designed for live show control:
- Multimedia Cues – Supports playback of audio, MIDI, video, and image files in all standard formats, with individual cue settings for volume, loop, fade-in / fade-out, and pan.
- Text Cues – Display custom text with adjustable font, size, and color during a show.
- Lighting Cues – Integrate DMX lighting scenes using the Art-Net protocol, letting cues directly control stage fixtures.
- Live Input Cues – Use the device’s microphone or camera as live inputs for audio or video cues.
- Automation Cues – Automate cue chains and events based on timing, volume, or command triggers.
- Group Cues – Create pre-show music playlist, create lighting sequence, etc. with only one cue required in the main playlist.
- External Control – Full support for MIDI, OSC, and AirPlay for triggering cues and communicating with other hardware devices or software applications.
- Unlimited Cues & Projects – Create and save unlimited cues and project lists (Pro version).
- iCloud Drive Integration – Store and sync projects across devices using iCloud Drive.
- Consistent Cross-Platform Experience – Same look and feel on Mac (macOS), iPad (iPadOS), iPhone (iOS).
System Requirements
Supported Operating Systems
- macOS 11.0 or later
- iPadOS 14.0 or later
- iOS 14.0 or later
Supported Devices
- Mac
- iPad
- iPhone
Audio Output
- Built-in headphone/audio jack (if available)
- External USB audio adapters and interfaces
- Bluetooth audio devices
- AirPlay audio output
A wired headphone/audio connection (built-in or via adapter) or professional external audio hardware is recommended for real-time live performances.
Bluetooth and AirPlay audio may introduce latency and are not suitable for time-critical playback.
Video, Image, Text & Live Input Output
- Built-in VGA, HDMI or USB-C video output (if available)
- External USB video adapters and interfaces
- AirPlay wireless display
External display behavior depends on device capabilities and adapters used.
iPhone and iPad support one external display at a time.
Mac devices may support multiple external displays depending on hardware configuration.
AirPlay introduces latency and is not recommended for time-critical video playback.
Tip
When using display mirroring on Mac, hide the macOS menu bar on the external display for a clean output:
https://www.mix16showcue.com/mt-content/uploads/2026/06/mix16-apps-hide-menu-bar-on-external-display.pdf
Installation
Mac
- Open the Mac App Store
- Search for MiX16 Show Cue
- Click Buy
- Launch the app after installation
iPad / iPhone
- Open the App Store
- Search for MiX16 Show Cue
- Tap Buy
- Launch the app after installation
First Launch
When opening MiX16 Show Cue for the first time:
- The main interface appears
- Grant media access permissions if prompted
- Tap or click the + button to begin creating your cue playlist
Interface Overview
The interface is designed for fast, reliable operation during live performances and provides a consistent experience across iPhone, iPad, and Mac.
The main workspace is organized into a cue display area and two toolbars.
Top Toolbar

The top toolbar contains project and cue management tools:
- Project menu – Create, open, save, import and export projects
- Cue menu – Add new cues (multimedia, text, lighting, automation, and more)
- Edit controls – Move and delete cues, and undo or redo
- Search – Find cues in large playlists
- View controls – Toggle cue view and full-screen display
- MIDI & OSC – Open MIDI and OSC settings
- AirPlay – Open AirPlay settings
- Lighting – Open the lighting control panel showing the active lighting scene and master lighting control
- Tools menu – Access utilities and settings
Central area
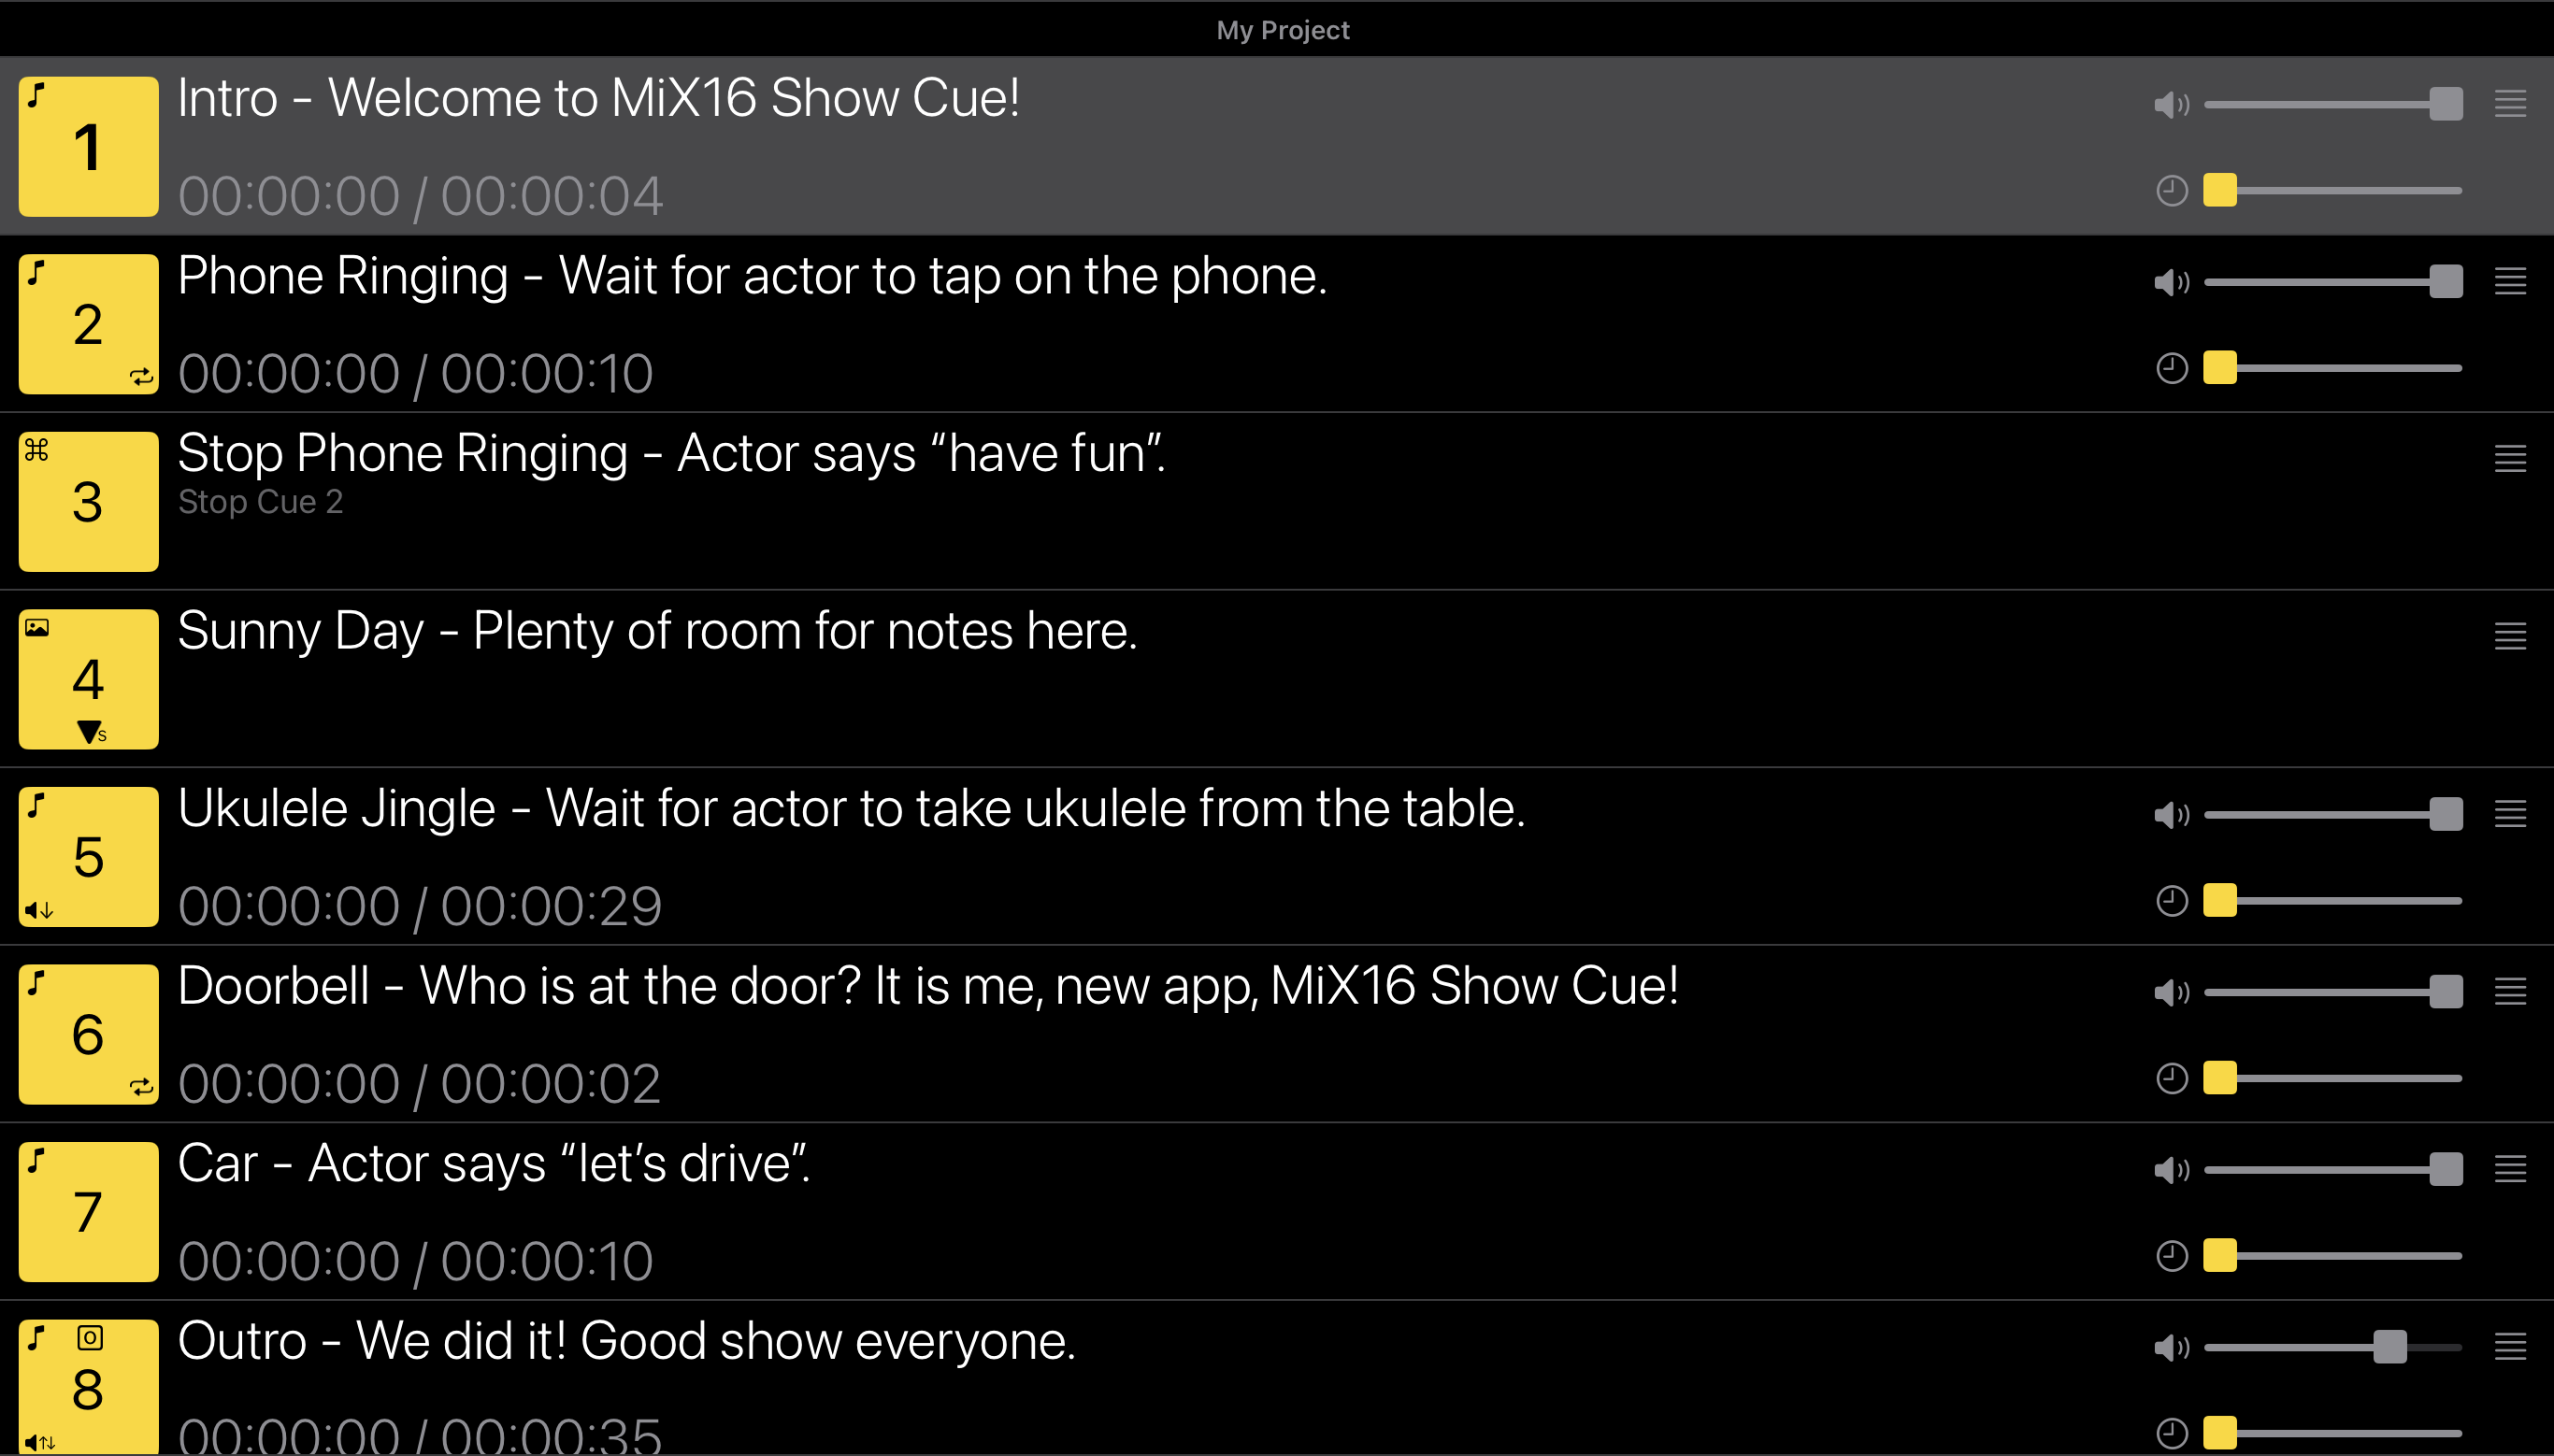
The central area displays the current project name at the top and contains your cue playlist.
It supports multiple viewing styles:
- Playlist view (default)
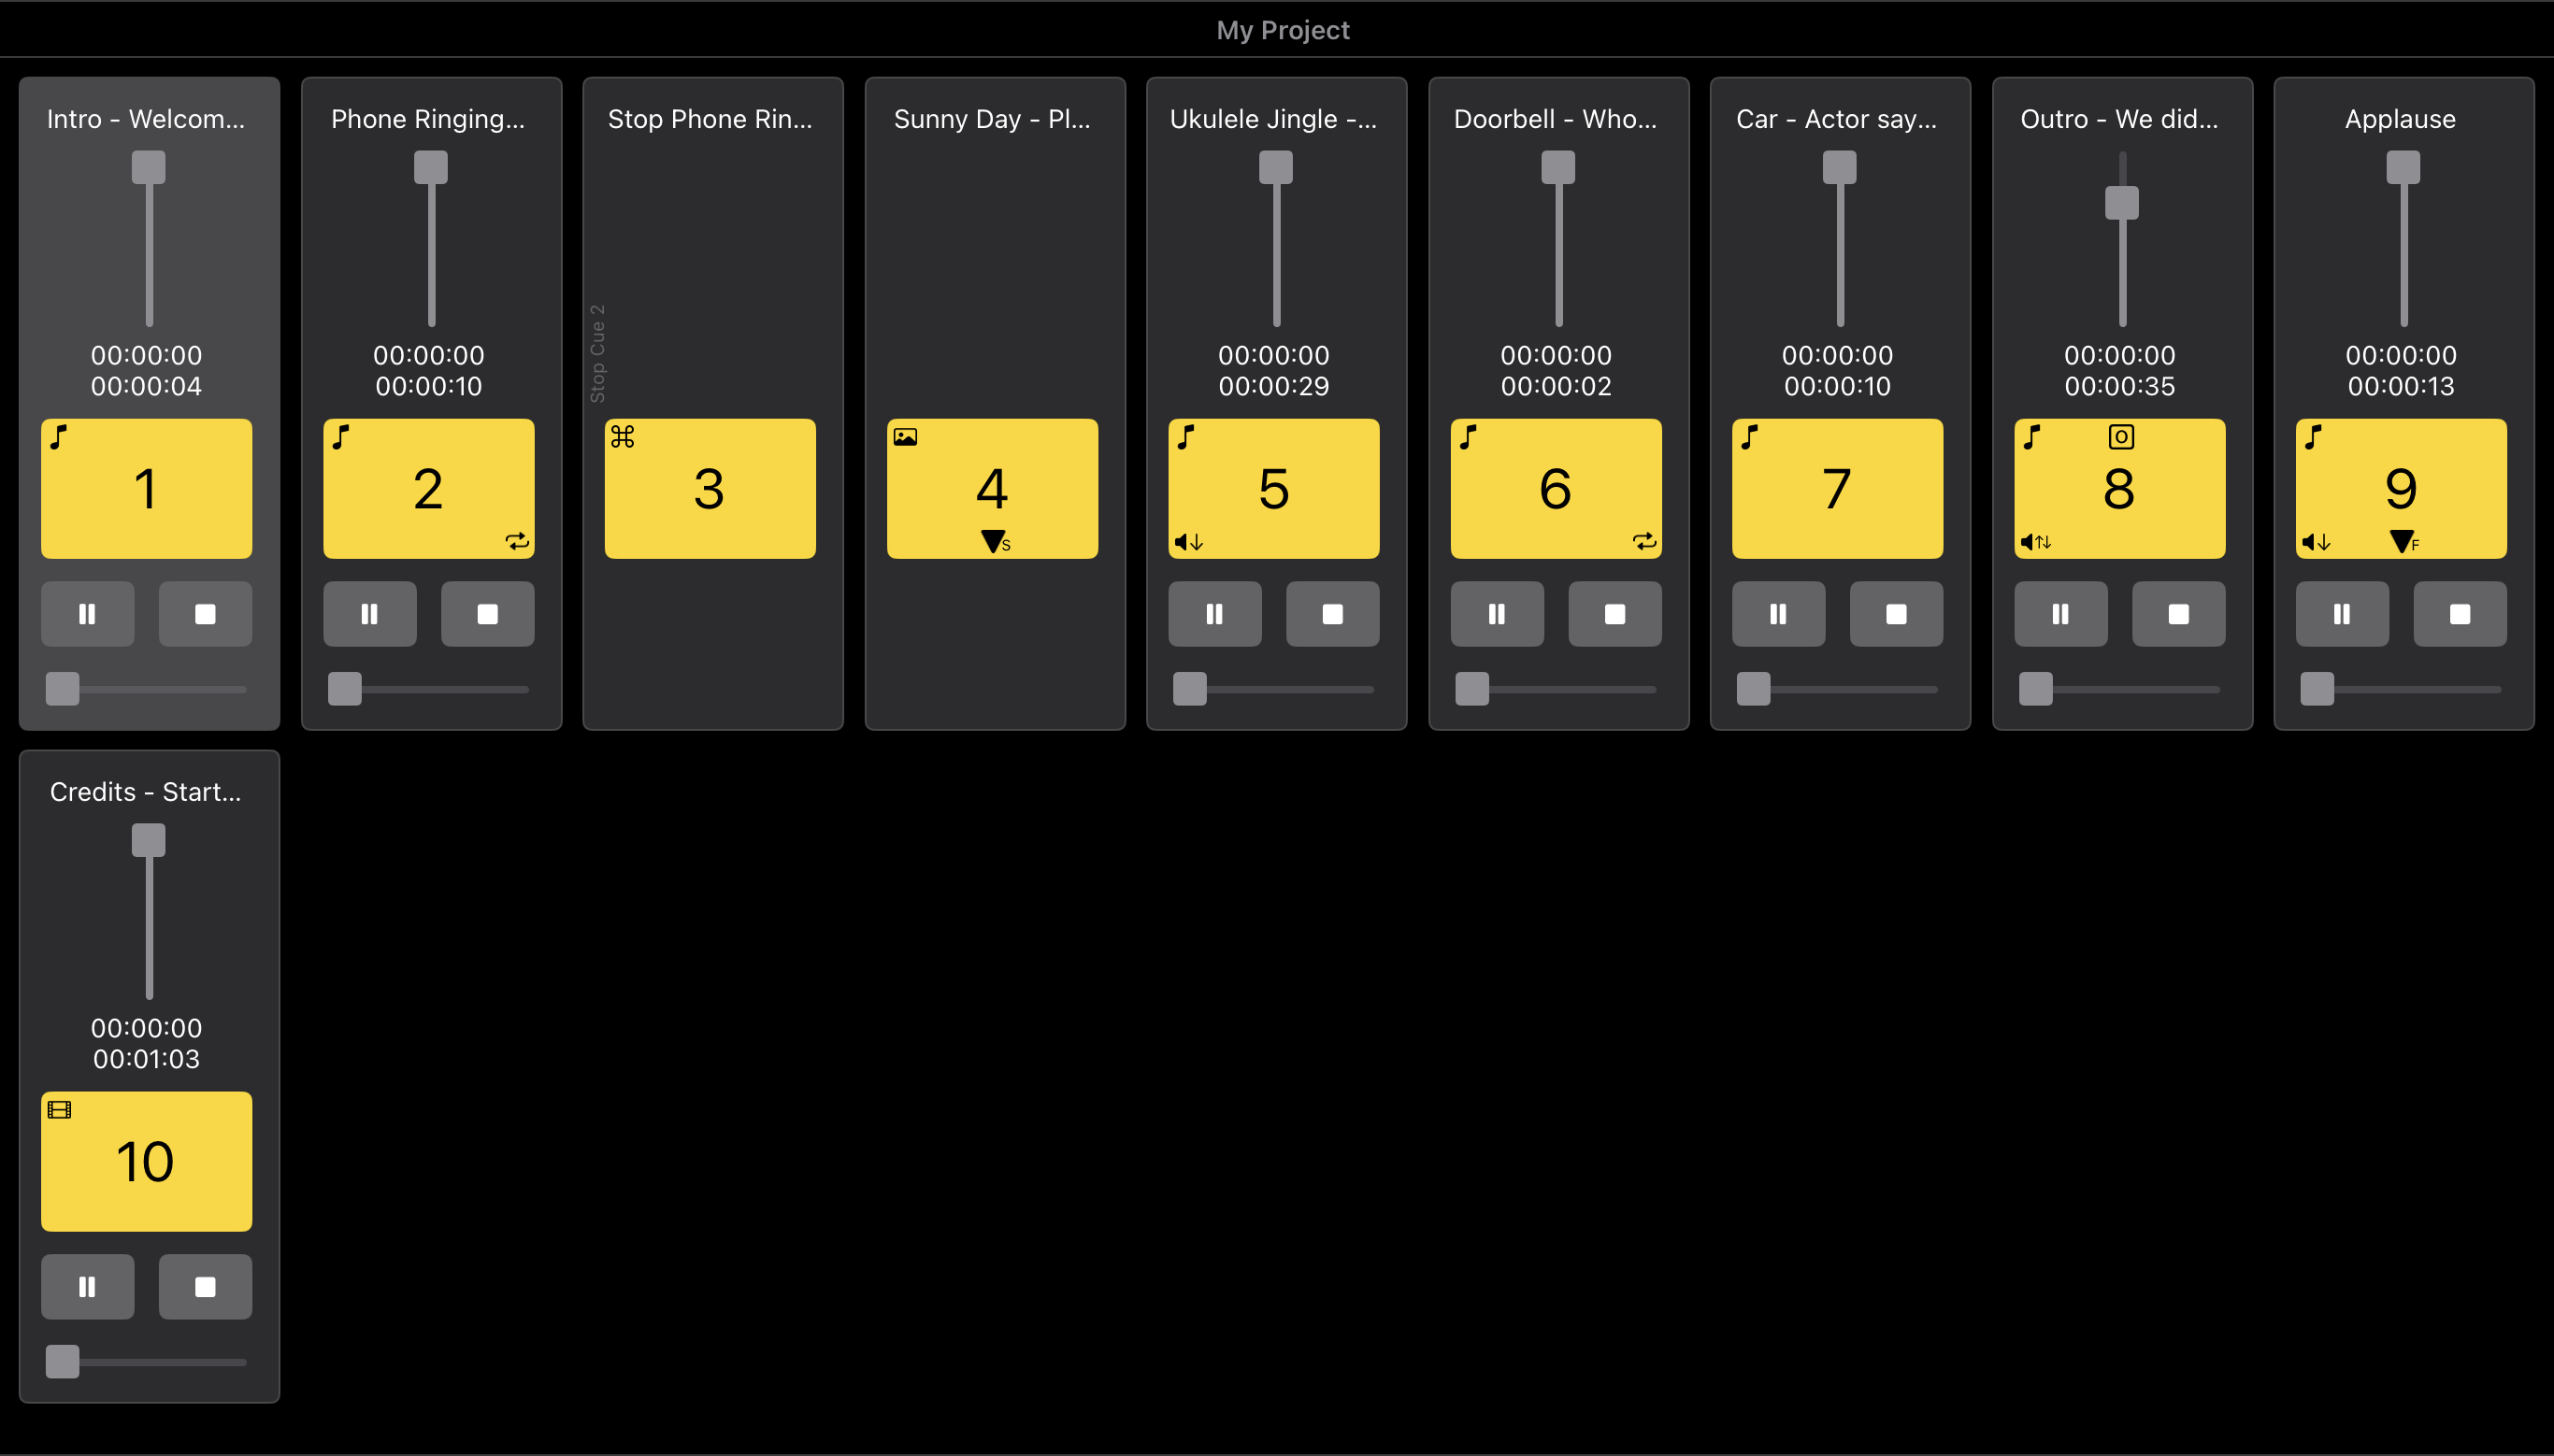
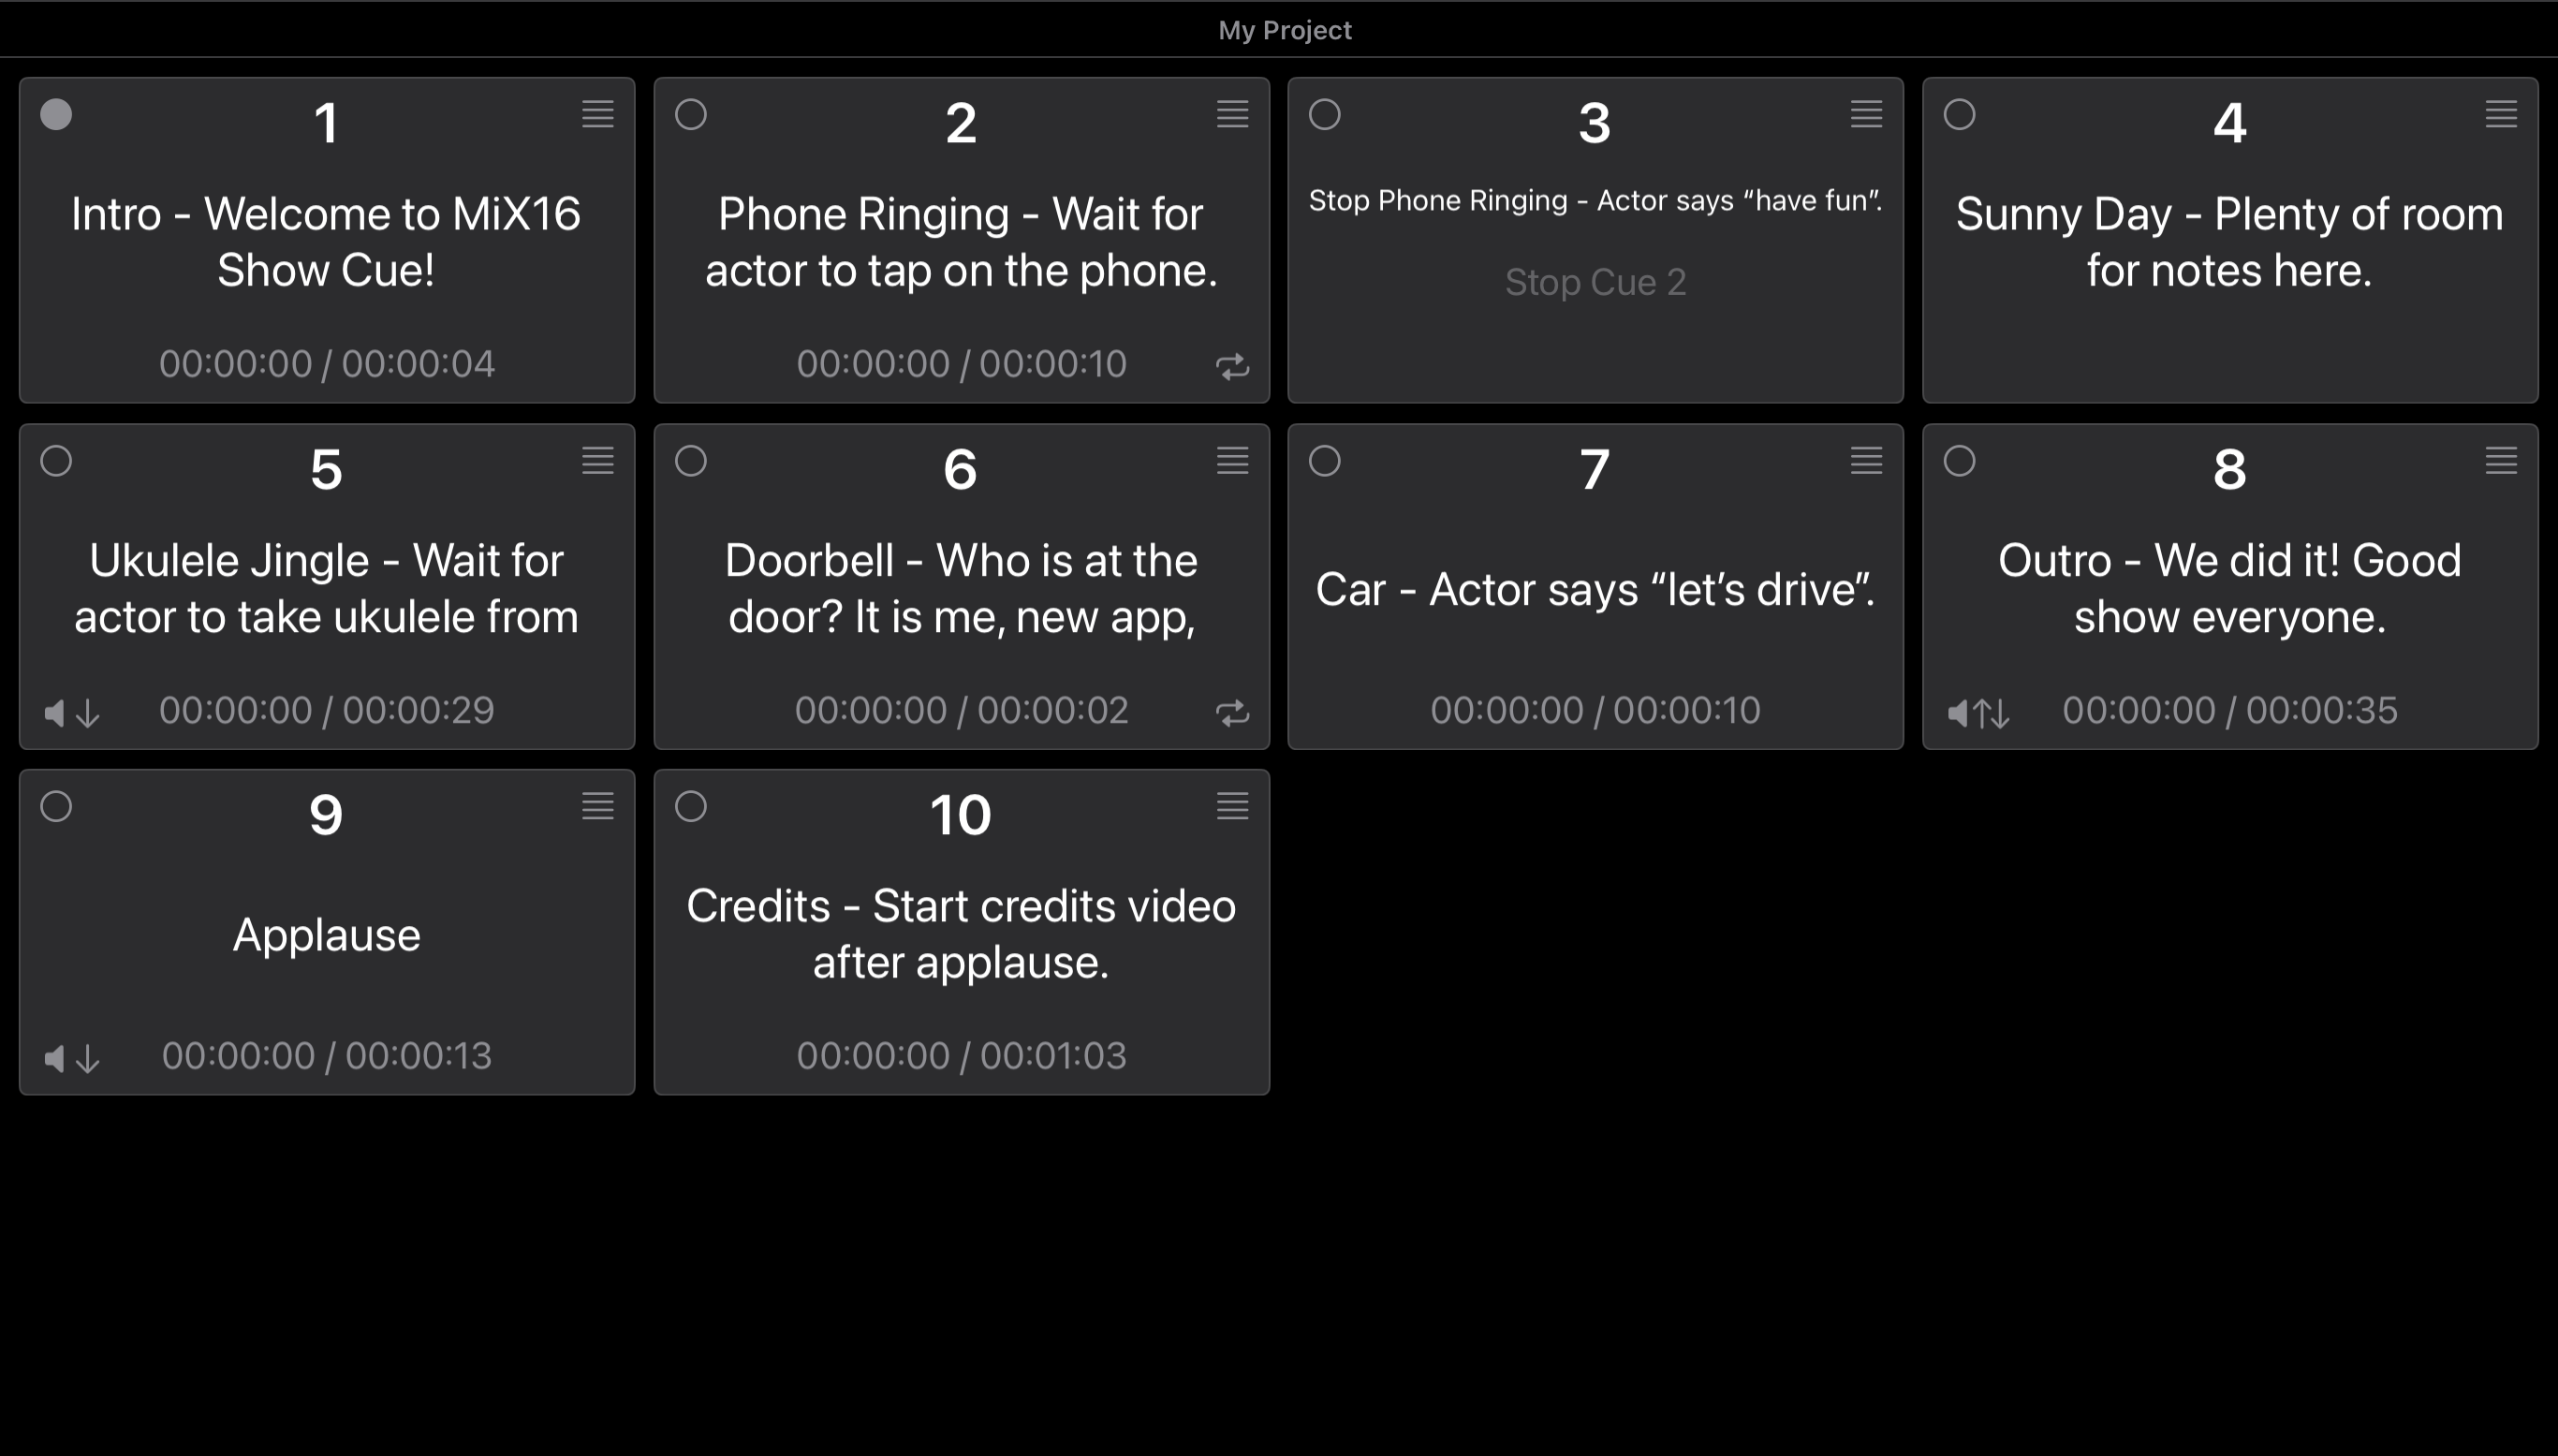
- Grid view
- Tiles view
Viewing styles can be changed from the Tools menu.
Bottom Toolbar

The bottom toolbar provides transport controls, master controls, and GO behavior settings:
- Pause
- Rewind
- Fast forward
- Master volume
- GO delay
- Set GO to previous cue
- Set GO to next cue
- Stop all cues
GO delay temporarily disables the GO button after it is pressed to help prevent accidental double triggering. Available delay values are OFF, 0.5, 1, 1.5, and 2 seconds.
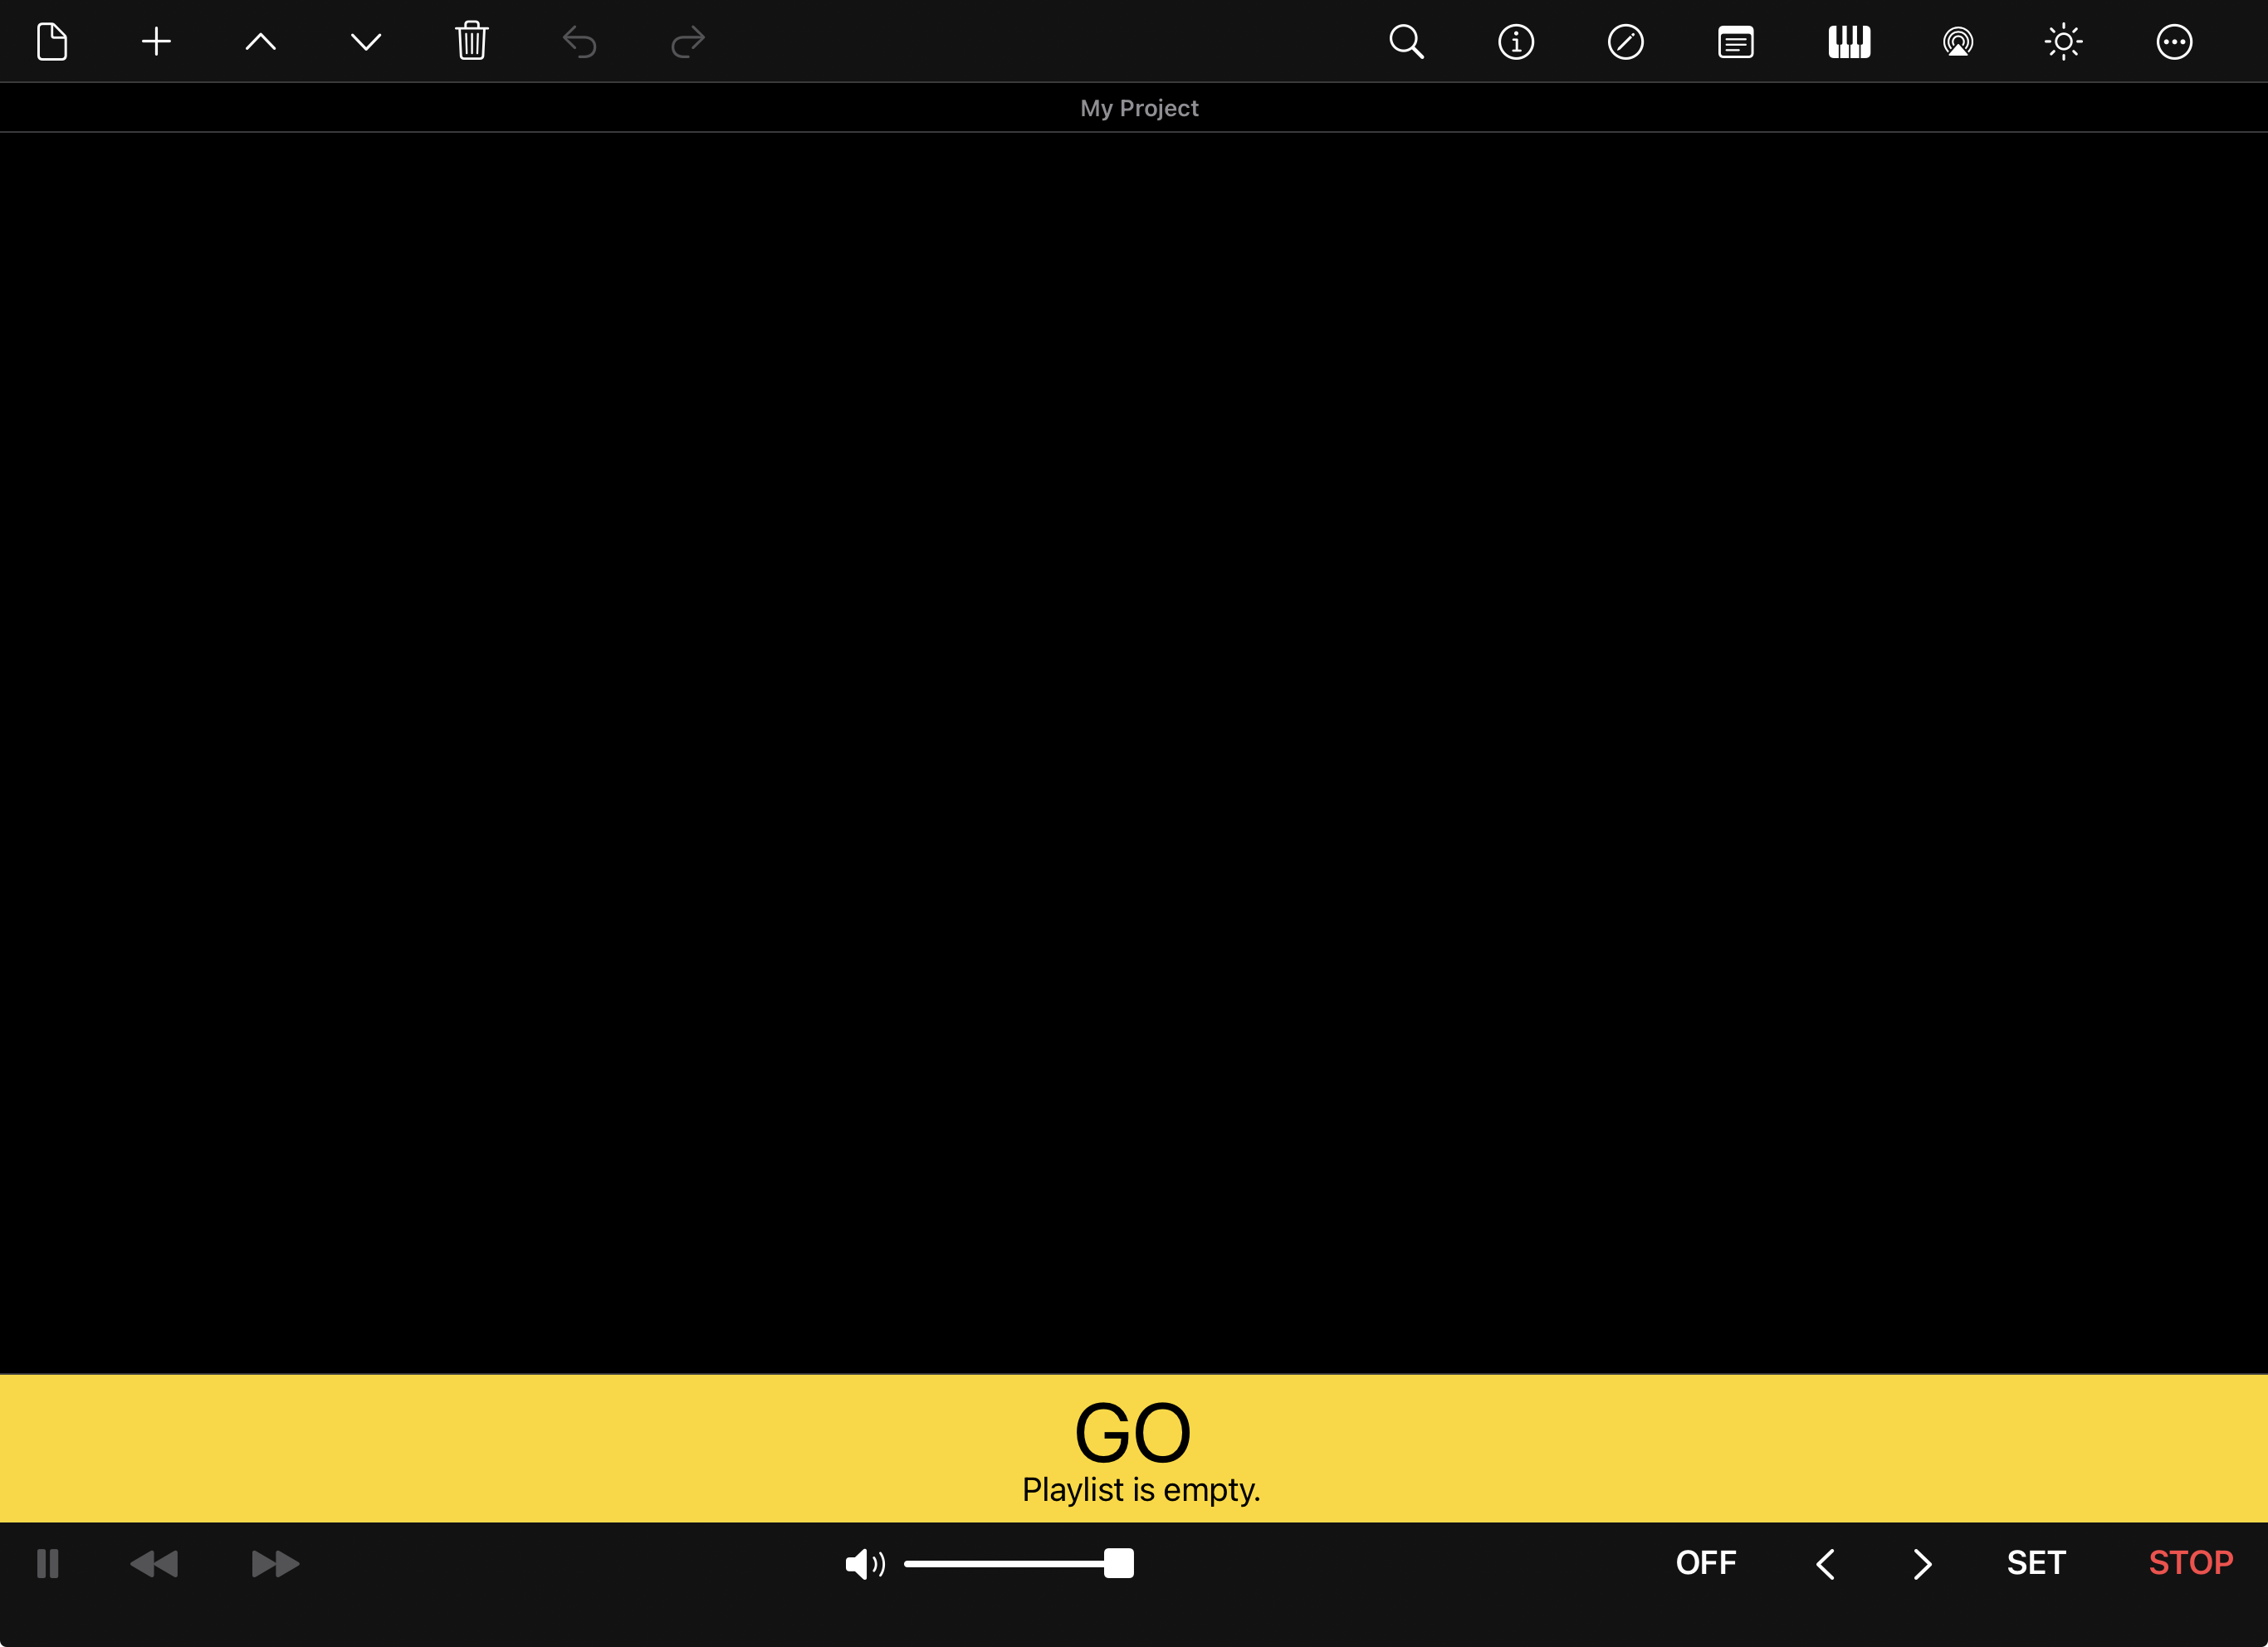
GO Button


A large GO button is positioned above the bottom toolbar for immediate access during performance. Pressing GO triggers the next cue in sequence.
In Settings, an optional split layout can be enabled that adds a large STOP button. In this mode, the screen displays approximately 70% GO and 30% STOP for quick emergency access during live shows.
The GO button can be hidden from the Tools menu when it is not needed during a performance. This also applies to the GO/STOP split layout.
Storage & Media Management
MiX16 Show Cue supports:
- Local storage (Mac / On My iPad / On My iPhone)
- iCloud Drive
For live performances, storing multimedia files in local storage is strongly recommended.
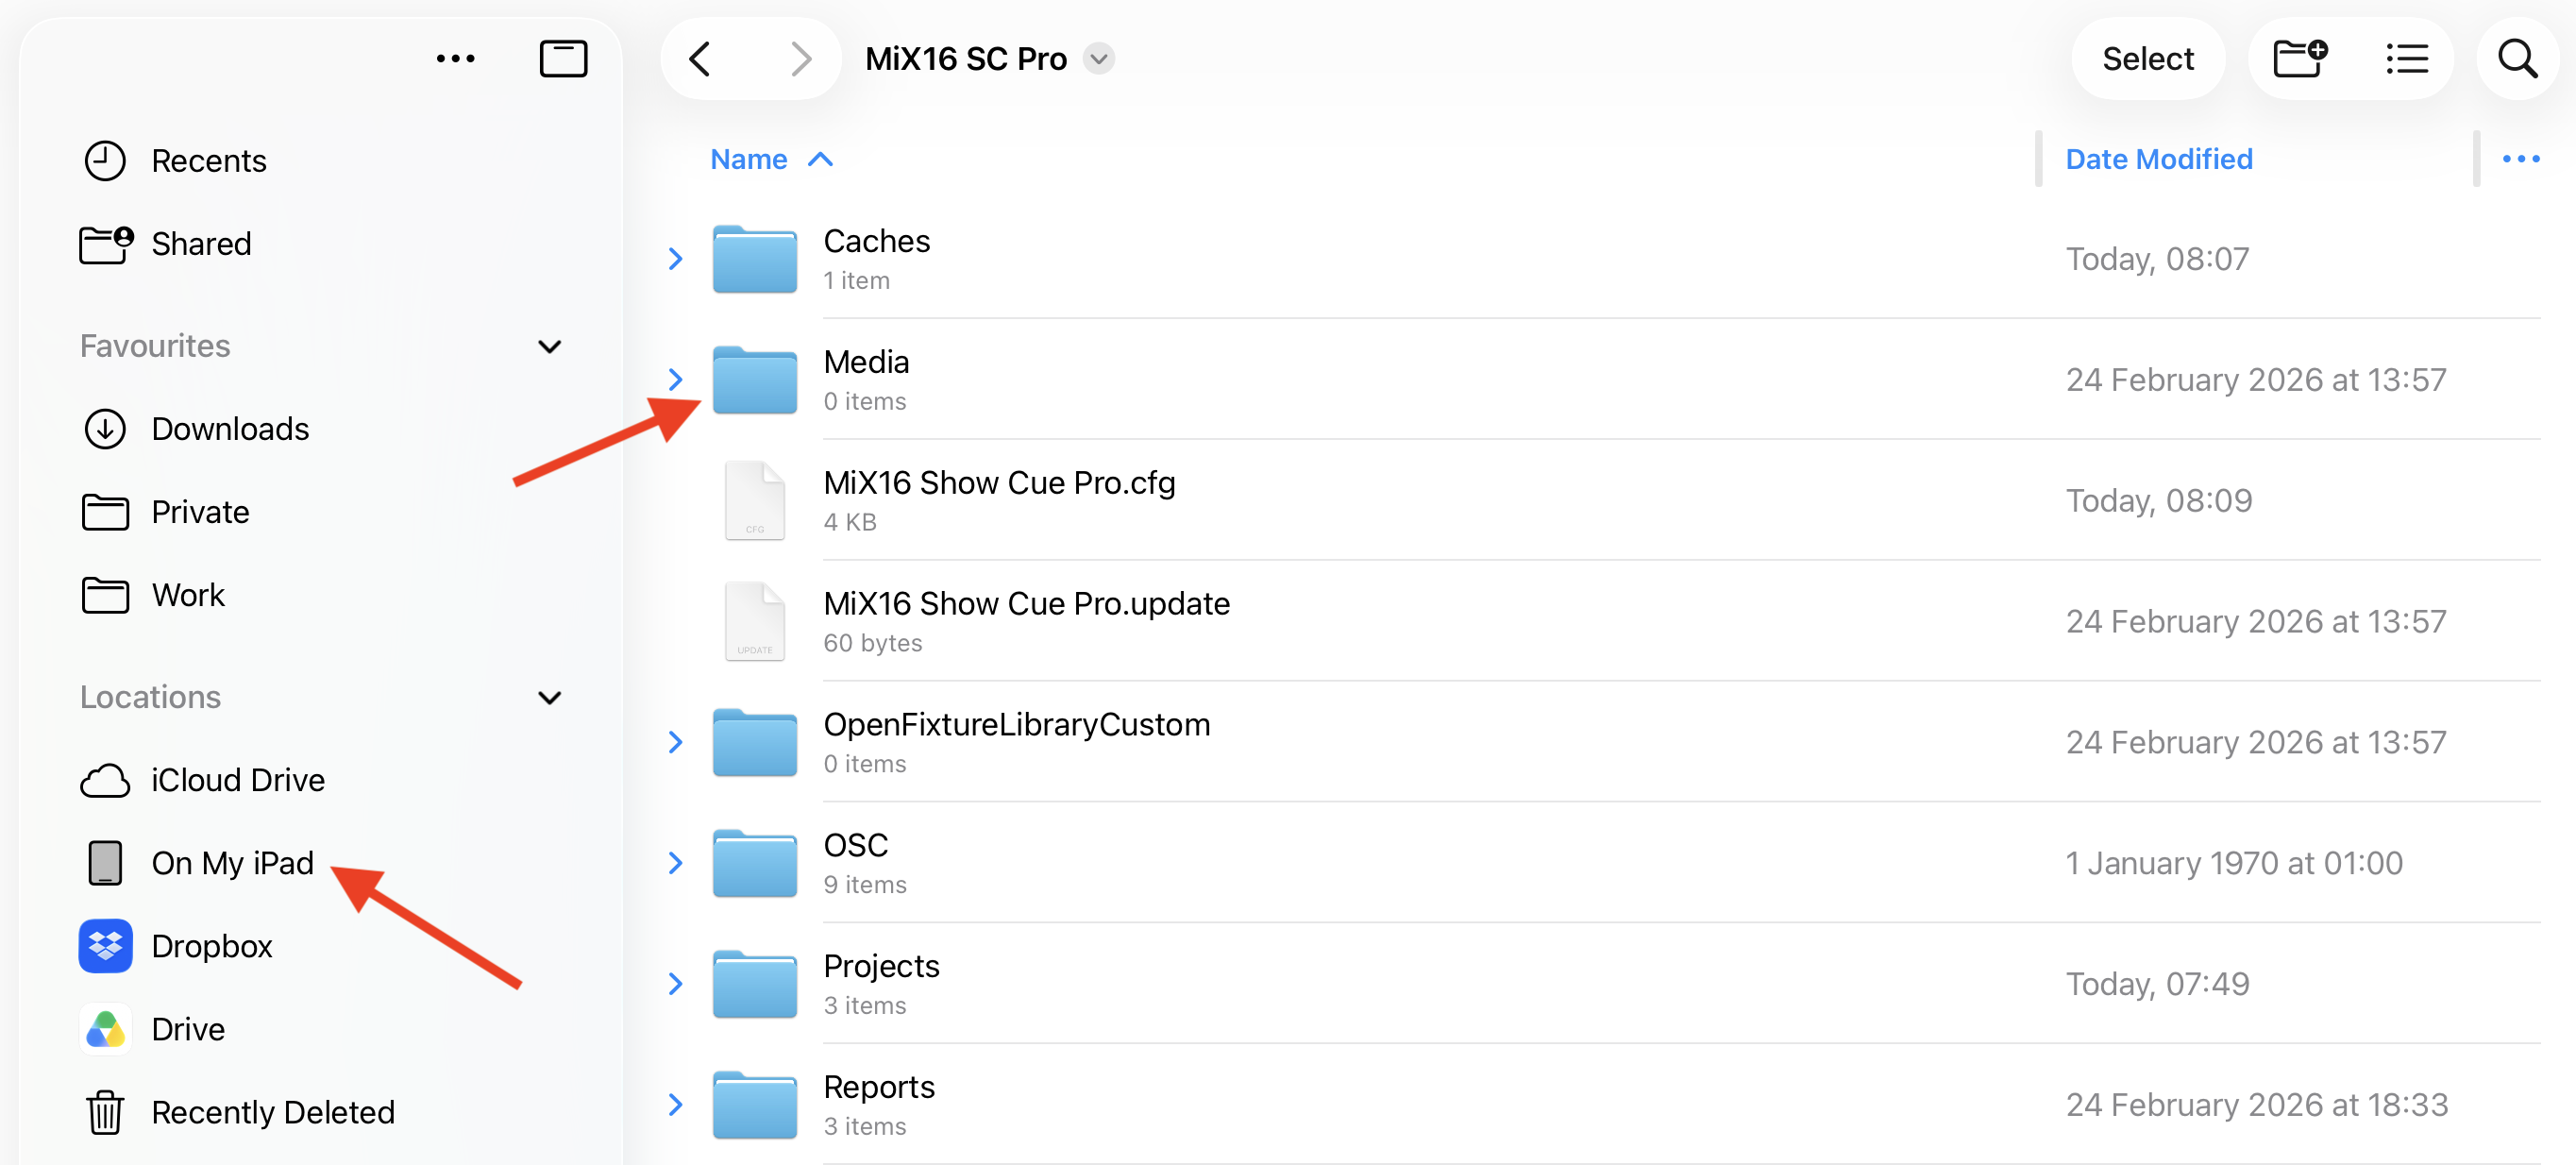
On iPad and iPhone, open the Files app, go to On My iPad or On My iPhone, and open the MiX16 SC Pro folder if using the Pro version, or MiX16 SC Lite if using the Lite version. Store multimedia files in the Media folder. This is the recommended location for best reliability during live performances.
If using iCloud Drive, ensure files are fully downloaded to the device before using them.
Use the Apple Files app to manage media and project files between local storage, iCloud Drive, and external storage.
![]()
Creating Cues
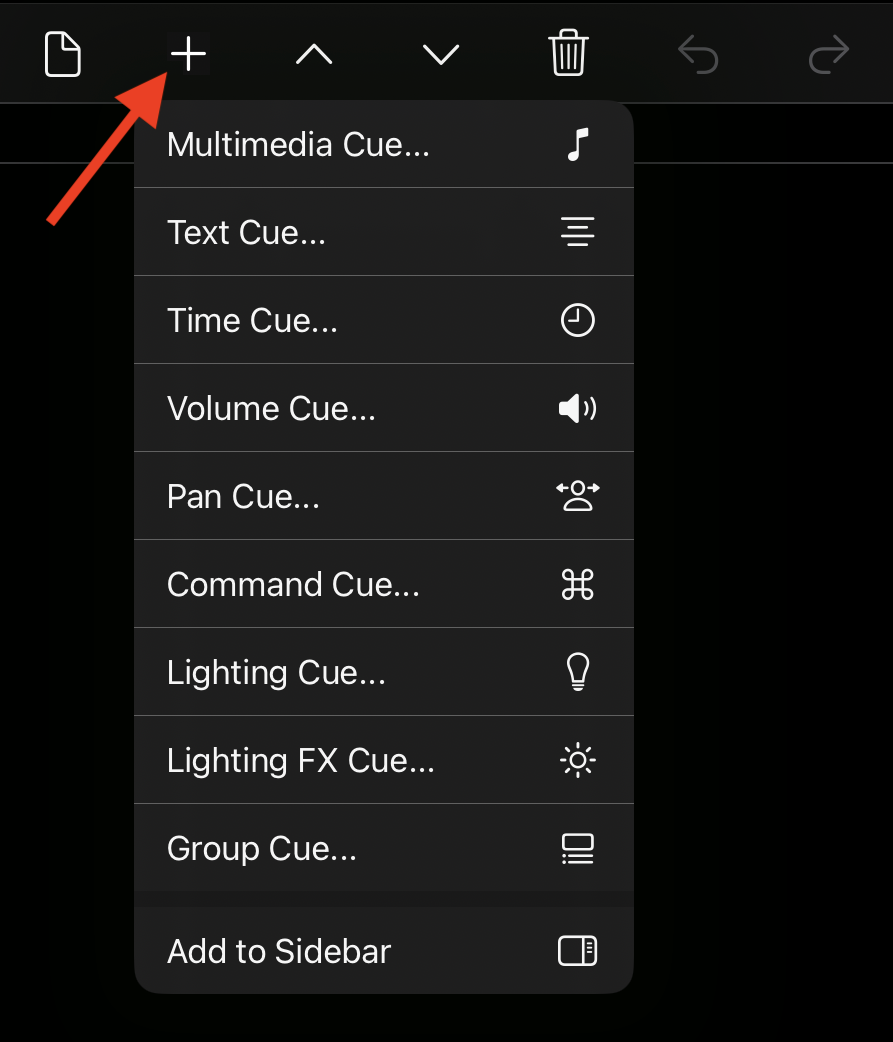
- Tap or click the + button in the main toolbar and select a cue type from the menu (Multimedia, Text, Lighting, Group, etc.)
- A setup window opens where you choose files (multimedia cues) or define the cue’s content and behavior (other cue types)
- Confirm to add the cue or cues to the playlist
The Pro version has no limit on the number of cues in a project. The Lite version is limited to 50 cues.
Main Playlist vs Sidebar
Cues can be added either to the main playlist or to the sidebar.
In the Cues menu, enable Add to Sidebar to add all newly created cues to the sidebar instead of the main playlist. While this option is active, any cue you create (Text, Lighting, Multimedia, etc.) will be placed in the sidebar automatically.
When Add to Sidebar is turned off, newly created cues are added to the main playlist as usual.
The sidebar can be shown or hidden from the Tools menu.
Cue Types
Multimedia Cue
Multimedia cues play audio, MIDI, video, and image files during a performance.
Supported file formats:
aif, aifc, aiff, caf, m4a, mp3, wav, flac, mid, mov, m4v, mp4v, mp4, jpg, jpeg, png, bmp, gif
Image files with transparency (alpha channel) are supported, allowing layered visual compositions.
Animated GIF files are also supported and play back as animated image cues.
Each multimedia cue supports industry-standard playback properties, including volume, fade-in time, fade-out time, loop, and pan.
Available properties may vary depending on the media type (audio, MIDI, video, or image).
Text Cue
Text cues display custom text on the screen during a show.
You can enter text and adjust font, size, and color to match the visual style of your production.
Lighting Cue
Lighting cues transmit DMX512 lighting data over Ethernet using the Art-Net protocol.
Each lighting cue supports up to 512 DMX channels plus a master channel.
A time property can be set to create smooth transitions between lighting scenes.
Lighting FX Cue
Lighting FX cues generate dynamic lighting effects by automatically changing the values of DMX channels assigned the FX type.
Unlike standard Lighting cues, which transmit fixed DMX values, Lighting FX cues affect only channels marked as FX. Channels with other types (such as Dimmer or Fixed Value) remain unchanged.
Each Lighting FX cue includes the following properties:
- Minimum Value (%) – The lowest DMX value used for the effect (0–100%, where 100% equals DMX value 255).
- Maximum Value (%) – The highest DMX value used for the effect.
- Start Time (s) – The minimum time interval before generating the next random value.
- End Time (s) – The maximum time interval before generating the next random value.
- Duration (s) – The total duration of the lighting effect.
During playback, the cue continuously generates random DMX values within the defined range and time frame, creating animated lighting effects.
Lighting FX cues can be used to produce effects such as strobes, flicker, or randomized ambient lighting (for example, a television or firelight effect). By adjusting the timing and value ranges, both rhythmic and organic lighting behaviors can be achieved.
Live Input Cue
Live Input cues capture and play audio or video in real time using the device’s internal or external microphone and camera.
This allows live sources to be integrated directly into the cue workflow.
Group Cue
Group cues allow multiple cues to be triggered as a single action.
They are commonly used for pre-show music playlists, lighting sequences, or complex cue chains while requiring only one cue in the main playlist.
Automation Cue
Automation cues allow automatic control of playback behavior and other cues.
MiX16 Show Cue includes four types of automation cues:
- Time Cue – Set a duration for a cue or timed event.
- Volume Cue – Define start volume, end volume, and transition duration for an audio cue, video cue, master volume or lighting master.
- Pan Cue – Define start pan, end pan, and transition duration for an audio cue.
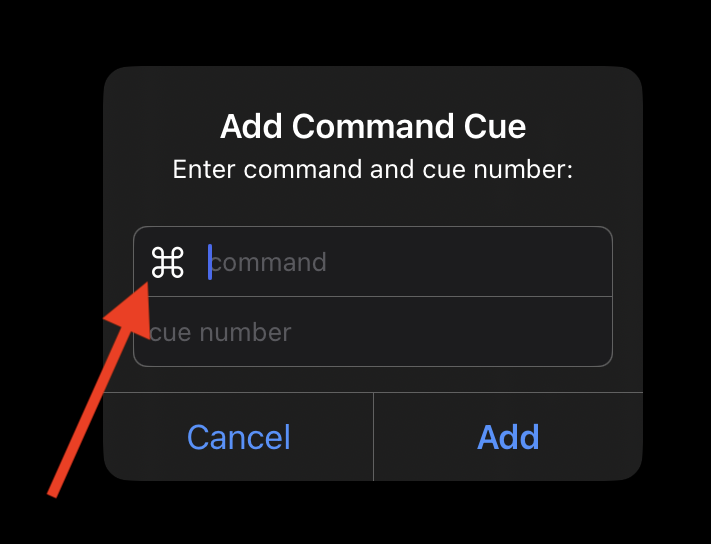
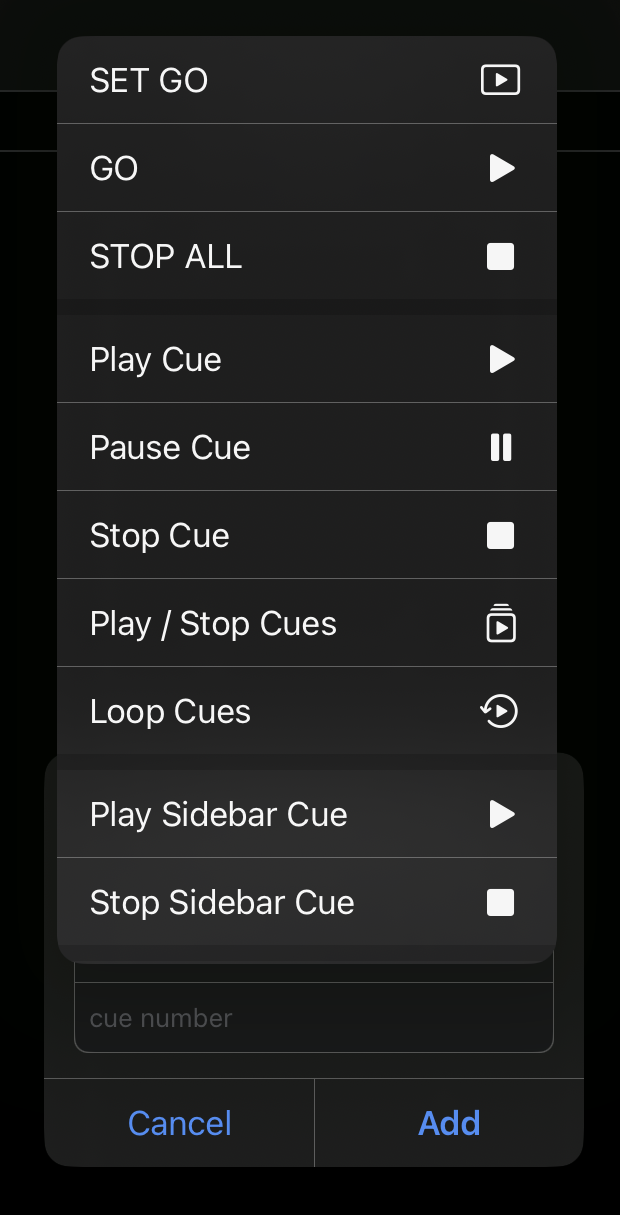
- Command Cue – Trigger actions such as play, pause, or stop for a specific cue, or global actions such as GO <cue number> or Stop All Cues.
Editing & Managing Cues
Cue Settings
Cue settings allow you to modify the behavior and appearance of a cue.
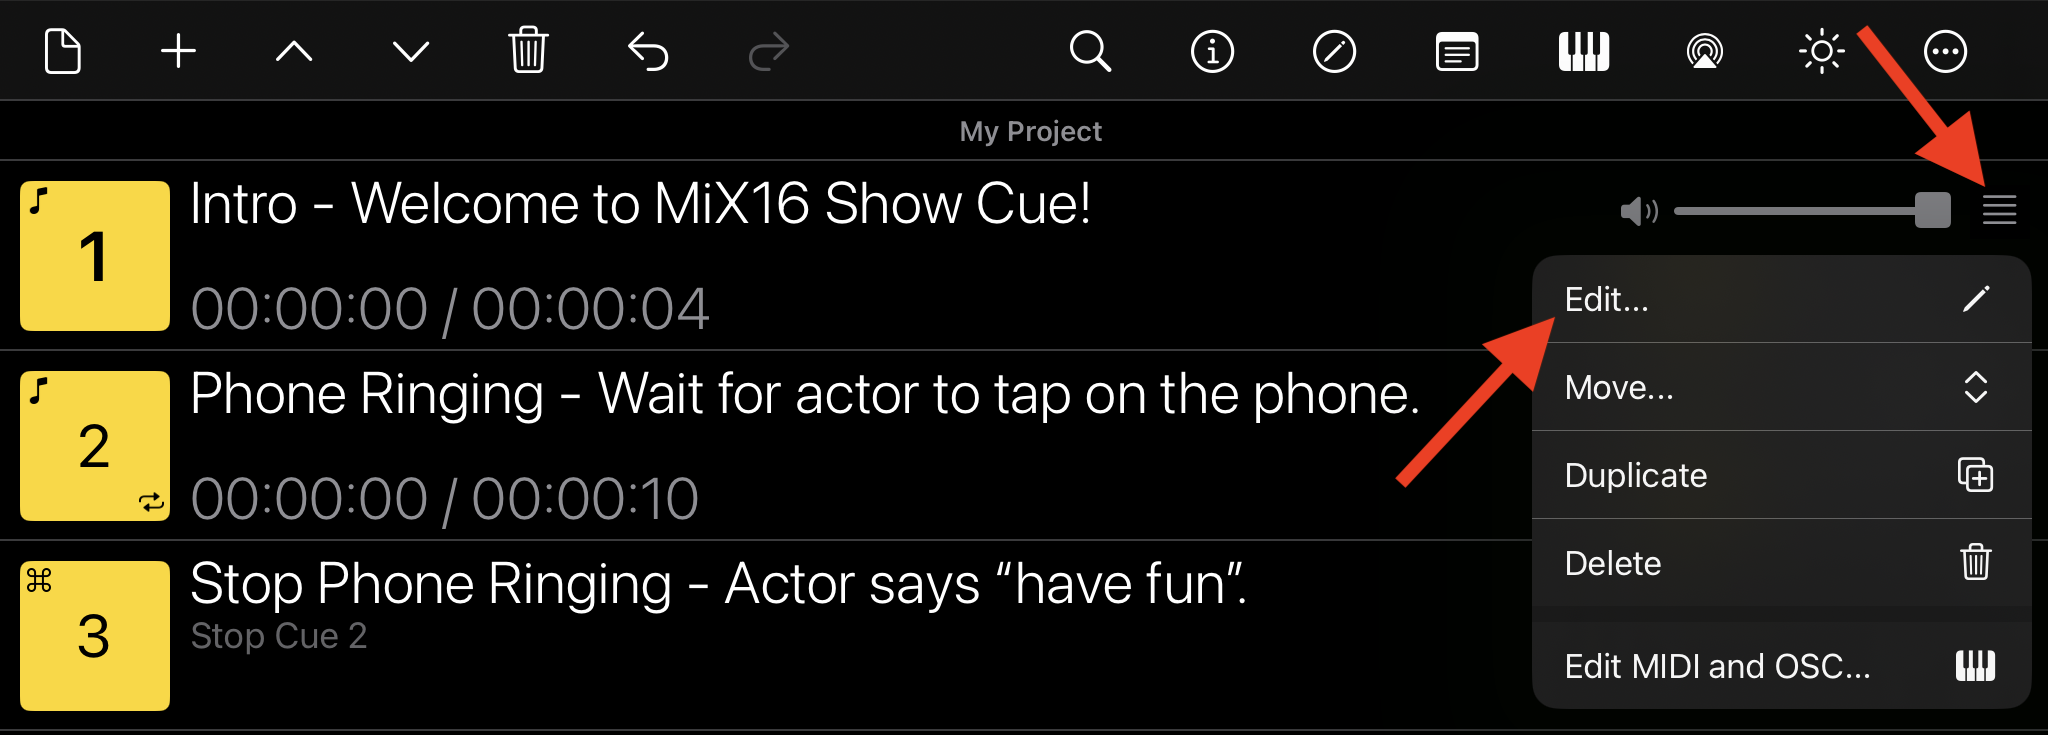
To access cue settings, tap or click the Cue Tools icon (four horizontal lines) on a cue, then select Edit from the drop-down menu.
A new window opens showing all available cue settings. Some settings are common to all cue types, while others are available for specific cue types.
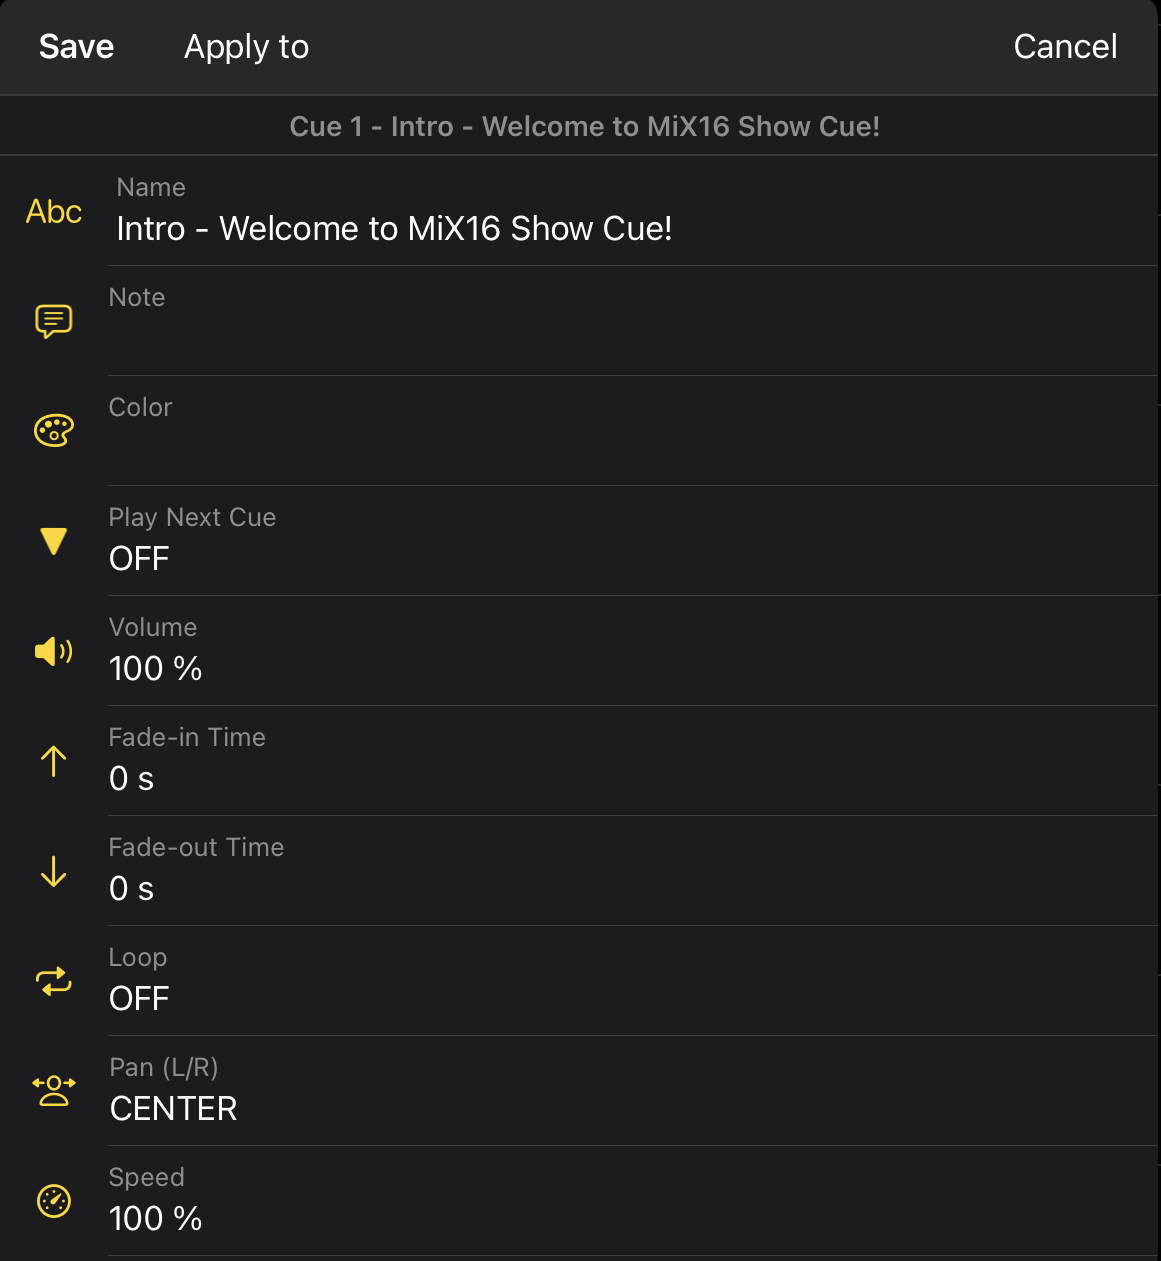
The cue settings window includes the following actions:
- Save – Save the current cue settings.
- Apply to – Copy selected cue settings to other stopped cues only of the same type. Tap or click Apply to to open a dialog where you can choose which settings should be copied. You can then apply the selected settings to all stopped cues or only to selected stopped cues of the same type. Playing or paused cues are not affected.
- Cancel – Close the window without saving changes.

Note
Some settings and dialog windows include an option button next to an input field. Tap or click the button to open a menu with available options, or enter the value manually.
The following list describes all cue settings. Setting names are shown exactly as they appear in the user interface.
Common (all cue types)
-
Name – Name of the cue displayed in the cue interface (playlist, grid, tiles).
-
Note – Optional note displayed in the cue interface.
-
Color – Background color of the cue displayed in the cue interface.
-
Play Next Cue – Defines what happens when a cue starts, finishes playing, or is stopped by the user.
OFF – No action
ON PLAYBACK START – Start the next cue when this cue starts
ON FADE-OUT START – Start the next cue when fade-out begins (audio and video cues, and image or text cues with duration set)
ON PLAYBACK END – Start the next cue when playback finishes -
Keyboard – Assign a keyboard key to trigger the cue (play / stop).
-
MIDI and OSC – Open the MIDI and OSC editor to configure external triggers and controls.
-
Playback Delay Time – Delay between trigger and actual cue playback.
-
Live Speech Text – Phrase to speak to trigger the cue.
-
Command Before Play – Execute a command immediately before the cue starts.
-
Command After Play – Execute a command immediately after the cue starts.
-
Command Before Stop – Execute a command immediately before the cue stops.
-
Command After Stop – Execute a command immediately after the cue stops.
Audio Cues
-
Volume – Audio playback volume.
-
Fade-in Time – Fade-in duration in seconds.
-
Fade-out Time – Fade-out duration in seconds.
-
Loop – Enable continuous playback looping.
-
Pan (L/R) – Stereo panorama control (L / C / R).
-
Speed – Playback speed from 50% to 200% without pitch shifting (time-stretch only).
-
File – Change the media file used by the cue.
-
Timeline – Open the non-destructive timeline editor to set playback start and end points.
-
Audio Output – Select stereo output channels on a multichannel audio device.
Video Cues
-
Volume Mode – Determines which elements are affected by volume changes.
AUDIO/VIDEO – Affects both audio volume and video opacity
AUDIO – Affects audio only
VIDEO – Affects video opacity only -
Volume – Audio playback volume and/or video opacity, based on the selected volume mode.
-
Fade-in Time – Fade-in duration in seconds.
-
Fade-out Time – Fade-out duration in seconds.
-
Loop – Enable continuous playback looping.
-
Pause On Stop – Pause the last video frame when playback ends, keeping it visible until manually stopped.
-
Display Mode – Video scaling mode: FIT TO SCREEN ASPECT RATIO or FILL SCREEN.
-
Filter – Apply visual effects during playback (color invert, sepia, bloom, pixelate, etc.), including CHROMA KEY.
Chroma key transparency is supported on macOS only and removes the default green color. -
Video Output Window – Select the output display used for playback.
SYSTEM DEFAULT uses the default external display.
On macOS, up to four video output windows are supported (1–4), including combinations (for example: 1,3,4). -
Audio Delay Time – Delay audio playback by 0.001 to 10 seconds to synchronize audio with video playback. This can be useful in installations or live setups where audio and video are not perfectly synchronized (for example, due to video processing or long signal paths).
-
File – Change the media file used by the cue.
-
Timeline – Open the non-destructive timeline editor to set playback start and end points.
Image Cues
-
Duration – Cue duration in seconds.
-
Fade-in Time – Fade-in duration in seconds.
-
Fade-out Time – Fade-out duration in seconds.
-
Display Mode – Image scaling mode: FIT TO SCREEN ASPECT RATIO or FILL SCREEN.
-
Filter – Apply visual effects during playback (color invert, sepia, bloom, pixelate, etc.), including CHROMA KEY.
Chroma key transparency is supported on macOS only and removes the default green color. -
Always On Top – Keep image cues above all other visual cues regardless of playback order.
-
Video Output Window – Select the output display used for playback.
SYSTEM DEFAULT uses the default external display.
On macOS, up to four video output windows are supported (1–4), including combinations (for example: 1,3,4). -
File – Change the media file used by the cue.
Text Cues
-
Duration – Cue duration in seconds.
-
Fade-in Time – Fade-in duration in seconds.
-
Fade-out Time – Fade-out duration in seconds.
-
Always On Top – Keep text cues above all other visual cues regardless of playback order.
-
Video Output Window – Select the output display used for playback.
SYSTEM DEFAULT uses the default external display.
On macOS, up to four video output windows are supported (1–4), including combinations (for example: 1,3,4). -
Text – Open the text editor to configure text content, font, size, and color.
Time Cues
- Duration – Cue duration in seconds.
Volume Cues
-
Audio/Video Cue or Master Volume – Target cue number (1, 2, 3, …), M for audio master volume, or L for lighting master.
-
Start Volume – Initial volume value in percent.
-
End Volume – Final volume value in percent.
-
Duration – Cue duration in seconds.
Pan Cues
-
Audio Cue – Target audio cue number.
-
Start Pan – Initial stereo pan position (Left = -100%, Center = 0%, Right = 100%).
-
End Pan – Final stereo pan position.
-
Duration – Cue duration in seconds.
Command Cues
- Command – Select the command executed when the cue starts.
Lighting Cues
-
Duration – Cue duration in seconds.
-
DMX Channels – Open the DMX channel editor.
Lighting FX Cues
-
Minimum Value – Lowest DMX value used for the FX effect (0–100%, where 100% = DMX value 255).
-
Maximum Value – Highest DMX value used for the FX effect.
-
Start Time Frame – Minimum time interval before generating the next random DMX value.
-
End Time Frame – Maximum time interval before generating the next random DMX value.
-
Duration – Cue duration in seconds.
-
DMX Universe – DMX universe used by the lighting FX cue.
Live Input Cues
-
Volume Mode – Determines which elements are affected by volume changes.
AUDIO/VIDEO – Affects both audio volume and video opacity
AUDIO – Affects audio only
VIDEO – Affects video opacity only -
Volume – Audio playback volume and/or video opacity, based on the selected volume mode.
-
Video Capture Device – Select the internal or external video capture device.
Supports UVC-compliant USB devices and iPhone camera via macOS Continuity. -
Display Mode – Video scaling mode: FIT TO SCREEN ASPECT RATIO or FILL SCREEN.
-
Filter – Apply visual effects during playback (color invert, sepia, bloom, pixelate, etc.), including CHROMA KEY.
Chroma key transparency is supported on macOS only and removes the default green color. -
Video Output Window – Select the output display used for playback.
SYSTEM DEFAULT uses the default external display.
On macOS, up to four video output windows are supported (1–4), including combinations (for example: 1,3,4).
Group Cues
-
Loop – Enable continuous playback looping.
-
Crossfade – Automatically crossfade all cues inside the group that have duration and fade-in/out set.
-
Shuffle – Enable random playback order for group cues.
-
Simultaneous Playback – Start all cues in the group at the same time.
Perfect sync is guaranteed when all cues in the group are audio cues, making this useful for backing tracks (drums, bass, guitars, etc.). -
Cues – Open the group cue editor to add, edit, reorder, or remove cues.
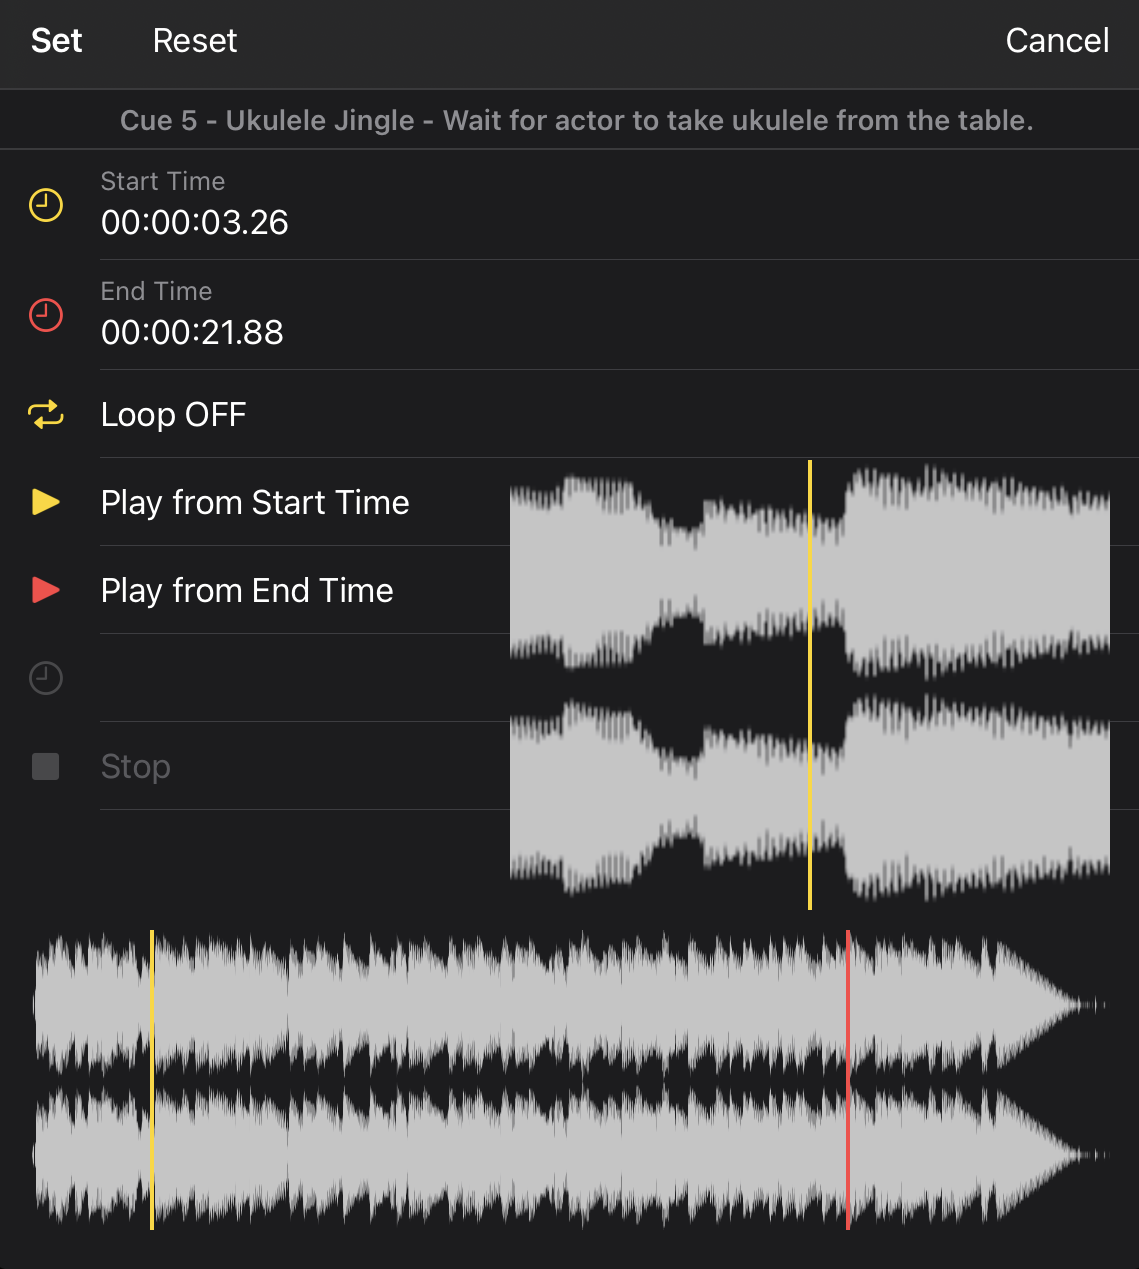
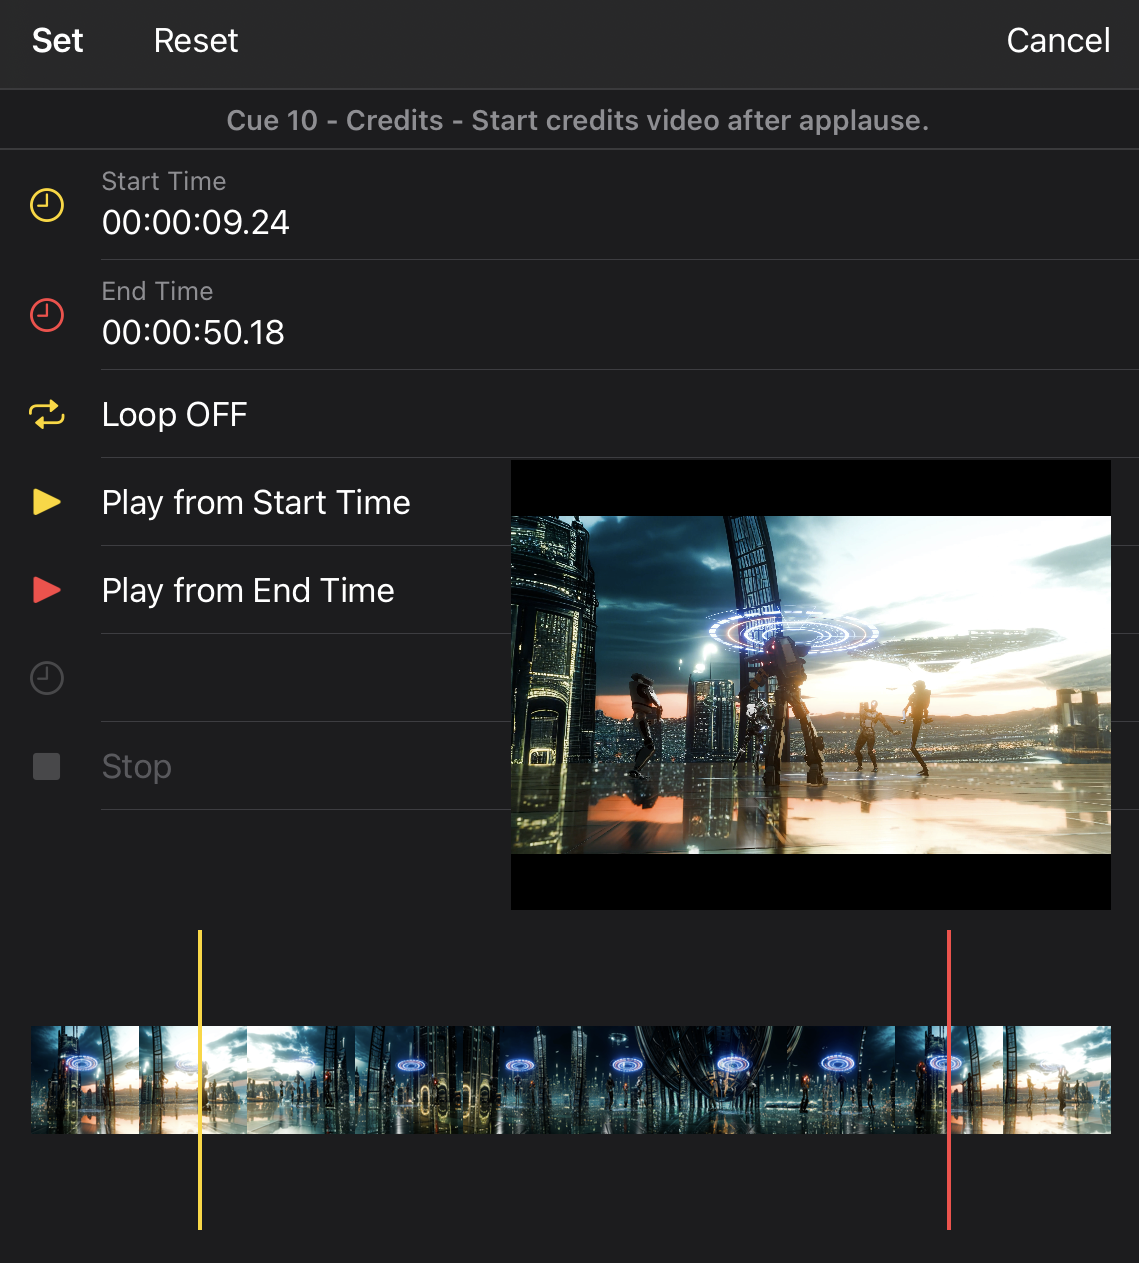
Timeline Editor
The Timeline Editor allows playback start and end points to be adjusted without modifying the original media file.
This makes it possible to play only a selected section of an audio or video file while keeping the original file unchanged.
Start and end times can be:
- Entered manually
- Adjusted using the yellow start slider and red end slider
When a slider is tapped or clicked and moved, a larger detailed preview is displayed to provide a more precise view for adjustment.
The following playback options are available:
- Play from Start Time – Preview playback from the selected start position
- Play from End Time – Preview playback from the selected end position
This can be useful for fine-tuning playback start and end points before applying the timeline settings.
Audio Timeline Editor
The Audio Timeline Editor displays an audio waveform preview for precise adjustment of playback start and end points.
When a slider is tapped or clicked and moved, a larger waveform preview is displayed to provide a more detailed view for precise adjustment.
Video Timeline Editor
The Video Timeline Editor displays a video frame preview for precise adjustment of playback start and end points.
When a slider is tapped or clicked and moved, a larger video preview is displayed to provide a more detailed view for precise adjustment.
Note
By default, audio waveform preview and video frame preview are disabled. To enable them, go to Settings → Audio Waveform Timeline and Settings → Video Timeline.For additional information, see the Settings section.
Triggering Cues
GO Workflow
Press GO to trigger the next cue in sequence.
This workflow is designed for live performances where hands-free simplicity is critical.
GO Playback Modes
MiX16 Show Cue includes three GO playback modes that define what happens to already playing cues when GO is triggered.
To change the playback mode, press and hold the STOP button in the bottom toolbar (or the Big STOP button if enabled) for approximately 1 second.
The selected mode is displayed directly in the GO button title using dots.
Standard Playback (No Dots)

In standard playback mode, pressing GO triggers the next cue without affecting other currently playing cues.
Multiple cues can play simultaneously.
Stop Main Playlist Cues (One Dot)

In one dot mode, pressing GO stops all currently playing cues in the main playlist, except for the cue triggered by GO.
Sidebar cues are not affected and continue playing.
This mode can be useful when only one main playlist cue should play at a time.
Stop All Cues (Two Dots)

In two dots mode, pressing GO stops all currently playing cues in both the main playlist and the sidebar, except for the cue triggered by GO.
This mode ensures only the newly triggered cue continues playing.
Set GO to Selected Cue
The SET button allows the GO button to be armed with a specific cue from the playlist.

Select a cue in the playlist, then tap or click SET. The selected cue becomes the next cue triggered by GO.
This is useful when rehearsing, jumping to a different section of a show, or recovering from an unexpected situation during a live performance.
Press and hold SET for approximately 1 second to switch to AUTO mode.

When AUTO mode is enabled, the button changes from SET to AUTO, turns green, and GO is automatically armed when a cue is selected in the playlist.
This allows a faster GO workflow during rehearsals or live performances without manually pressing SET each time.
Press and hold AUTO for approximately 1 second again to switch back to SET mode.
Direct Cue Playback
You can trigger any cue directly by pressing its play button.
Automation
Cues can trigger:
- Other cues
- MIDI commands
- OSC messages
- Art-Net lighting events
Automation allows fully synchronized shows across audio, video, and lighting systems.
MIDI & OSC Integration
MiX16 Show Cue supports professional MIDI and OSC (Open Sound Control) workflows for external control, automation, and communication with hardware and software devices.
MIDI and OSC can be used to:
- Trigger cue playback
- Control cue parameters
- Send commands to external devices
- Receive commands from external devices
- Synchronize playback with other software or hardware
MiX16 Show Cue supports MIDI input, MIDI output, MIDI thru, Bluetooth MIDI, and OSC communication.
Tap or click the MIDI button in the top toolbar to open the MIDI and OSC Settings window.
Bluetooth MIDI Devices
The Bluetooth MIDI Devices tab allows Bluetooth MIDI devices to connect to the device running MiX16 Show Cue.
Supported devices may include:
- Bluetooth MIDI controllers (synths, keyboards, footswitches, pad controllers, etc.)
- Computers or mobile devices supporting Bluetooth MIDI
- Other Bluetooth MIDI-compatible hardware or software
Tap or click a device in the list to connect or disconnect it.
Local MIDI Service
The Local MIDI Service tab allows MiX16 Show Cue to advertise itself as a Bluetooth MIDI device.
When enabled, other MIDI-compatible applications or devices can discover and connect to MiX16 Show Cue using the Bluetooth MIDI protocol.
This can be useful when communicating with other applications or devices supporting Bluetooth MIDI.
Enable Advertise MIDI Service to make the app available for Bluetooth MIDI connections.
MIDI Input, Output & Thru Devices
The MIDI Devices tab displays all MIDI devices currently available to the system.
Devices are grouped into:
- MIDI Input Devices – Devices that send MIDI commands to MiX16 Show Cue.
- MIDI Output Devices – Devices that receive MIDI commands from MiX16 Show Cue.
- MIDI Thru Devices – Devices used for MIDI thru routing.
Tap or click a device to enable or disable it for use in MiX16 Show Cue.
When MIDI Thru is enabled for a device, incoming MIDI commands received by MiX16 Show Cue are automatically forwarded to that device.
MIDI & OSC Cue Settings
The MIDI & OSC Cue Settings tab contains predefined cue playback commands used when creating or controlling cues.
Examples include:
- Play cue
- Pause cue
- Stop cue
- Cue volume
Both input and output commands can be configured.
These settings act as presets for newly created projects and cues. They are stored in the project and application settings, and can also be saved as templates and loaded when needed.
The same MIDI and OSC commands can also be configured individually for each cue in Cue Settings.
This is useful when using the same MIDI hardware or OSC workflow across multiple projects.

MIDI DMX Channels Settings
The MIDI DMX Channels Settings tab allows MIDI commands to control lighting cue DMX channels.
Settings are available for the Lighting Master and all 512 DMX channels.
These MIDI commands are active only while the Lighting Cue Editor is open when adding or editing a lighting cue.
MIDI communication works in both directions:
- Input – Incoming MIDI commands control DMX values.
- Output – DMX changes send MIDI commands.
For example, a MIDI command such as:
NON,1,1
represents:
- NON – MIDI command (Note On)
- 1 – MIDI channel
- 1 – MIDI note or program number
The final MIDI value is handled automatically.
MIDI values range from 0–127, while DMX values range from 0–255. MiX16 Show Cue automatically converts MIDI values to DMX values for input, and DMX values back to MIDI values for output.
MIDI & OSC Settings
The MIDI & OSC Settings tab contains predefined general playback commands used throughout the application.
These commands control actions such as:
- Play next cue
- Pause all cues
- Stop all cues
- Set previous cue
- Set next cue
- Master volume
- Lighting master
Both input and output commands can be configured.
These settings act as presets and are stored in the project and application settings. They can also be saved as templates and loaded when needed.
This allows the same MIDI or OSC setup to be reused across multiple projects without configuring commands repeatedly.

Editing MIDI & OSC Commands
To edit a MIDI or OSC command, tap or click a command in the table. A pencil icon appears in the selected row.
Tap or click the pencil icon to open the command editor dialog.
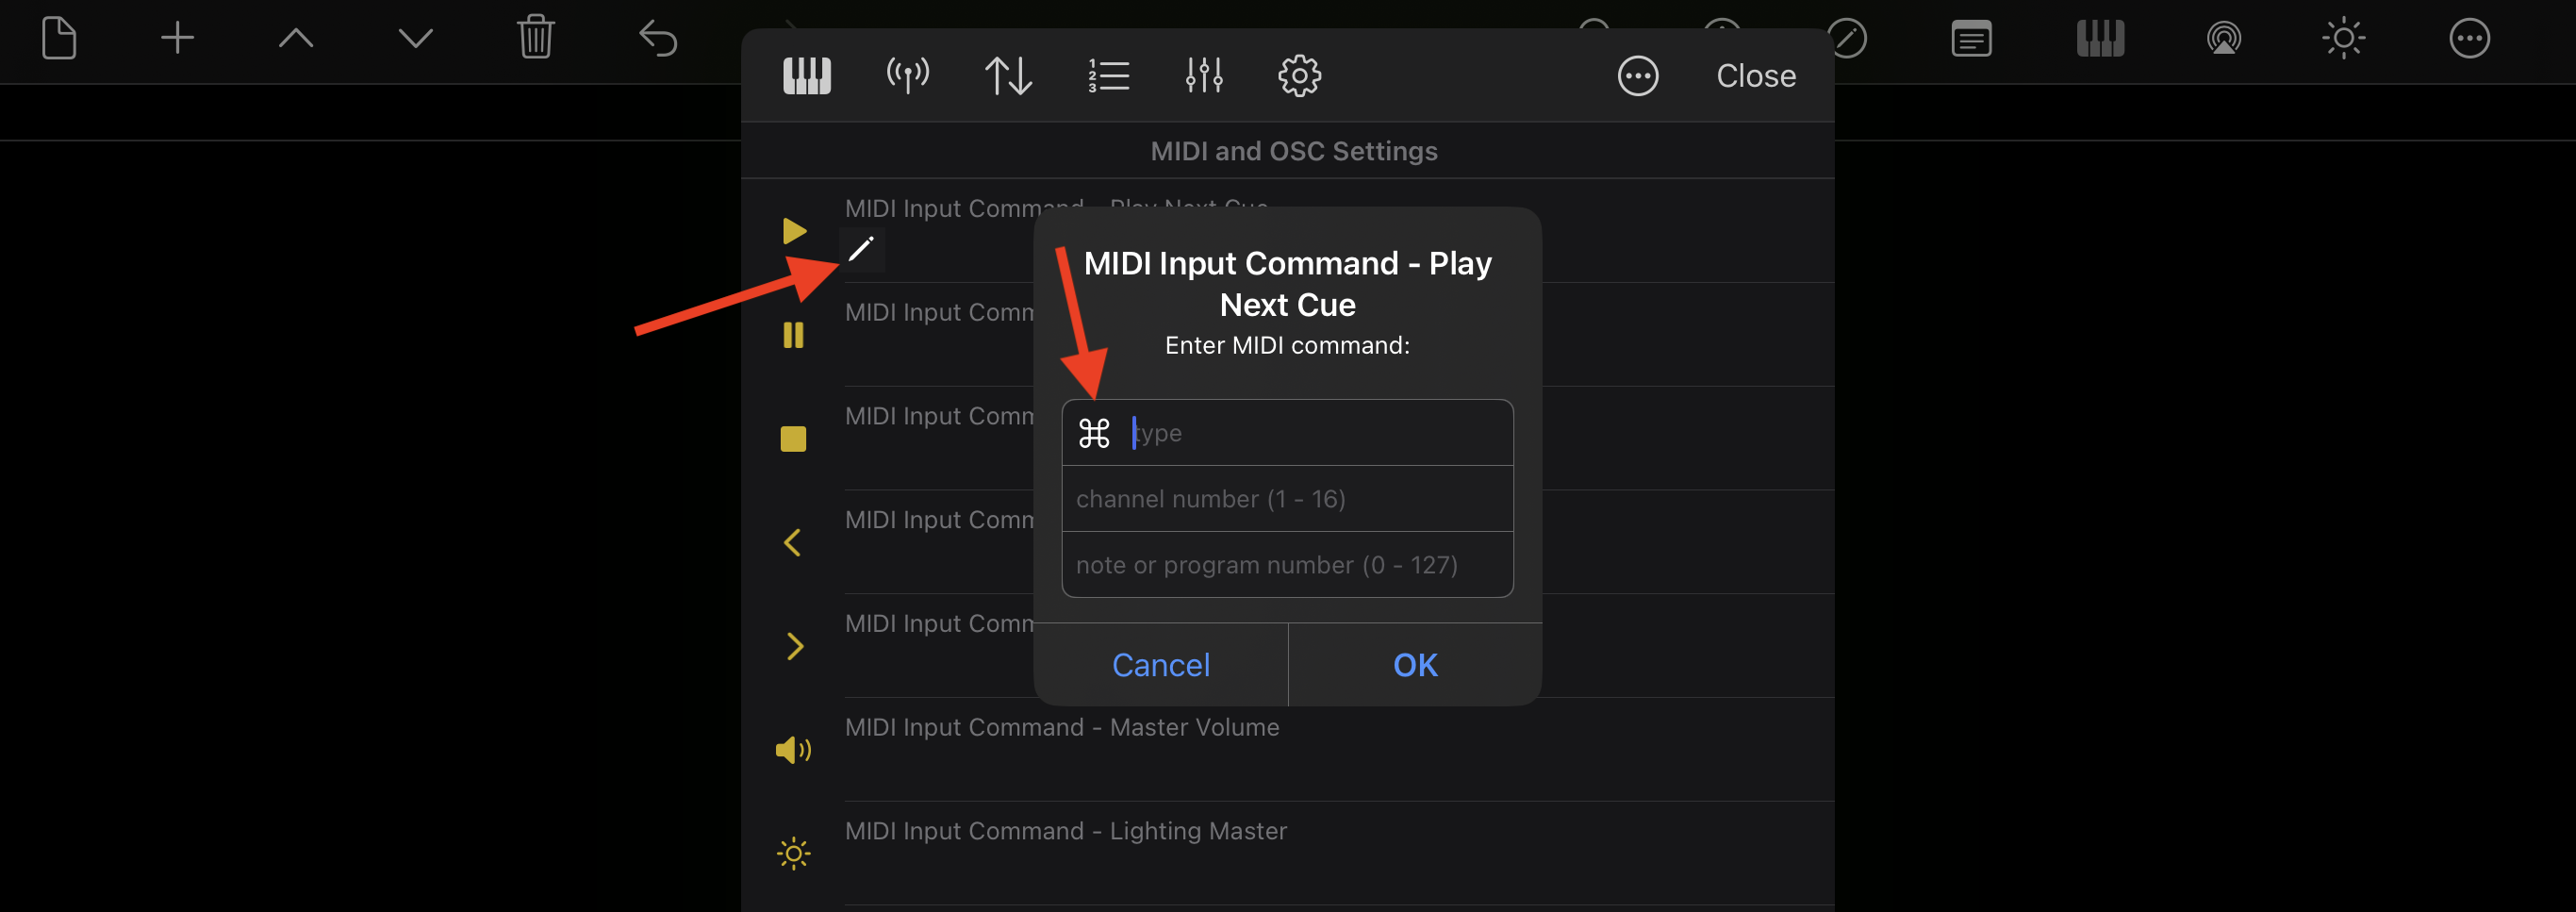
An option button is available next to the input field. Tap or click it to display available command options.

All values can also be entered manually.
MIDI Commands
MIDI commands must follow a valid MIDI format and cannot contain arbitrary text.
Available MIDI command types include:
- Note On
- Note Off
- Pitch Bend
- Control Change
- Program Change
For example:
NON,1,1
means:
- NON – Note On
- 1 – MIDI channel
- 1 – MIDI note or program number
For MIDI output commands, a value must also be entered.
For example:
NON,1,1,127
where 127 represents the MIDI value.
OSC Commands
OSC commands follow the Open Sound Control format.
There are no strict naming rules, but OSC commands typically begin with a forward slash.
Example:
/osccommand/playcue/
For additional information about OSC command structures, refer to Open Sound Control documentation and articles online.
Art-Net DMX Lighting
Lighting cues transmit DMX512 lighting data over Ethernet using the Art-Net protocol.
Each lighting cue supports 512 DMX channels plus a master channel. Lighting cues can be used to control dimmers, RGB fixtures, moving lights, relays, and any Art-Net compatible DMX device.
A Duration value can be set in cue settings to create smooth transitions between lighting cues.
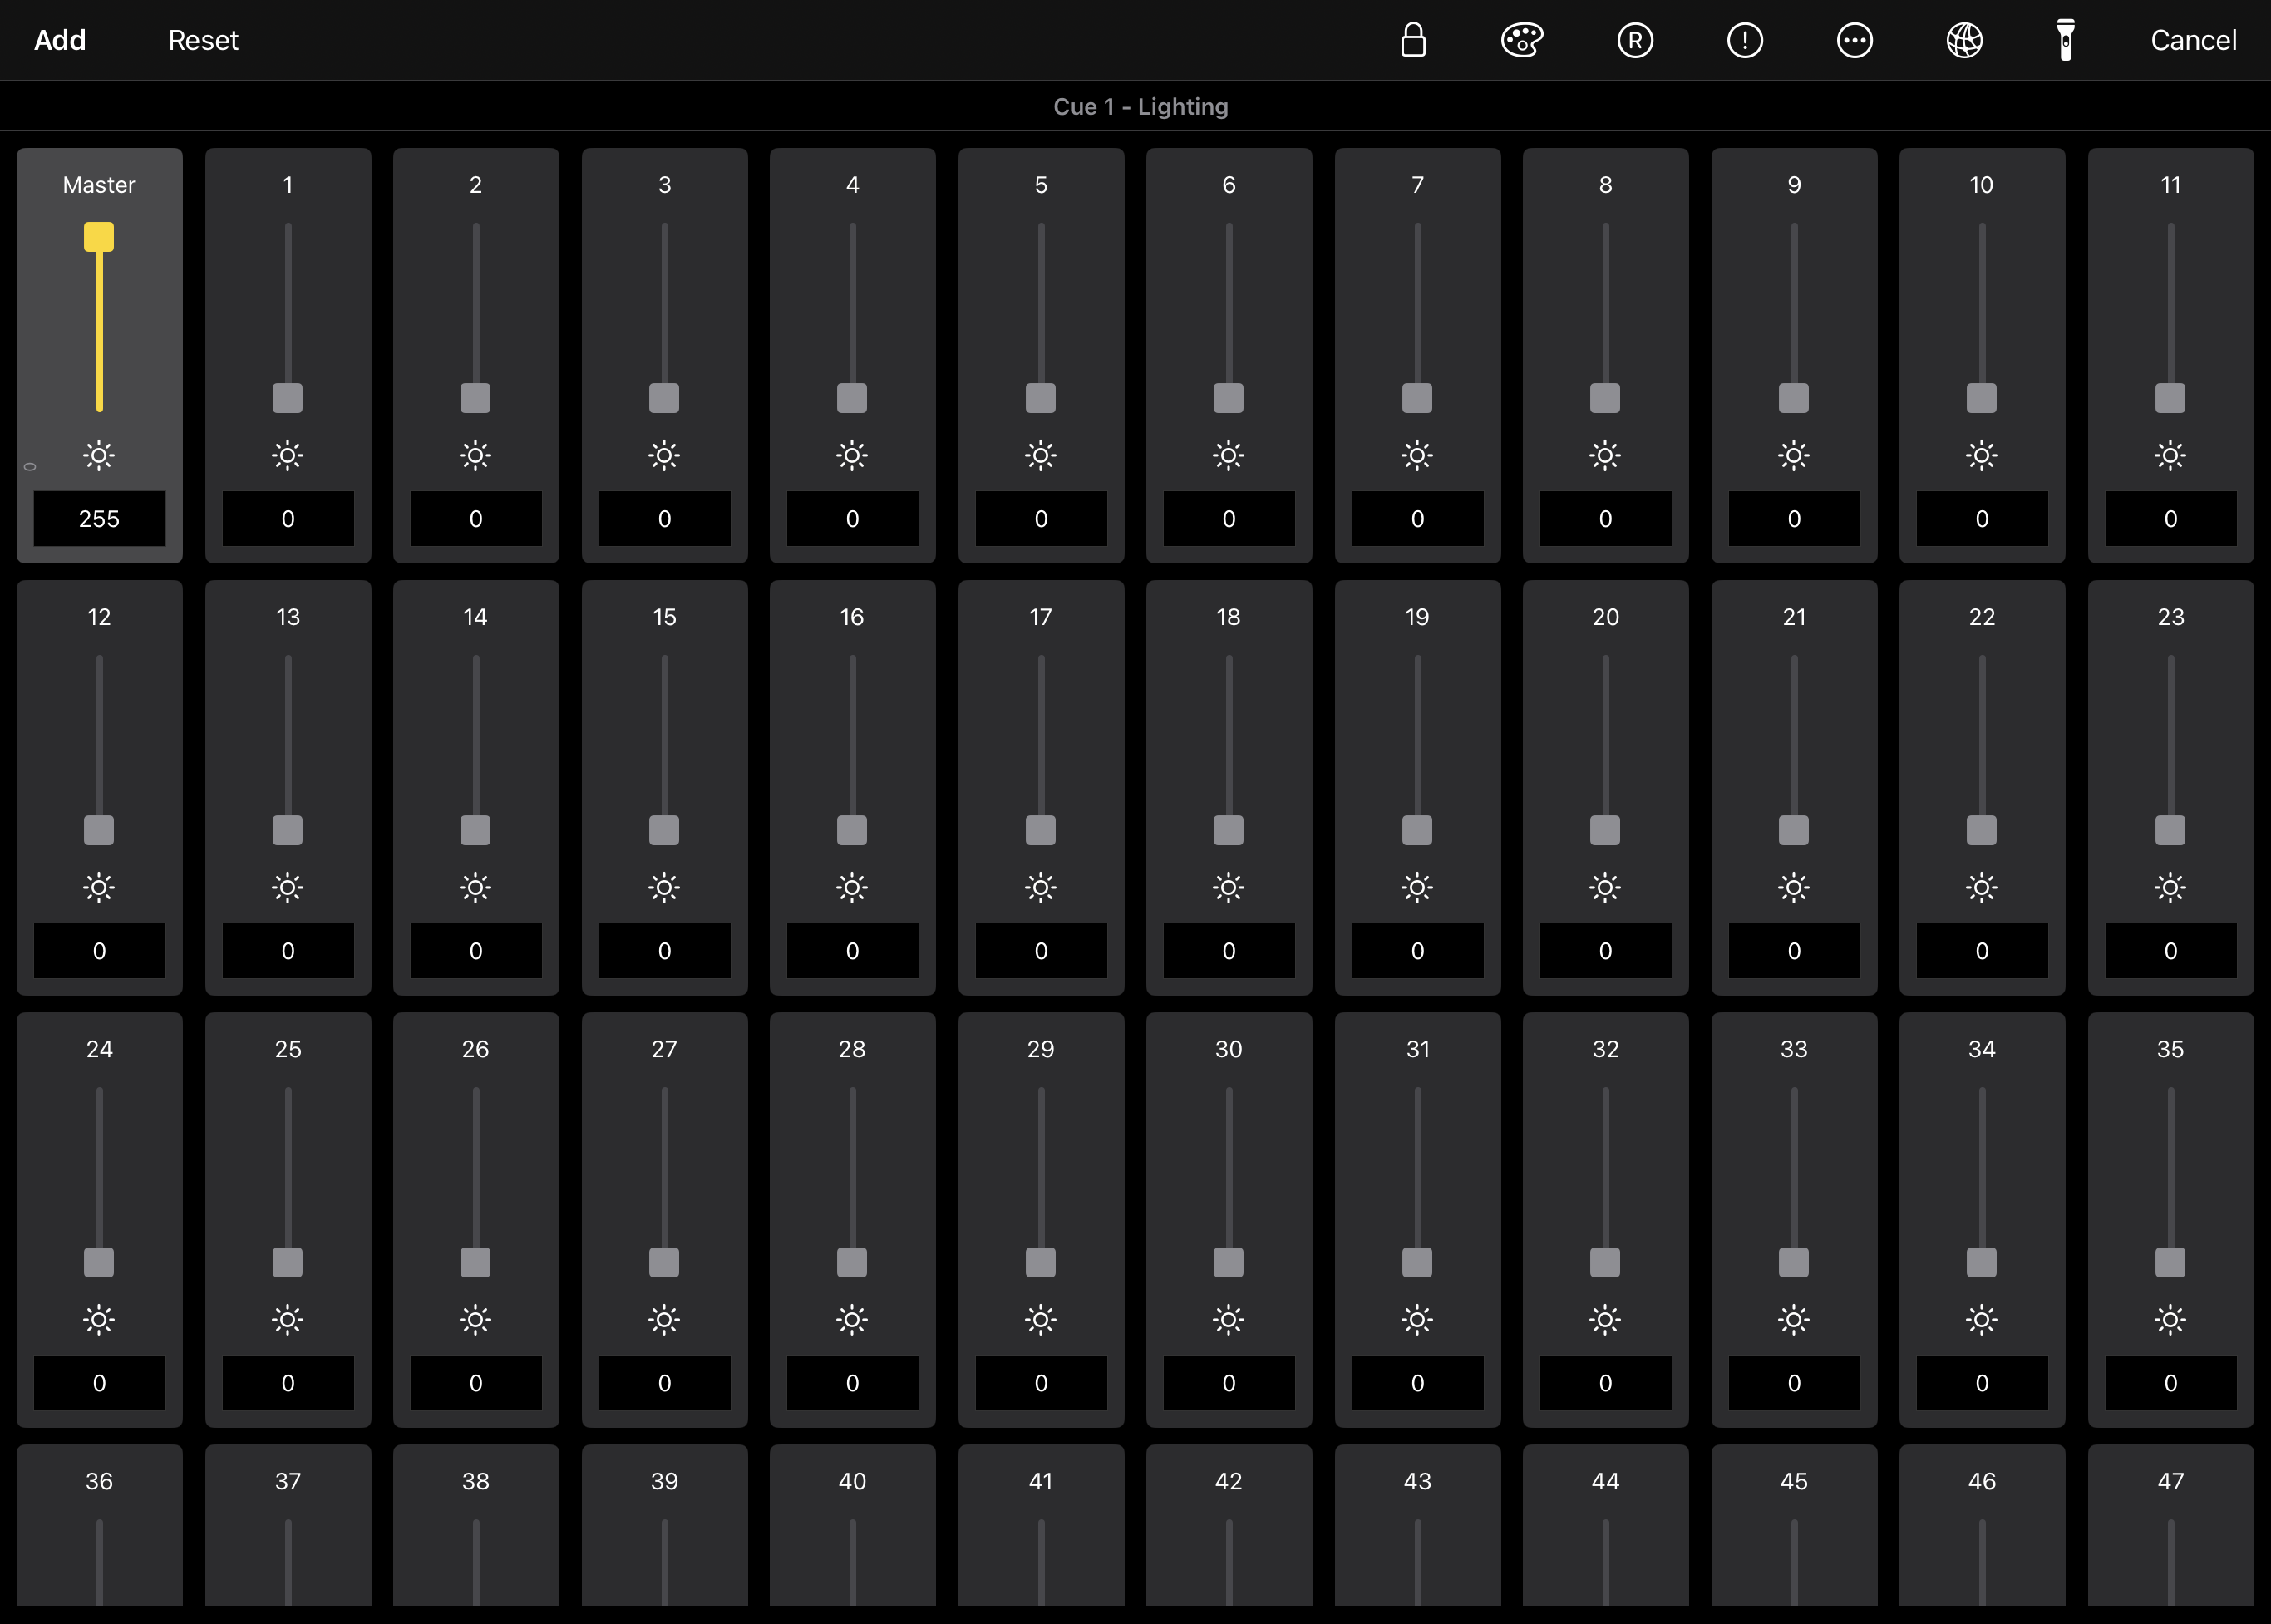
Lighting Cue Editor
When adding or editing a Lighting Cue, the DMX channel editor opens.
The editor displays 512 DMX channels and one master channel. Each channel includes a slider and DMX value (0–255) for setting the desired output level.
The Lighting Cue Master affects only channels using the Dimmer or FX type.
DMX Channel Types
Each DMX channel can be assigned a channel type by tapping or clicking the channel type icon.
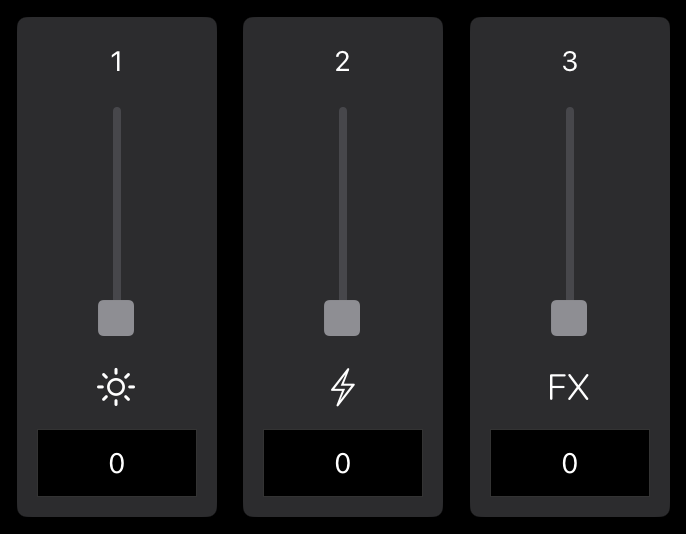
The following channel types are available:
-
Dimmer (sun icon) – The channel responds to the Lighting Cue Master and the global lighting master. It is also affected by transitions between lighting cues.
-
Fixed Value (bolt icon) – The channel always outputs the exact DMX value set in the cue. It is not affected by the Lighting Cue Master, global lighting master, or transitions between lighting cues. This is useful for channels that represent ON/OFF states, fixture modes, or fixed RGB color values.
-
FX (FX icon) – Used by Lighting FX Cues. Like Dimmer channels, FX channels respond to the Lighting Cue Master, global lighting master, and transitions between lighting cues, while also allowing dynamic effects generated by Lighting FX cues.
Channel Naming & DMX Universe
Tap or click a channel number above the slider to open a dialog where you can enter a channel name.
Channel names help identify fixtures and channels more easily and are especially useful in Fixtures Mode.
Tap or click Master above the master slider to select the DMX Universe used by the lighting cue.
MiX16 Show Cue supports DMX Universes 0–9.
Channel Background Colors
Background colors can be assigned to channels for easier fixture organization.
Enable background color mode, then tap or click a channel to set its color.
Background colors are visual only and do not affect DMX output.
This can be useful for grouping fixtures (for example: front lights, back lights, RGB fixtures, moving heads, etc.).
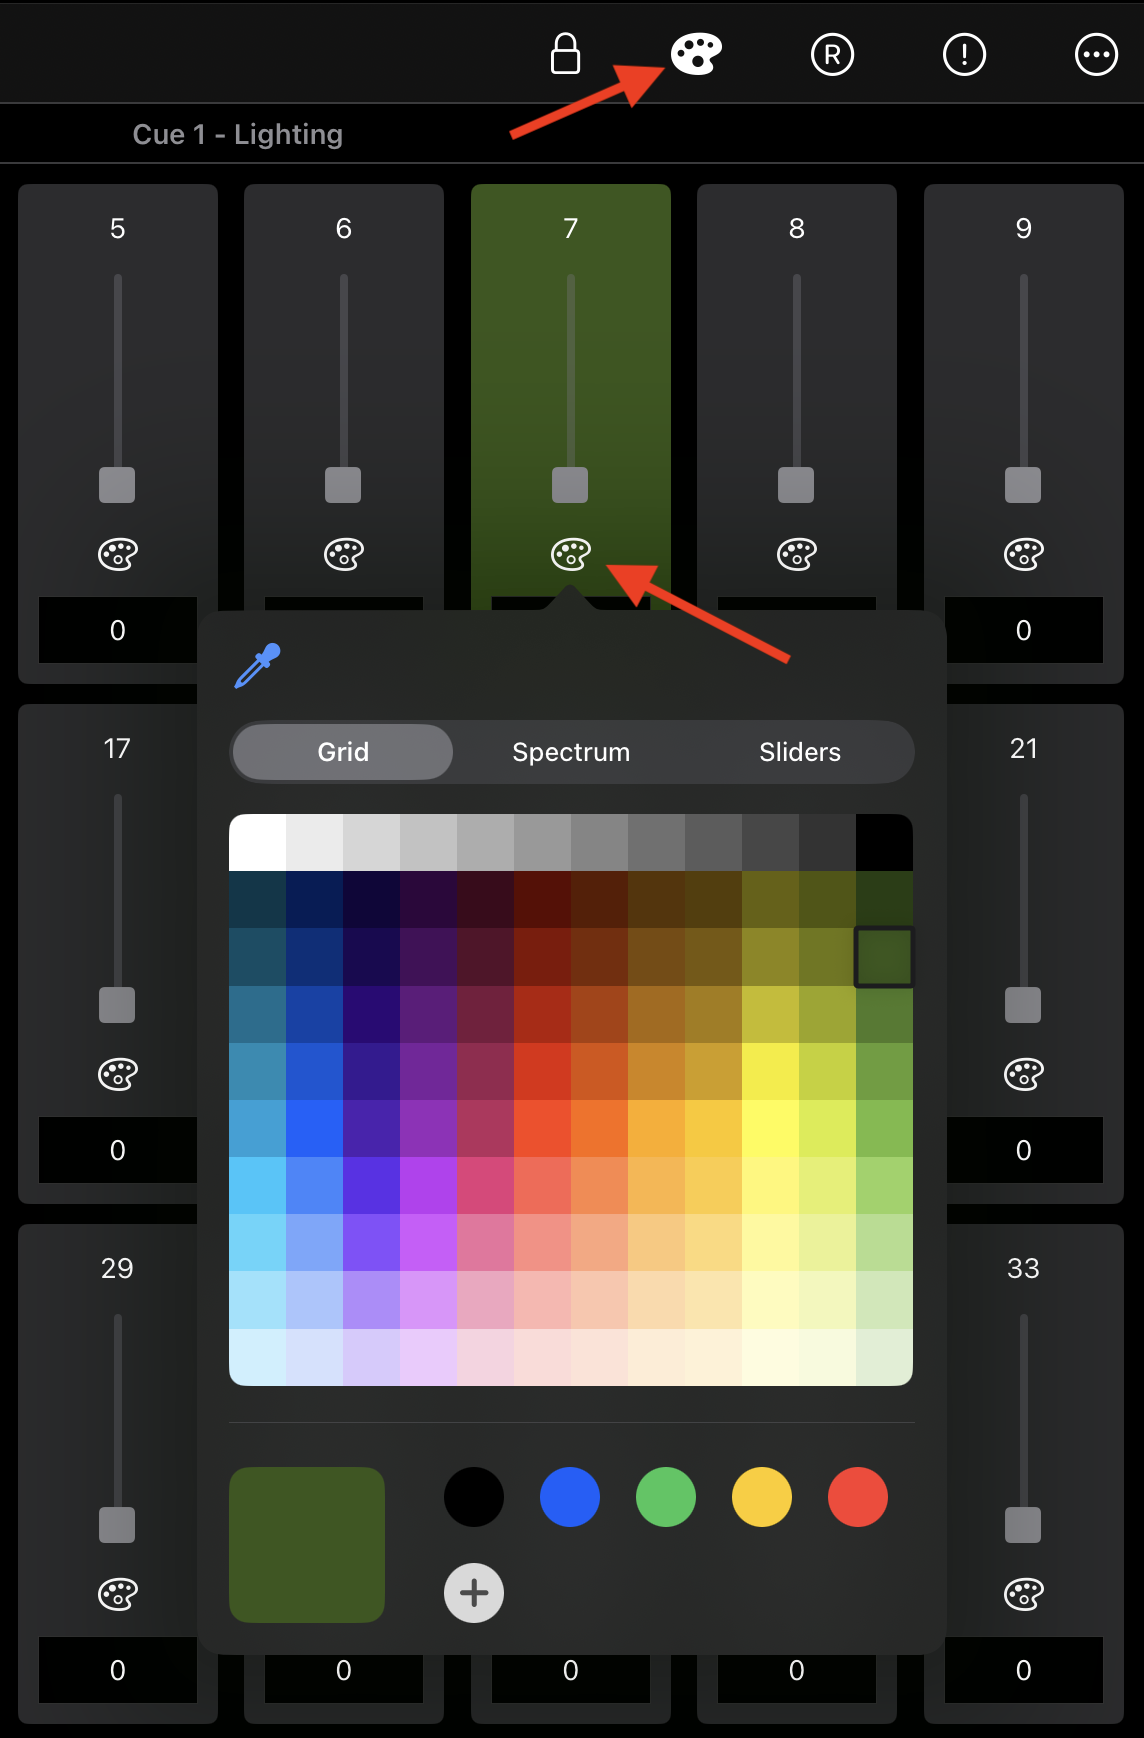
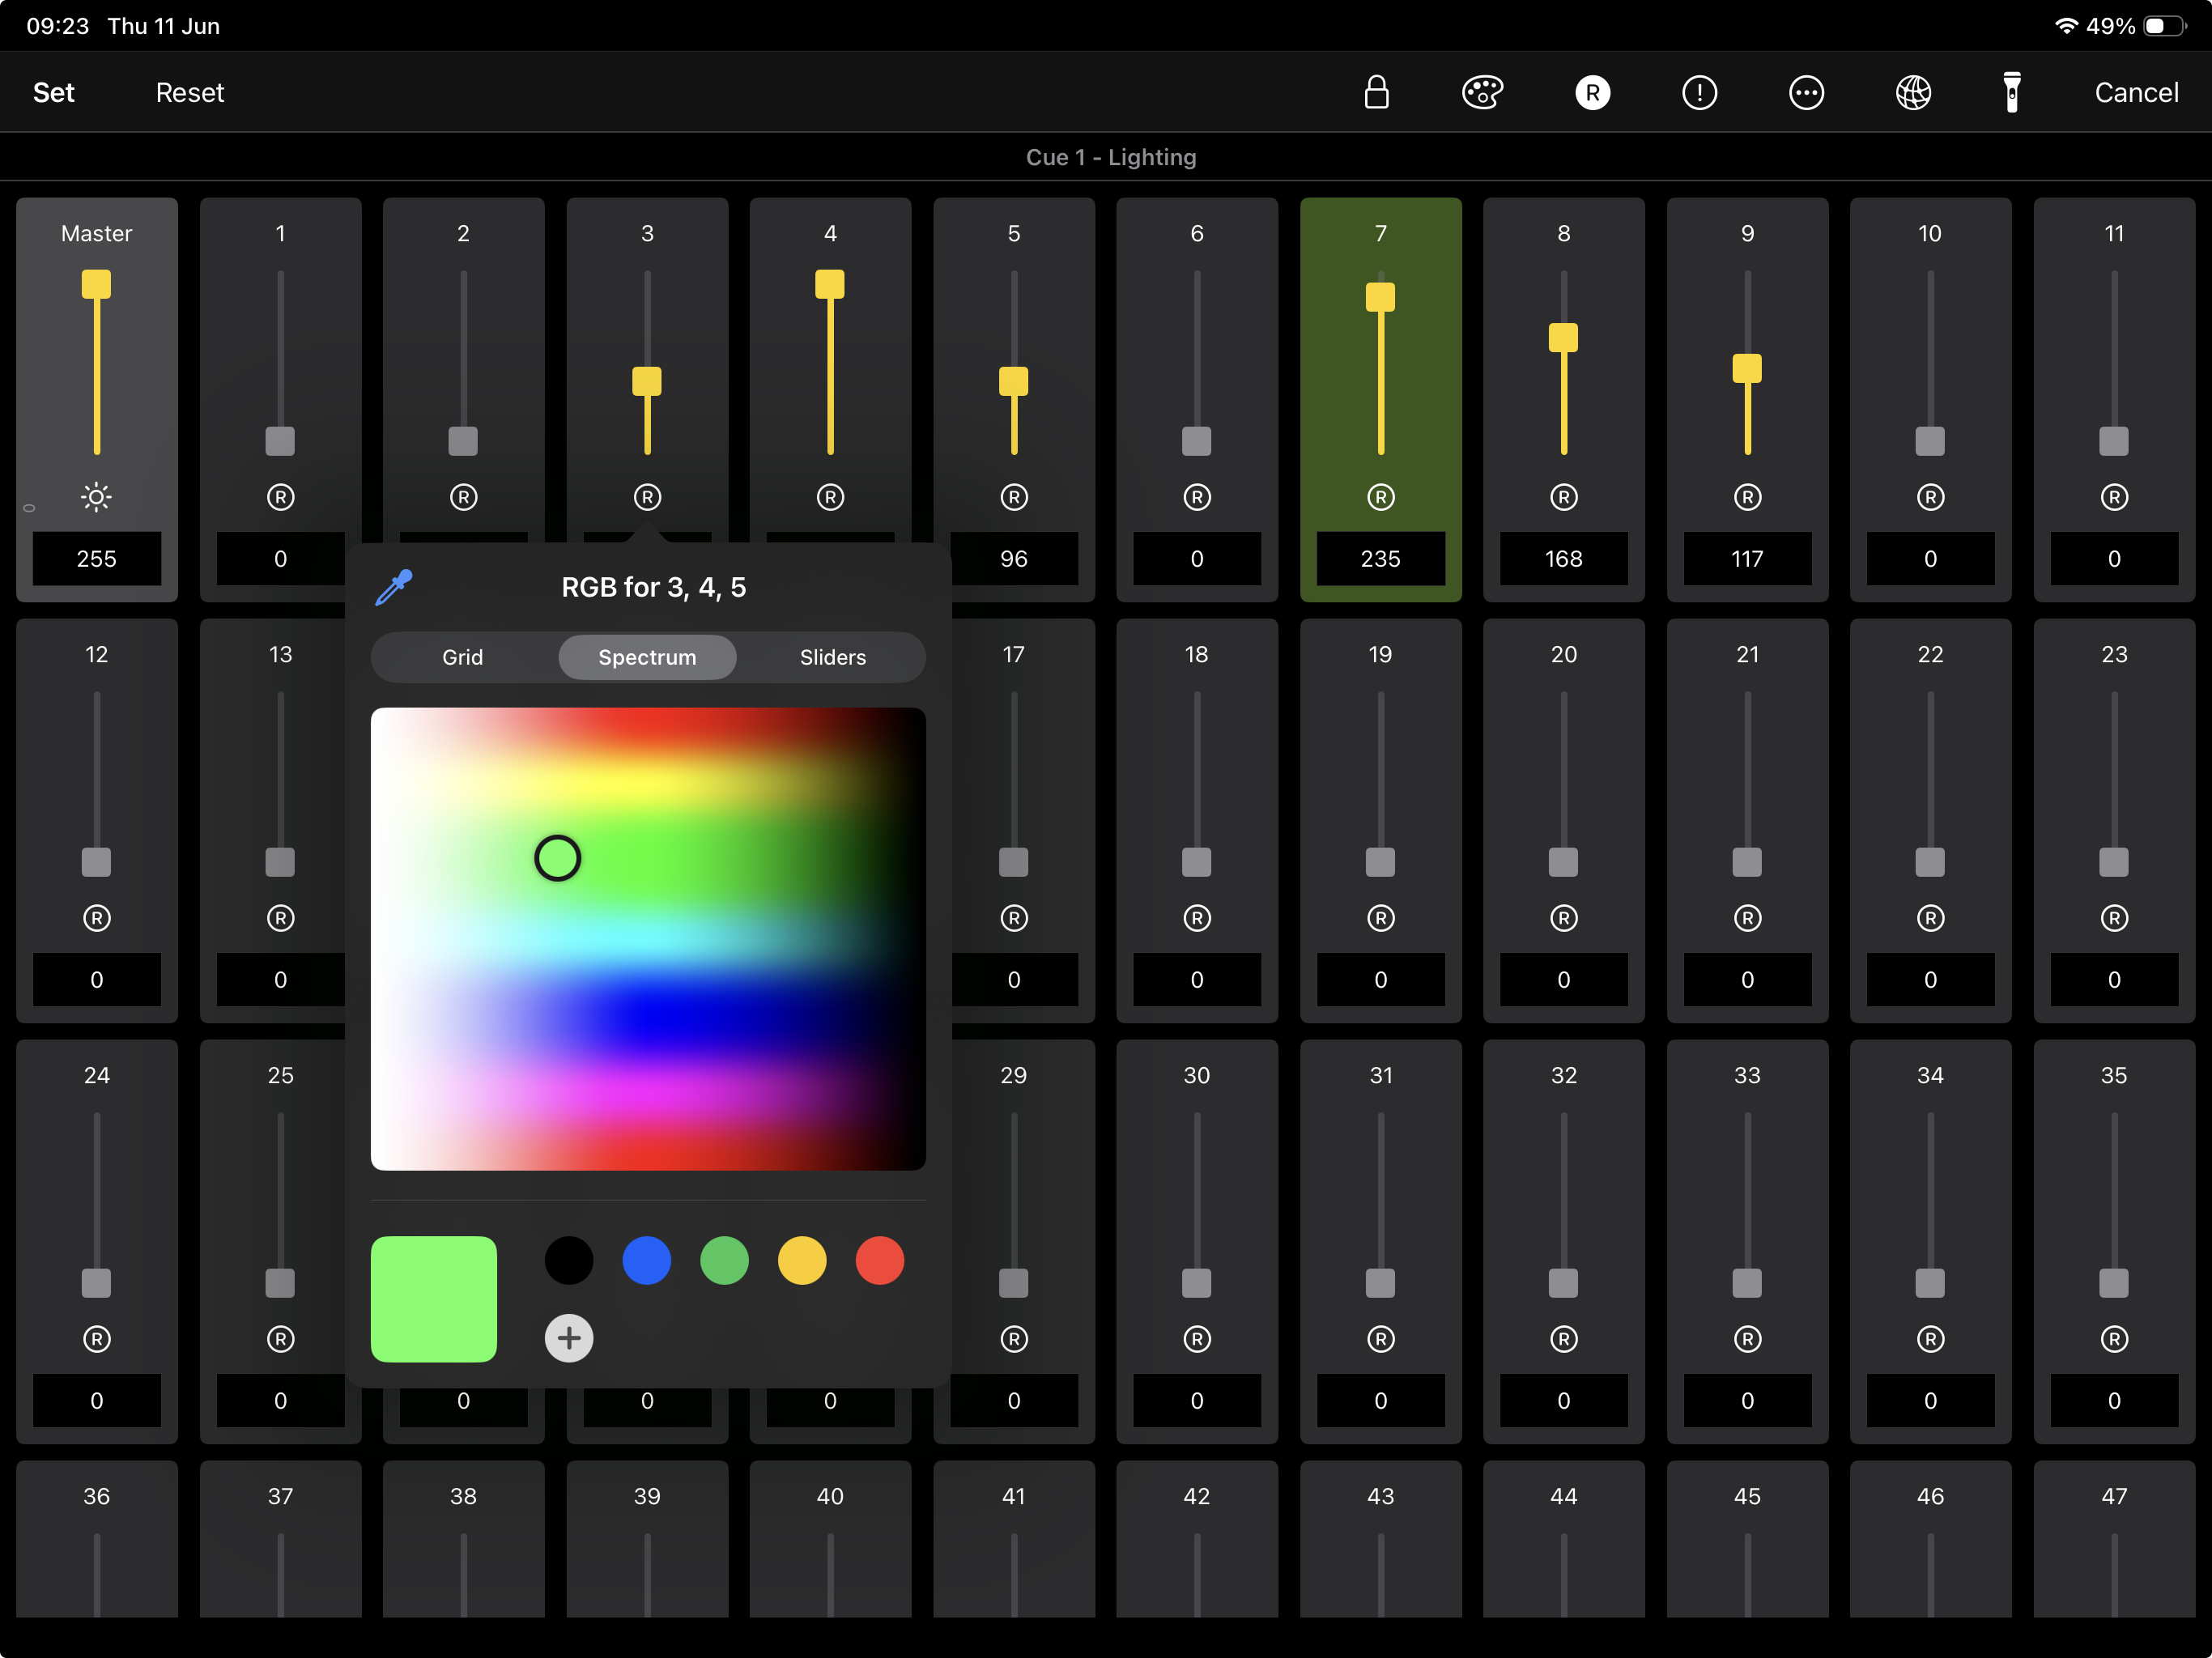
RGB Channel Setup
RGB fixtures can be linked for easier color control.
Enable RGB mode, then tap or click the red (R) channel of an RGB fixture. The selected channel becomes the R channel. Then enter the corresponding green (G) and blue (B) channel numbers.
Channels can be assigned in any order between 1 and 512, but each channel must be unique.
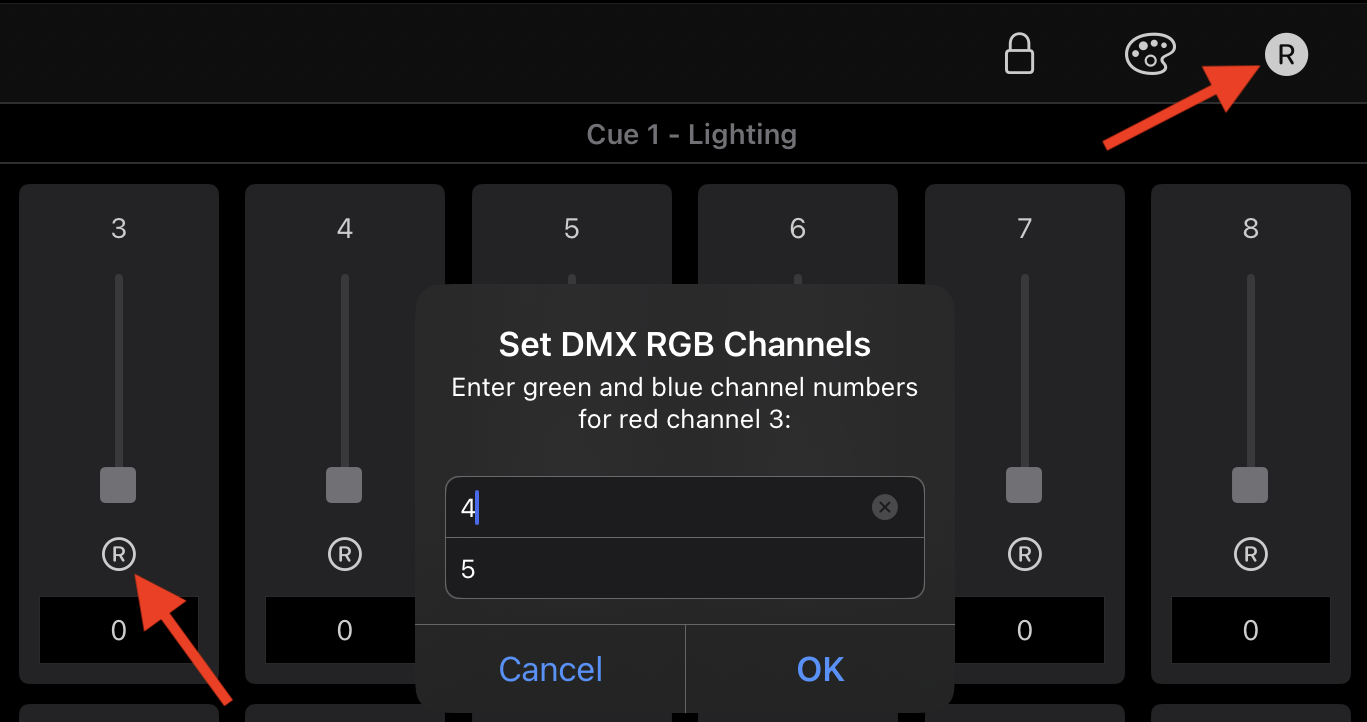
Once RGB channels are assigned, tapping or clicking the RGB channel opens the color picker.
Selecting a color automatically calculates and applies the appropriate DMX values (0–255) to the assigned R, G, and B channels, making RGB fixture control faster and easier.
RGB channels can use Dimmer, Fixed Value, or FX channel types depending on the desired behavior. For example, Dimmer channels allow smooth color transitions between lighting cues, while Fixed Value channels keep colors unchanged during transitions.
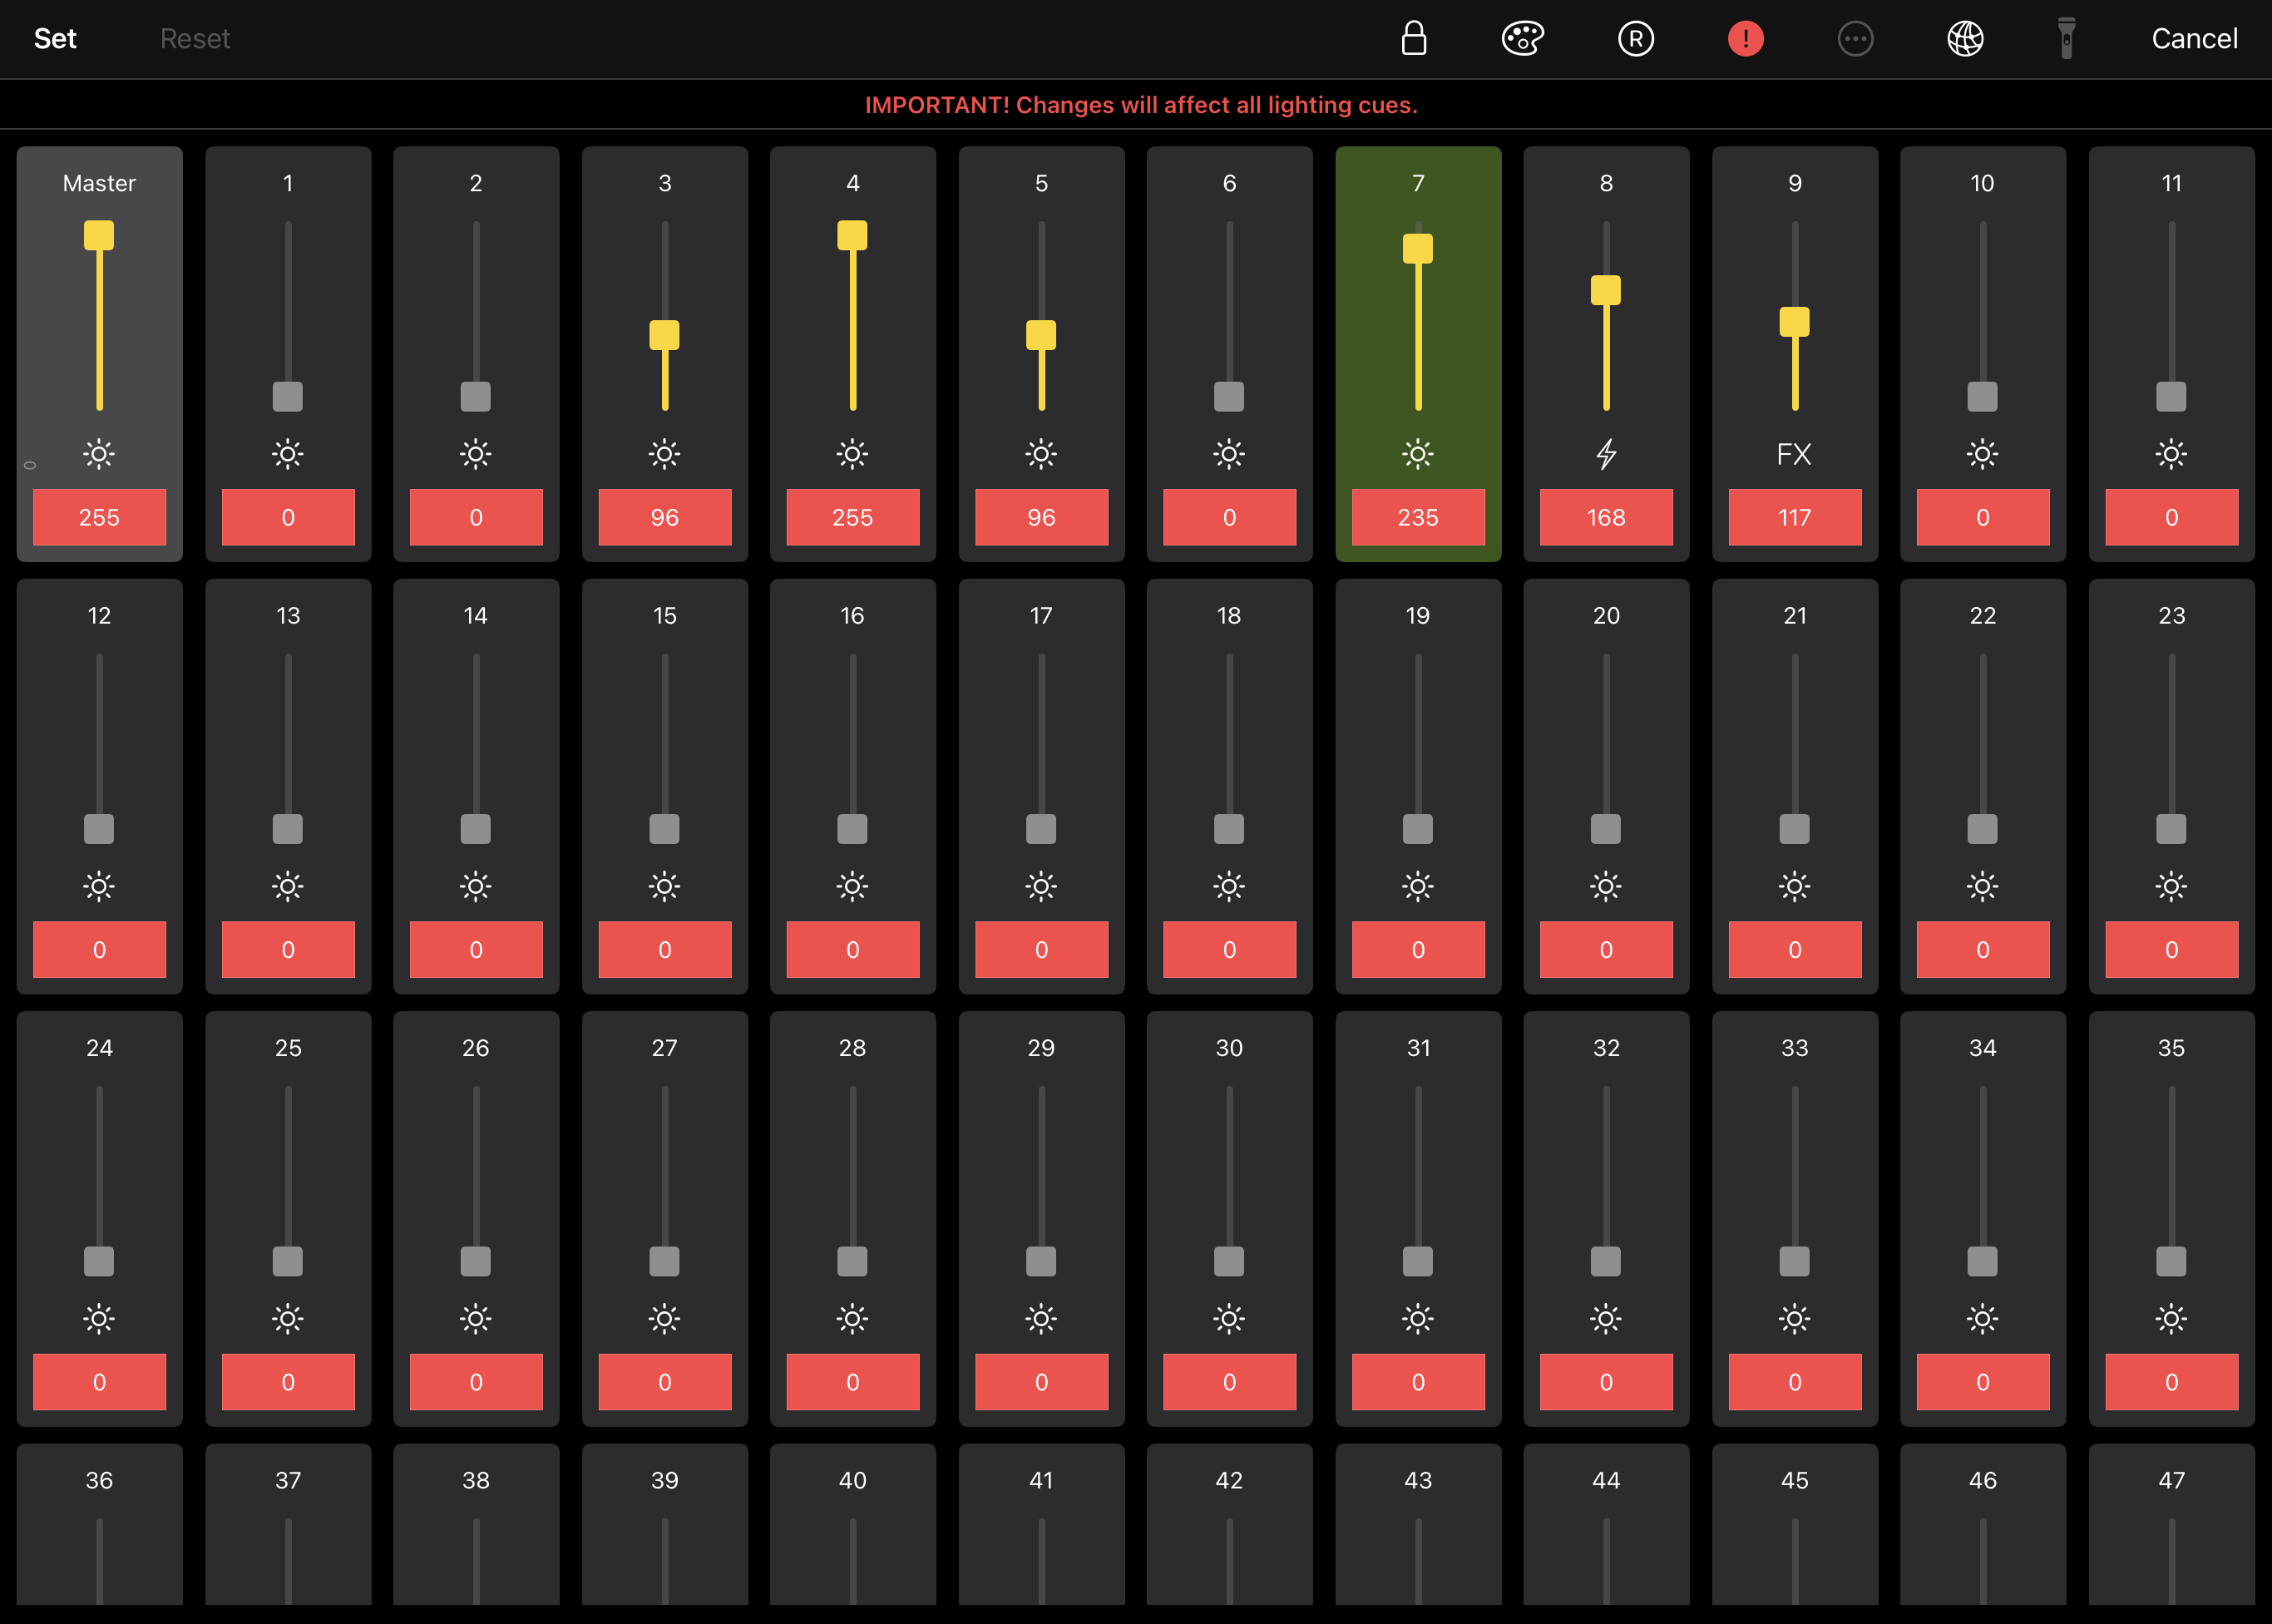
Apply Changes to All Lighting Cues
The Apply to All Lighting Cues mode allows changes made in the editor to affect all existing lighting cues in the playlist.
When enabled, any modification (channel values, names, types, RGB settings, etc.) is applied immediately while editing.
This is useful when adjusting channels that should remain consistent across multiple lighting cues, avoiding the need to edit each cue individually.
Use with caution. Changes affect all existing lighting cues and cannot be undone.
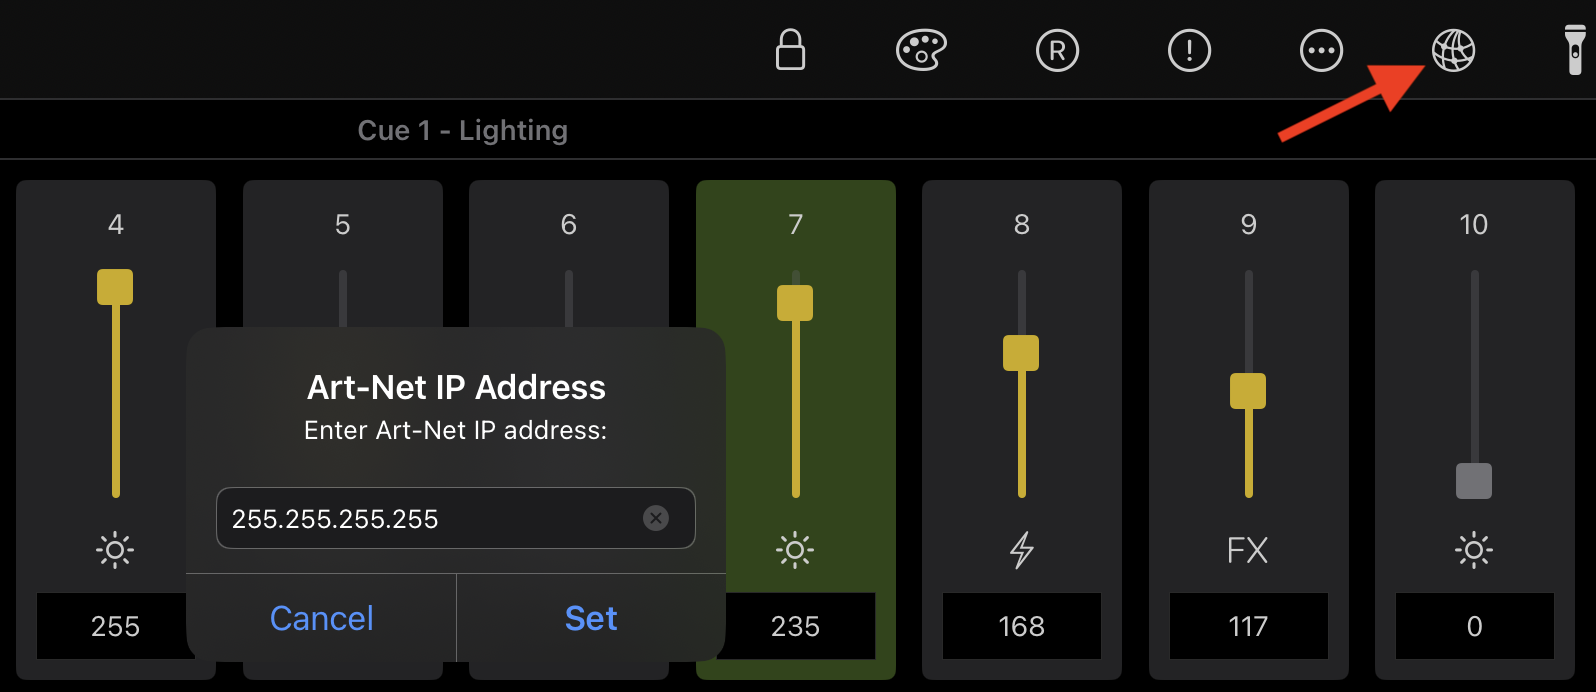
Art-Net IP Address
Set the Art-Net IP address of your Art-Net to DMX device (for example: Showtec NET-2/5 Pocket, Enttec ODE Mk3, or similar).
The Art-Net device must be on the same local network (LAN) as the device running MiX16 Show Cue.
Multiple IP addresses can be entered by separating them with commas. DMX data will be sent to all specified devices simultaneously.
Alternatively, the broadcast address (255.255.255.255) can be used if supported by your Art-Net device.
Note: Broadcast is supported on macOS. Due to platform security restrictions, it is not supported on iPadOS and iOS.
Tools Menu
Tap or click the Tools button to open the lighting tools menu.
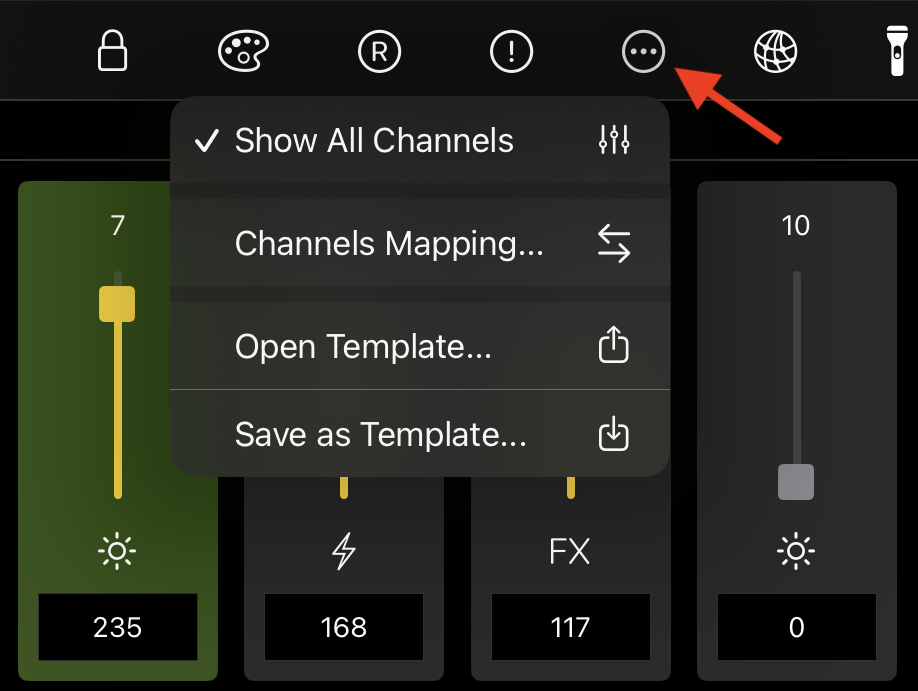
Available options:
-
Show All Channels – Show all 512 DMX channels in the editor. When disabled, only named channels are displayed.
-
Fixtures Split View – Display fixtures separately in the editor for a clearer overview when working with multiple fixtures.
-
Channels Mapping – Configure DMX channel mapping. This is described in a separate section below.
-
Open Template – Load a previously saved lighting template.
-
Save as Template – Save the current 512-channel DMX setup, including values and channel configuration, for reuse in another project.
-
Save as Fixture – Save only named channels currently visible on screen as a custom fixture. Saved fixtures become available under the Custom section in the fixture library.
Discovery Mode
Discovery Mode is useful when working in unfamiliar venues, theatres, or stages where fixture patching is unknown or undocumented.
When enabled, MiX16 Show Cue temporarily sends live DMX output in real time, turning only the selected channel ON (255) while setting all other channels to 0.
This makes it easy to identify which physical fixture or function is assigned to a specific DMX channel.
Use the < and > buttons to browse through channels 1–512.
Press and hold the large channel number to jump directly to a specific DMX channel.
Discovery Mode does not modify existing lighting cue channels unless you explicitly update a channel.
To update a channel in the current lighting cue, enter a channel name and select the desired channel type (Dimmer, Fixed Value, or FX).

Fixtures Mode
When working with fixtures, displaying all 512 channels is often unnecessary.
Disable Show All Channels in the Tools menu to switch to Fixtures Mode.
In Fixtures Mode, only named channels are displayed. This provides a cleaner workspace when working with fixtures or manually added channels.
The main toolbar will display a + button, allowing channels or fixtures to be added manually.
Additional fixture-related tools also become available.
Adding Channels and Fixtures
In Fixtures Mode, tap or click the + button to add channels or fixtures.
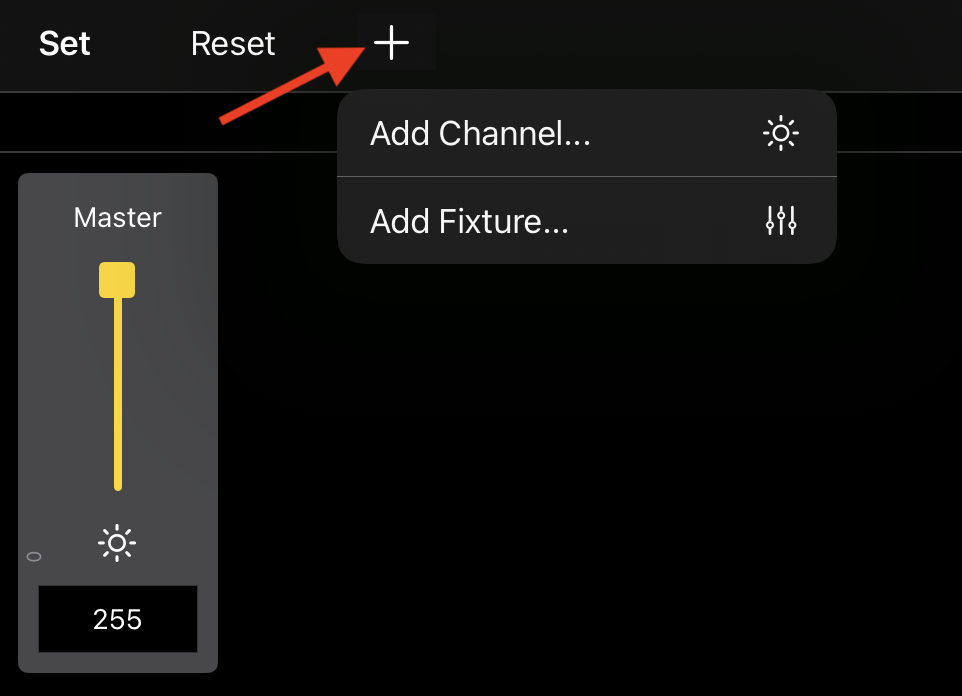
Available options:
-
Add Channel – Add one or more DMX channels manually. Enter a single channel (3), multiple channels separated by commas (1, 5, 7), or a channel range (23-27).
-
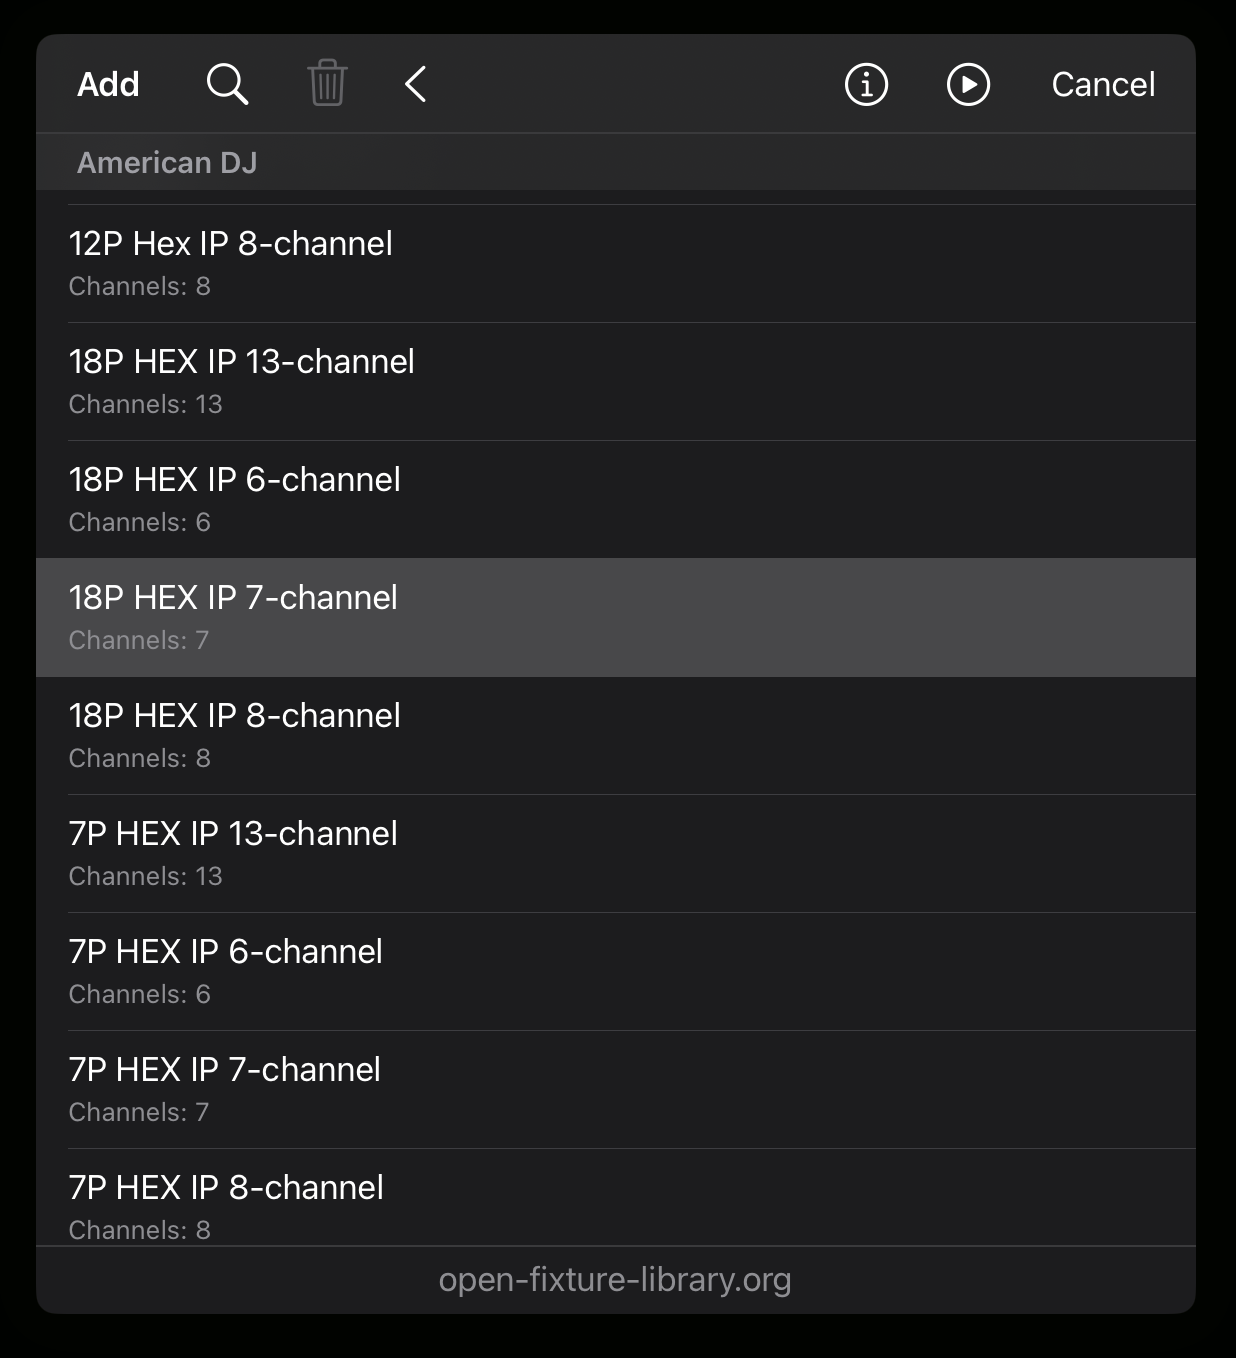
Add Fixture – Add a fixture from the built-in fixture library.
The fixture library is based on data from Open Fixture Library and is included offline inside the app.
First select a manufacturer, then tap or click > to continue.

Next, select a fixture and DMX mode (for example: 7-channel, 8-channel, etc.), then tap or click Add.
The Info (i) button opens a website with additional information about the selected fixture in your web browser.
The Play button opens a website with a video related to the selected fixture in your web browser (typically a demonstration or overview of how the fixture works).
If information or video is not available for the selected fixture, the corresponding button is disabled.
Once a fixture is added, its channels appear automatically in the lighting cue editor.
For a clearer layout when working with multiple fixtures, enable Fixtures Split View.

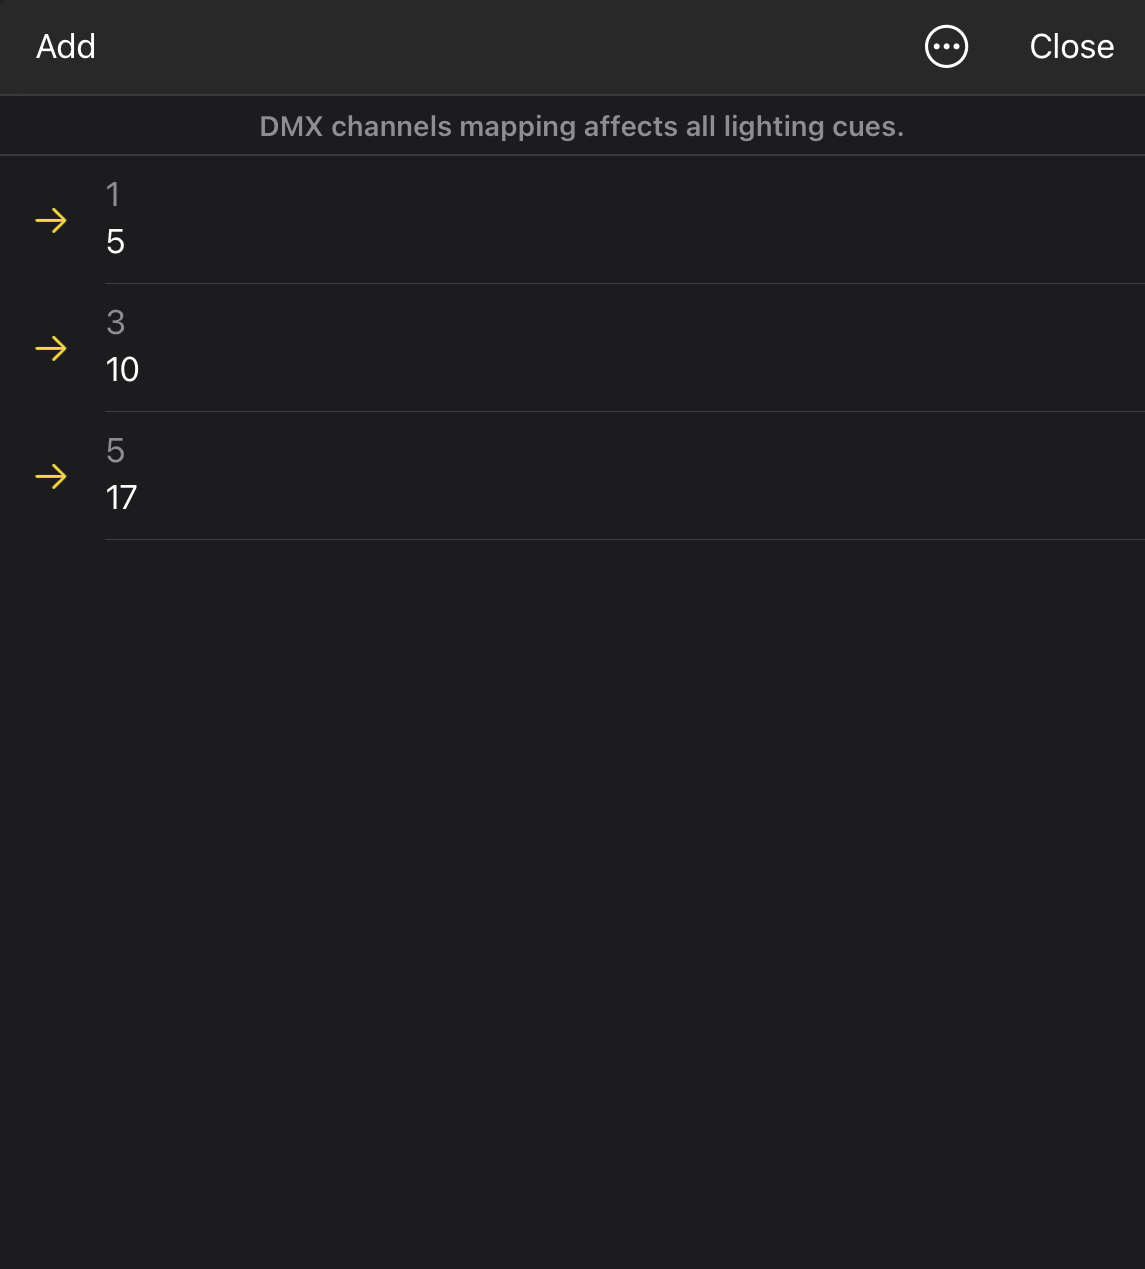
Channels Mapping
Channels Mapping allows DMX channels to be remapped when sending Art-Net data, without changing the original lighting cue programming.
The Channels Mapping window is available from the Tools menu in the lighting cue editor.
For example, a cue using DMX channel 1 can be automatically sent as DMX channel 5, while DMX channel 3 can be sent as DMX channel 10.
This is useful when performing at different venues or stages where fixture patching differs from your original setup. Your lighting cues remain unchanged, while the outgoing Art-Net DMX channels are automatically remapped.
To create a mapping, tap or click Add, then enter the from channel and to channel values.
To delete a mapping, tap or click the mapping in the table and clear its to channel value.
Lighting Control Panel
The Lighting Control Panel provides a real-time overview of the currently active lighting output, including the last played lighting cue, lighting master, and DMX channel activity.
To open the panel, tap or click the sun icon in the main top toolbar. Tap or click the icon again to hide the panel.
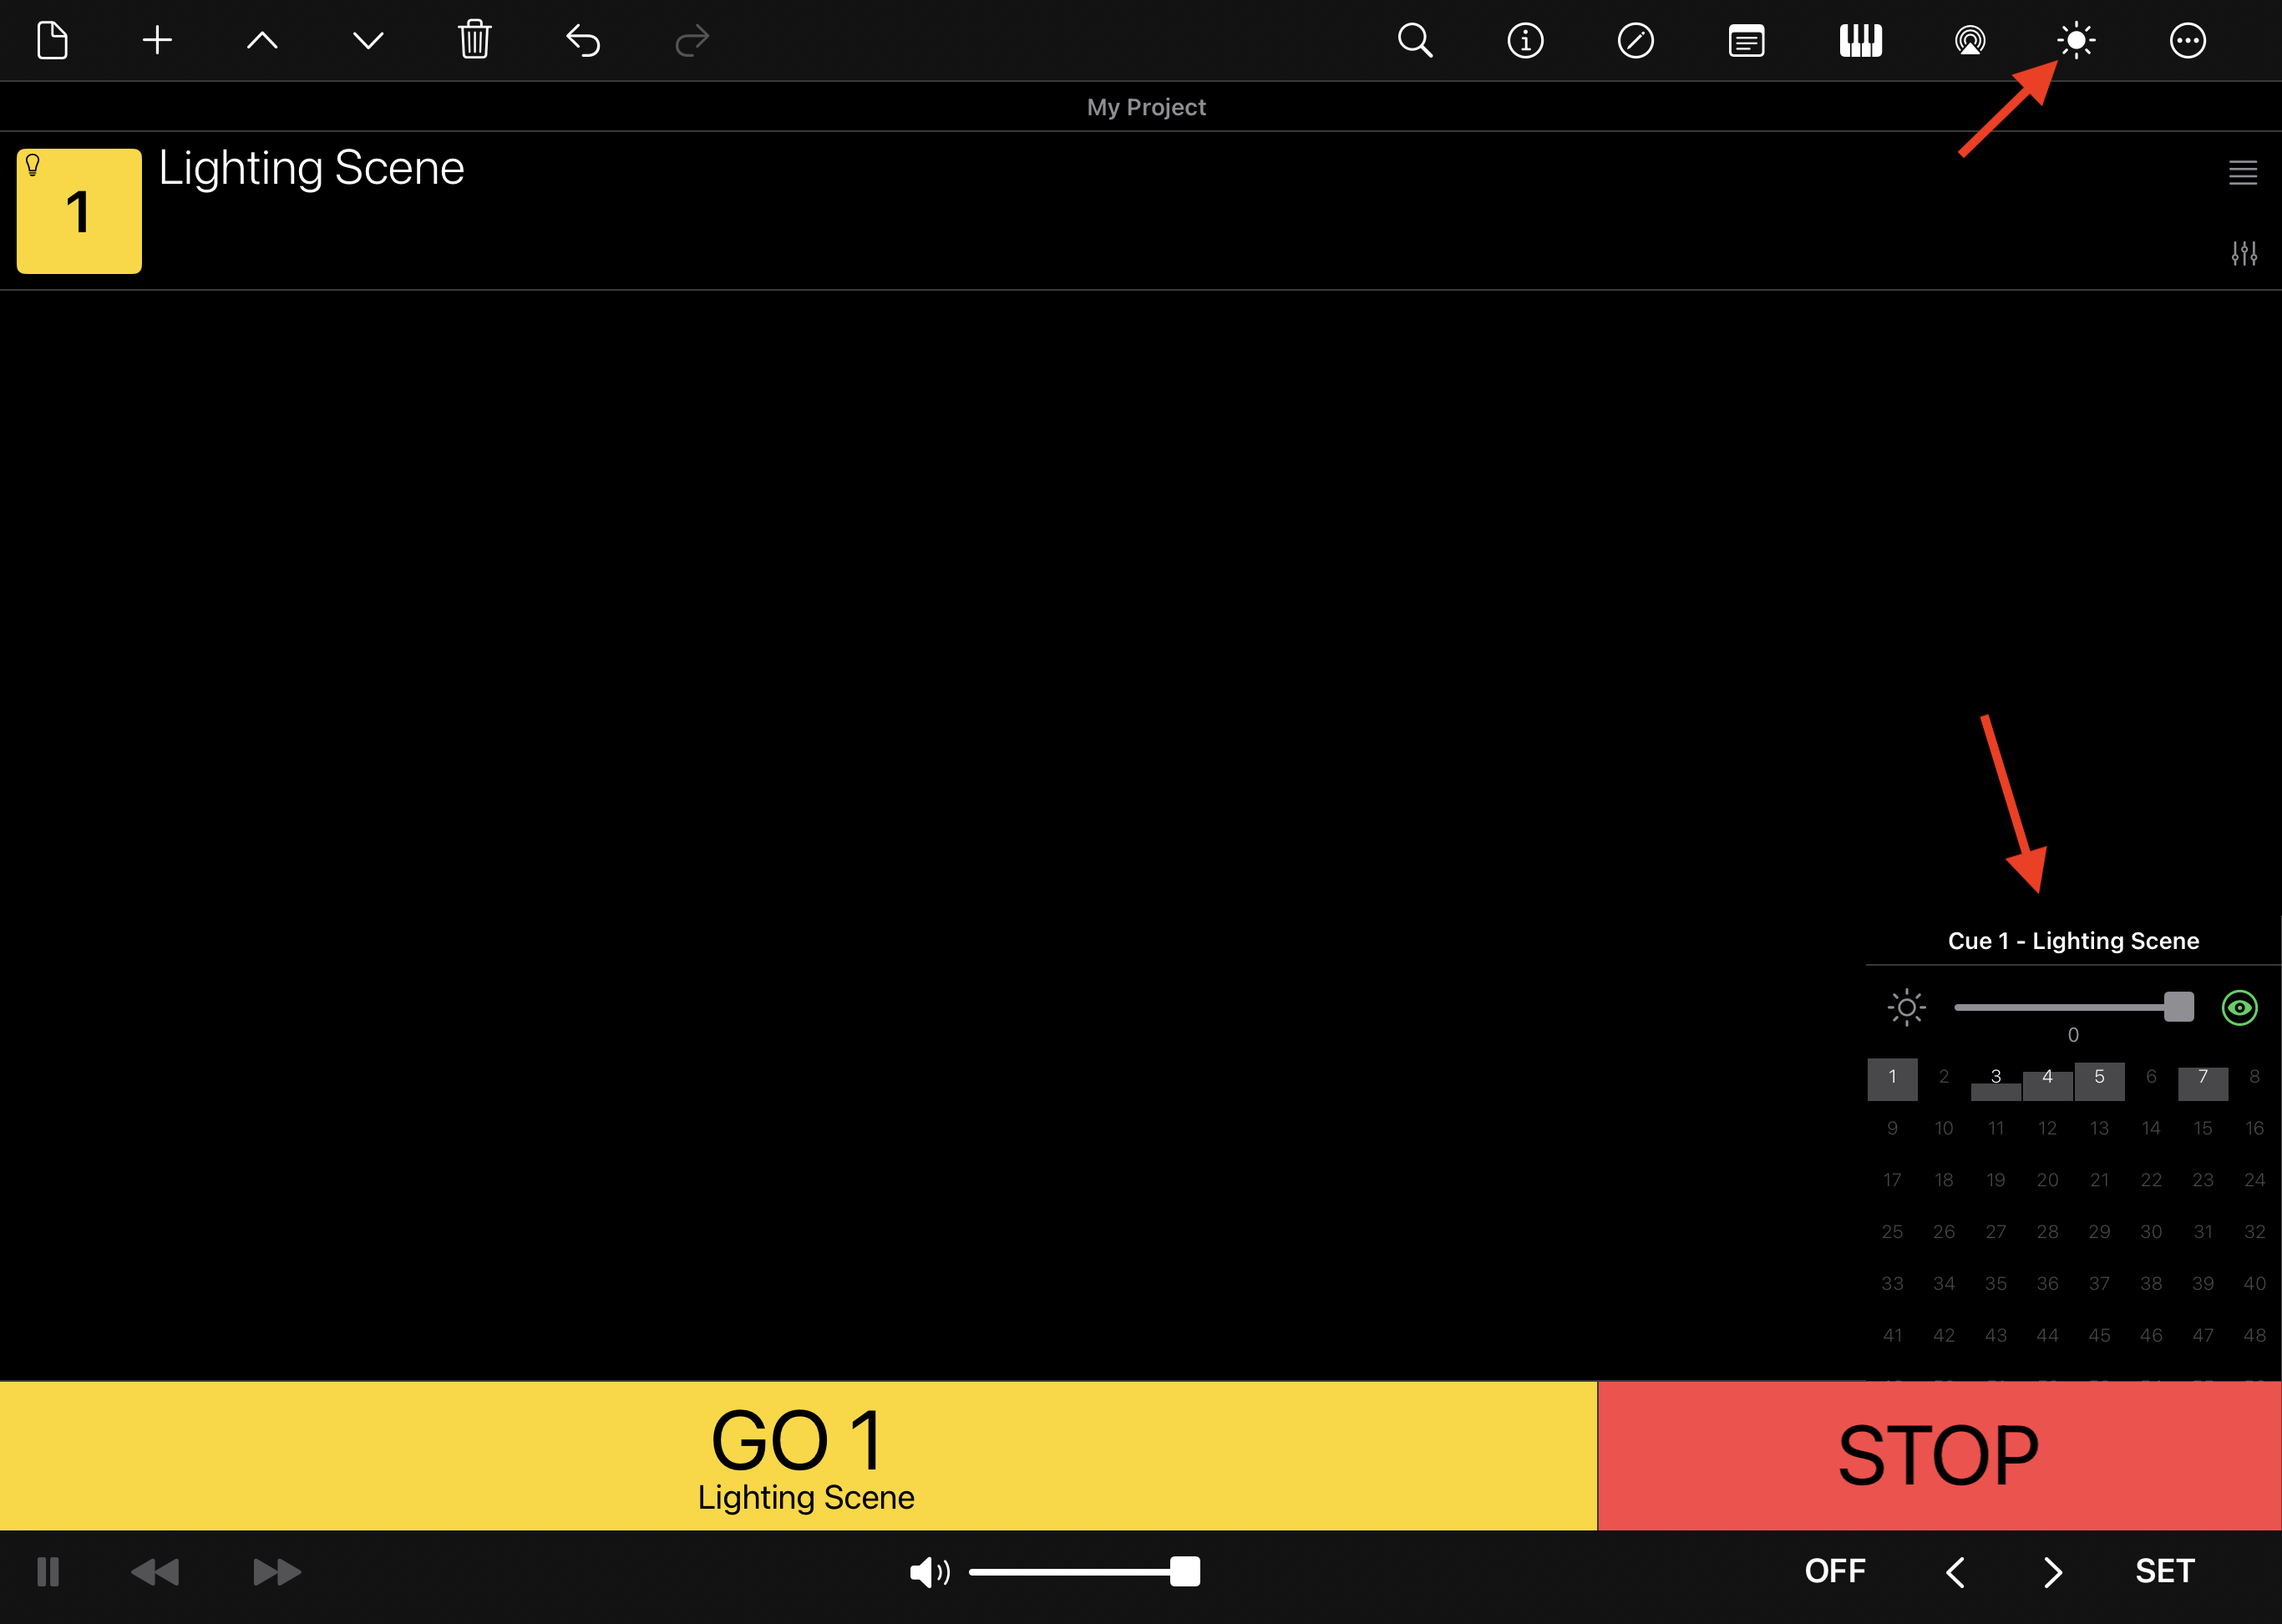
The panel includes:
-
Last Played Lighting Cue – Displays the name of the most recently triggered lighting cue.
-
Lighting Master – Global lighting master applied to all lighting cues. This works independently from the Lighting Cue Master and does not change cue values. Instead, it acts as an additional master level applied to the final Art-Net output.
-
DMX Channel Overview – Displays all 512 DMX channels. The interface is scrollable, so not all channels are visible at once.
Each DMX channel is represented by a vertical value bar, allowing quick visual monitoring of active channels and currently transmitted Art-Net values.
Blind Mode
Tap or click the eye icon to enable Blind Mode.
When enabled, the icon turns red and all Art-Net output is temporarily disabled. While Blind Mode is active, MiX16 Show Cue continues working normally, but no DMX data is sent to Art-Net devices.
This is useful during live performances when editing or testing lighting cues without affecting the current stage lighting.
Tap or click the icon again to disable Blind Mode and resume Art-Net output.

Projects
Cue playlists are saved as projects.
Projects store your cue playlist, cue settings, MIDI and OSC configuration, lighting settings, and other project-related data.
Projects are always stored locally on the device in the app’s Projects folder.
Important
Multimedia files are not embedded inside project files. Projects store only the file locations of media files.
If a media file is moved, renamed, or deleted, the project will report a missing file and the affected cue name becomes red in the playlist.
To restore a missing file, open the cue’s Cue Settings, scroll to the File setting, and browse for the missing media file.
Project Menu
Tap or click the Project button in the top toolbar to open the Project menu.
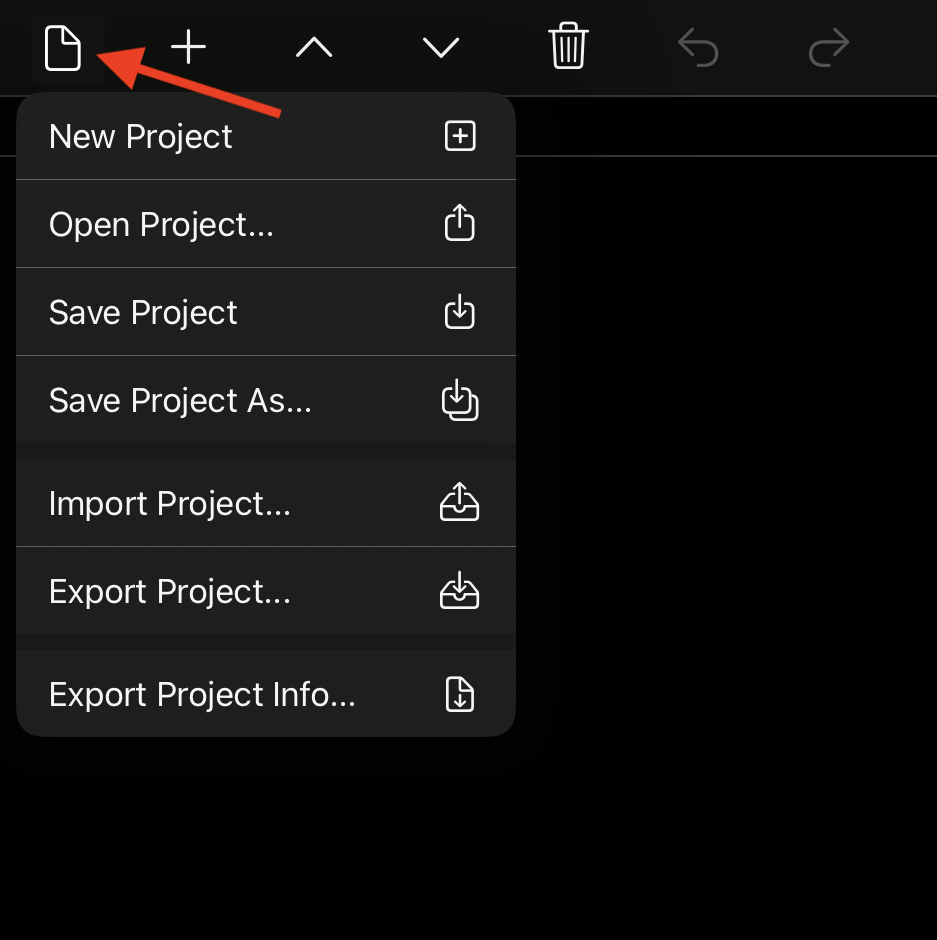
The following options are available:
New Project
Creates a new empty project with an empty cue playlist.
Use this option when starting a new show, event, or production.
Open Project
Opens the Open Project window where all saved projects are displayed.
Projects can be:
- Opened
- Searched by name
- Deleted (cannot be undone)
- Sorted by date or name in ascending or descending order
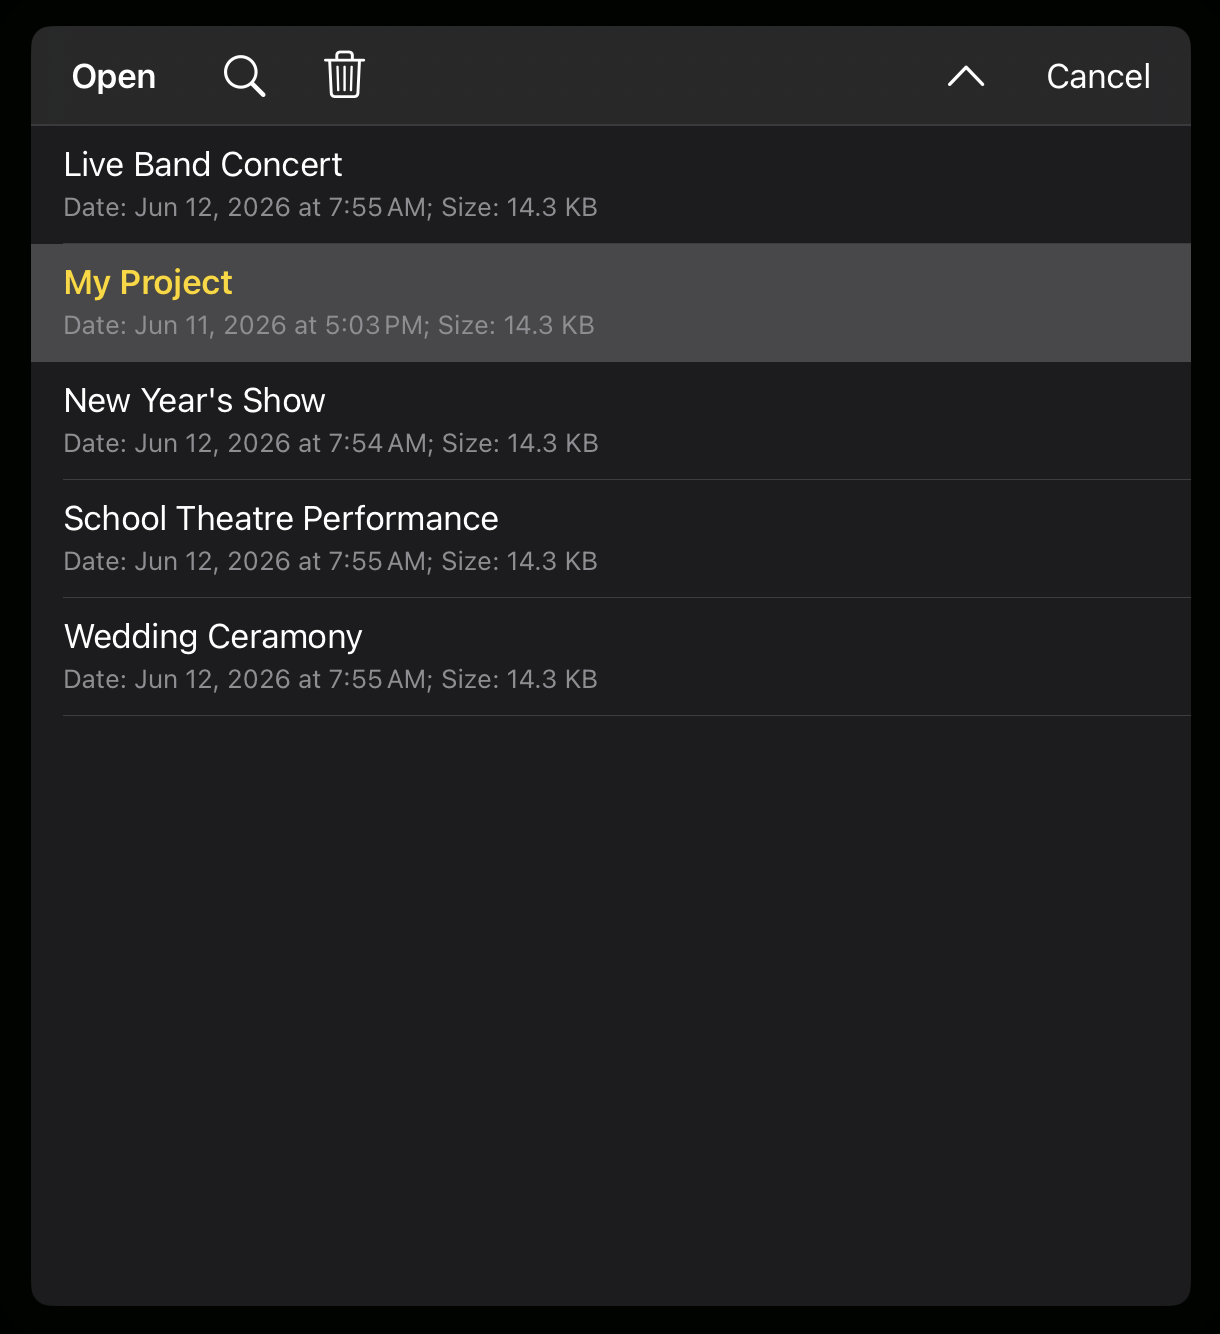
Example project names:
- New Year's Show
- School Theatre Performance
- Wedding Ceremony
- Live Band Concert
Save Project
Saves the current project.
MiX16 Show Cue does not use automatic saving. After creating or editing cues, you must manually save the project to preserve your changes.
Save Project As...
Saves the current project using a different name.
This is useful when creating a copy of a project or renaming an existing project.
For example, open a project and use Save Project As... to save it under a new name.
Import Project...
Imports a previously exported project.
This is commonly used when transferring projects between devices.
Export Project...
Exports the current project to a folder on the device.
MiX16 Show Cue creates a folder using the project name and copies all required project data and multimedia files into that folder.
The exported folder contains:
- Project data (cue playlist, settings, MIDI/OSC settings, lighting settings, etc.)
- All media files used by the project
This ensures the project can be transferred and opened on another device without missing media.
A recommended workflow for transferring projects between devices:
- Export the project
- Compress (ZIP) the exported folder
- Transfer the ZIP file using iCloud Drive, USB storage, external disk, AirDrop, or another method
- Extract the ZIP file on the destination device
- Use Import Project... in MiX16 Show Cue
- Save the imported project using Save Project so it becomes available in the local Projects folder
Export Project Info...
Exports project information as a CSV (Comma-Separated Values) file.
The exported file contains a structured overview of the cue playlist and can be opened in spreadsheet applications such as Microsoft Excel, Apple Numbers, or Google Sheets.
Depending on cue types and project content, exported information may include:
- Cue number
- Cue name
- Cue type
- Notes
- Duration
- Playback behavior
- Commands
- Total project duration
This can be useful for rehearsals, technical documentation, printing cue lists, or sharing show information with stage crew and operators.
Tools Menu
Tap or click the Tools button in the main top toolbar to open the Tools menu.
The Tools menu provides quick access to cue management, interface options, live performance tools, and application settings.
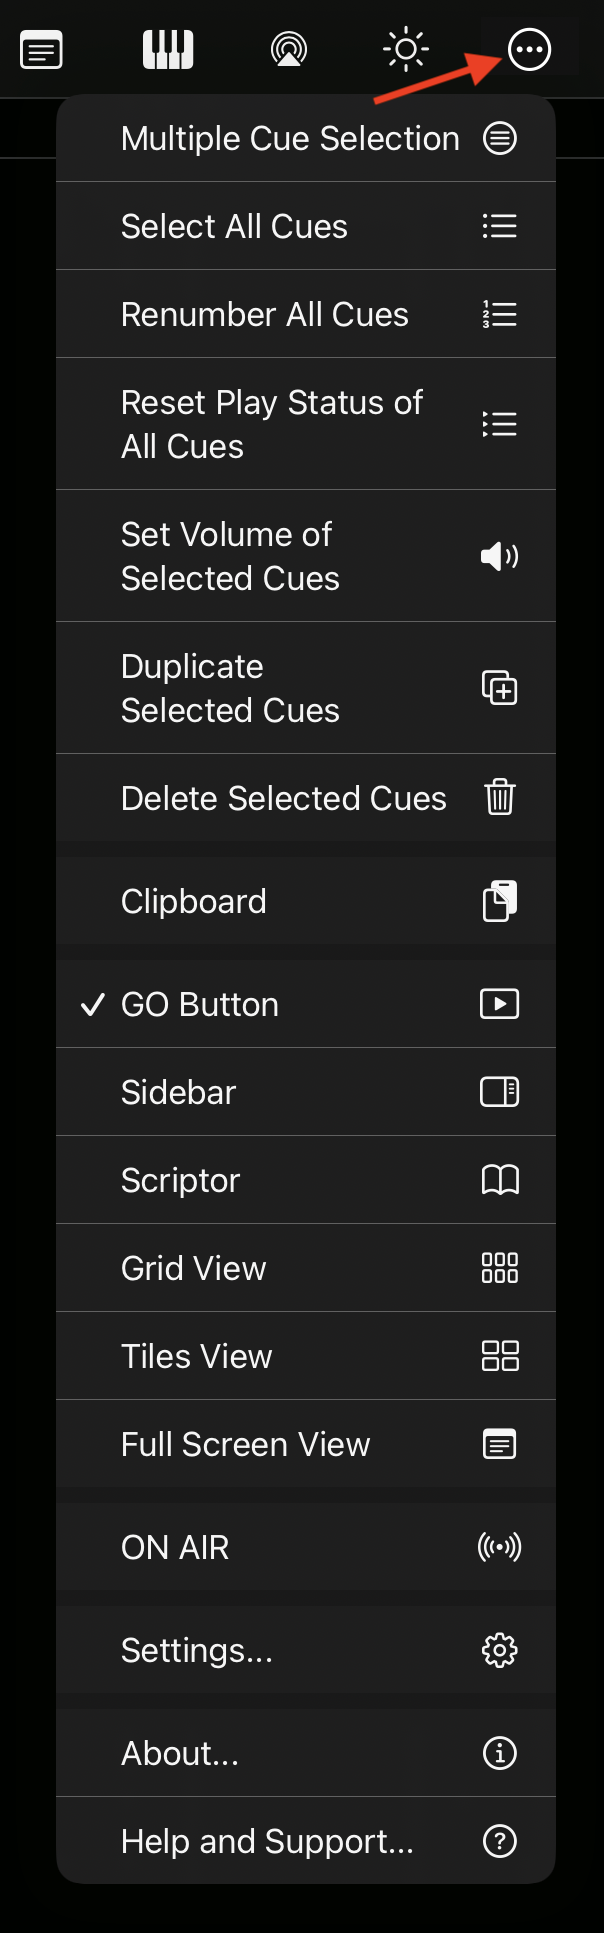
The following options are available:
Multiple Cue Selection
Enable or disable multiple cue selection.
When enabled, multiple cues in the playlist can be selected at the same time. This is useful when performing actions such as changing volume, duplicating, or deleting multiple cues at once.
Select All Cues
Select all cues currently in the playlist.
This is useful when applying actions to the entire cue list.
Renumber All Cues
Renumber all cues in the playlist to restore the correct numerical order.
When cues are added, cue numbers do not automatically change. For example, if cues 1, 2, 3, 4 already exist and a new cue is inserted after cue 3, the new cue may become 5, resulting in:
1, 2, 3, 5, 4
This behavior is intentional because cue numbers are often marked in printed scripts or show notes.
If cue numbering has not yet been finalized, use Renumber All Cues to restore sequential order:
1, 2, 3, 4, 5
Reset Play Status of All Cues
Reset the playback status of all cues.
Cue play buttons use color to indicate playback state:
- User Interface Color (default: yellow) – Cue has not yet played
- Green – Cue is currently playing
- Red – Cue finished playing
This provides a quick visual overview of cue progress during a show.
Use Reset Play Status of All Cues to return all cues to their initial state.
Set Volume of Selected Cues
Set the volume of multiple selected media cues at the same time.
Select the desired cues, then use this option to open a dialog where a volume value between 0% and 100% can be entered.
Only supported cue types with volume settings are affected.
Duplicate Selected Cues
Create copies of the selected cues.
Duplicated cues are added to the playlist and retain the same settings as the original cues.
Delete Selected Cues
Delete all selected cues from the playlist.
Clipboard
Open the Clipboard dialog.
The Clipboard allows you to:
- Copy selected cues
- Copy all cues
- Paste cues from the clipboard
This can be useful when duplicating cue structures between projects or rearranging complex cue lists.
GO Button
Show or hide the GO button.
When hidden, more space becomes available for the cue playlist, grid view, or tiles view.
Sidebar
Show or hide the Sidebar.
The Sidebar contains cues that are independent from the normal GO playback workflow and can be triggered manually at any time.
For additional information, see Creating Cues → Main Playlist vs Sidebar.
Scriptor
Show or hide Scriptor.
Scriptor allows an RTF (Rich Text Format) script file to be loaded into the application. Internal links can then be added to words or phrases inside the script.
When tapped or clicked, links can trigger actions such as:
- Play cue
- Pause cue
- Stop cue
- Other cue-related actions
This is useful for theatre, presentations, and scripted performances where cue triggering is tied directly to script text.
For additional information, see the Scriptor section later in this manual.
Grid View
Display cues in a grid layout.
For additional information, see Interface Overview → Central Area.
Tiles View
Display cues as tiles.
For additional information, see Interface Overview → Central Area.
Full Screen View
Toggle Full Screen View.
Full Screen View displays enlarged information about the currently playing cue and the next cue, making it easier to monitor cue progress from a distance.
This can be useful for one-person performances, bands, theatre productions, or situations where cues are triggered remotely while viewing the device from the stage.
Video Output Window
macOS only
Display visual cues in a separate Video Output Window.
On iPad and iPhone, when an external display is connected, MiX16 Show Cue automatically uses the external display for visual cue playback.
On macOS, external display behavior is different and multiple external displays may be connected at the same time. For this reason, Video Output Windows are used.
MiX16 Show Cue supports up to 4 Video Output Windows on macOS.
Each visual cue can be assigned to one or multiple output windows in Cue Settings → Video Output Window.
Multiple output windows can be selected by separating window numbers with commas (for example: 1,2,3), allowing the same visual cue to be displayed on multiple external displays simultaneously.
ON AIR
Enable or disable ON AIR mode.
When enabled, editing functions are disabled to help prevent accidental changes during a live performance.
This includes:
- Cue editing
- Cue settings
- Volume sliders
- Time sliders
- Master volume changes
ON AIR mode is useful when the show is ready and all settings have been finalized.
Settings...
Open the Settings window.
For additional information, see the Settings section.
About...
Display application information.
This includes version and general information about MiX16 Show Cue.
Help and Support...
Open the MiX16 apps website and display the Support section.
Settings
Settings allow you to customize the appearance, behavior, playback workflow, and external integration features of MiX16 Show Cue.
To open Settings, tap or click the Tools button in the top toolbar, then select Settings.
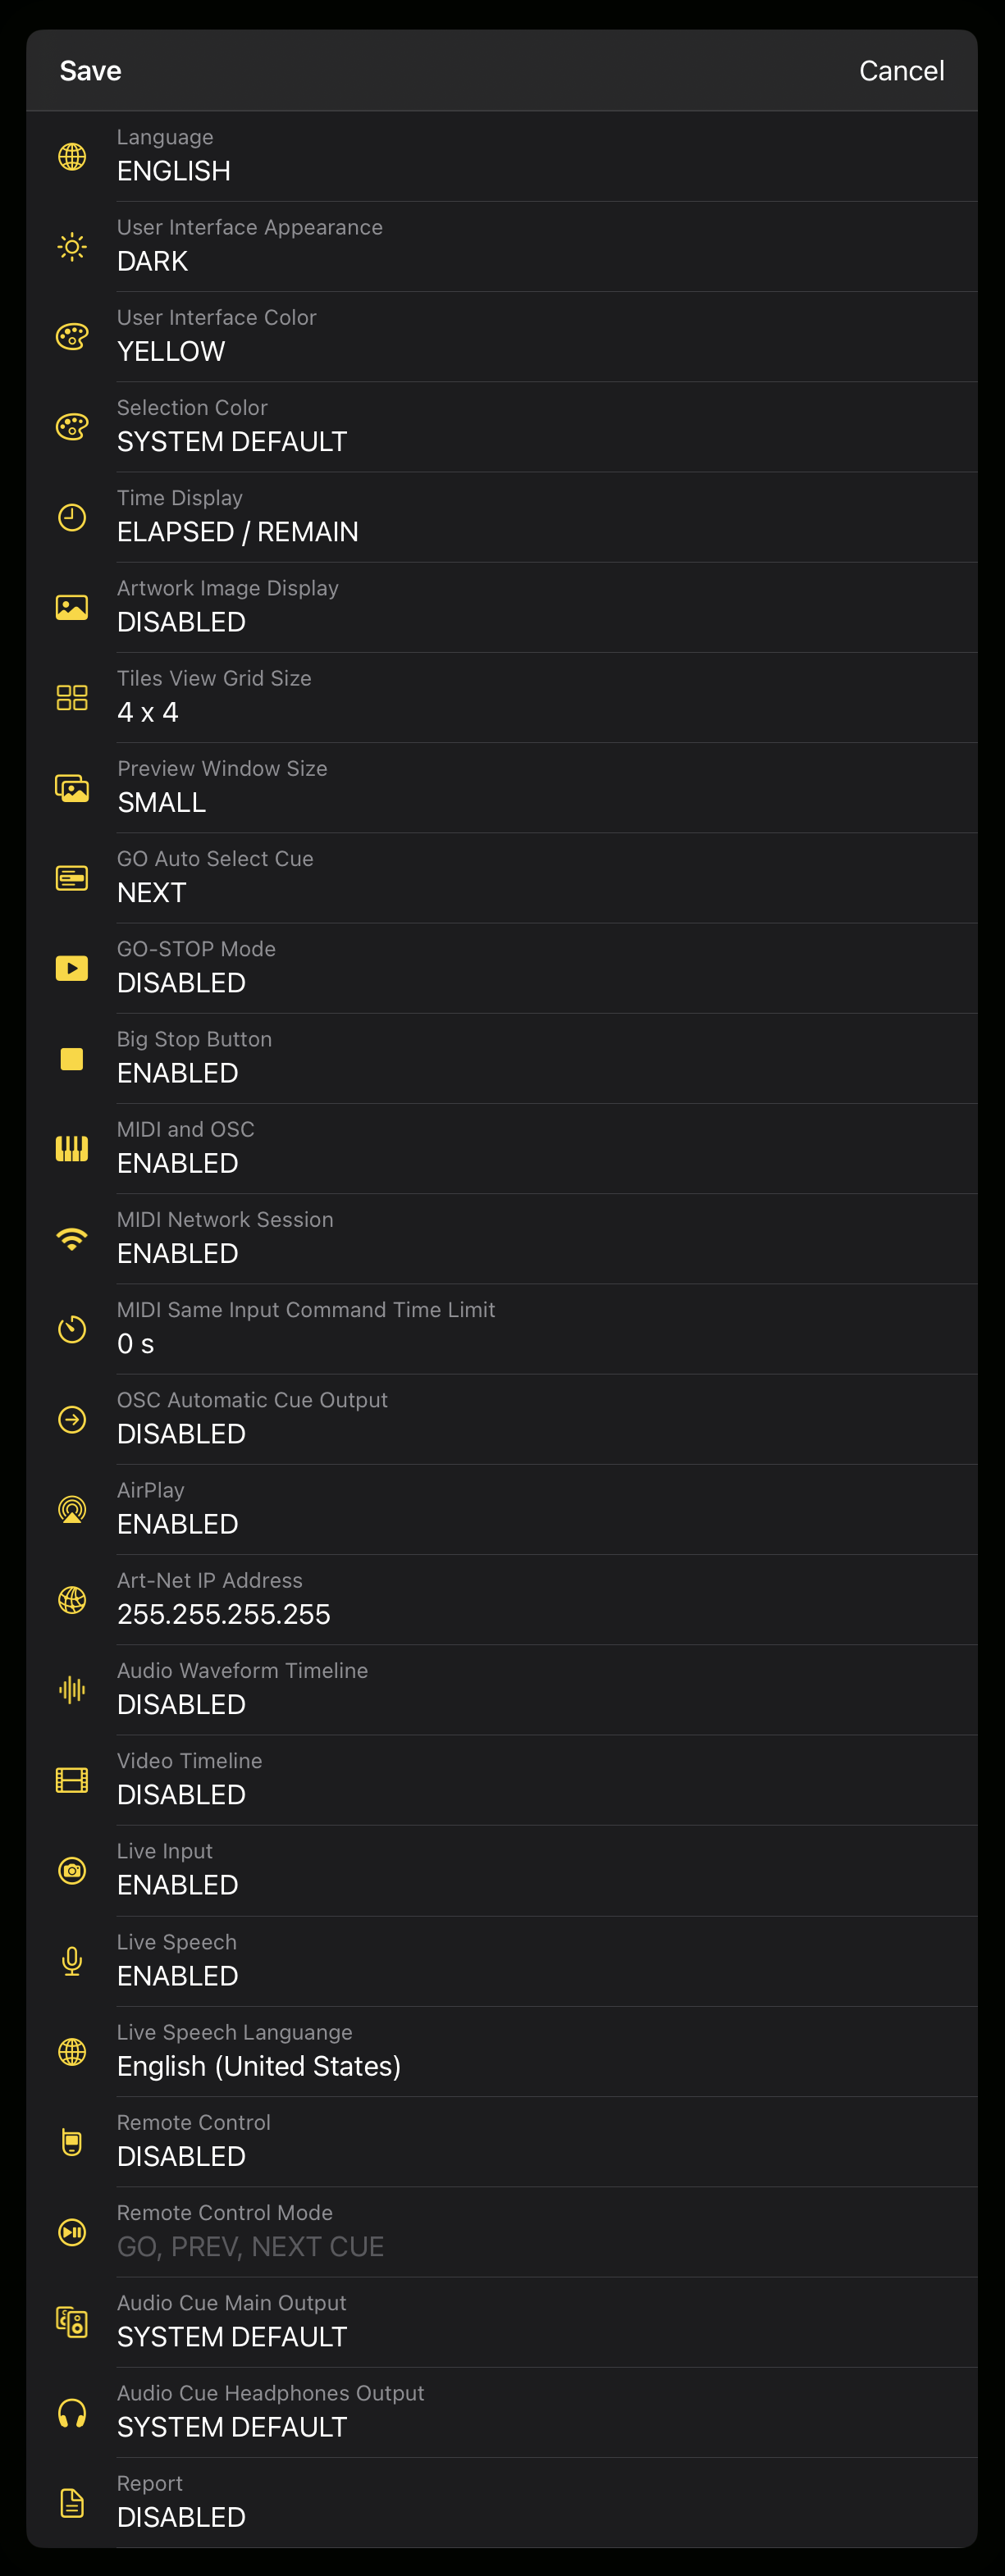
Important
After changing and saving settings, MiX16 Show Cue must be restarted manually for changes to take effect. The application will display a prompt when a restart is required.Mac: Quit and reopen the application.
iPad / iPhone: Close the application from the app switcher, then open it again.
The following settings are available:
Language
Select the application language.
MiX16 Show Cue supports the following languages:
- English
- German
- French
- Italian
- Spanish
- Slovenian
Changing the language opens the device’s system language settings, where the preferred language can be selected.
User Interface Appearance
Choose the appearance mode used by the application.
Available options:
- SYSTEM DEFAULT – Uses the device operating system appearance
- LIGHT – Always use light mode
- DARK – Always use dark mode
User Interface Color
Change the accent color used throughout the application.
The selected color affects:
- GO button color
- Settings icons
- Highlighted controls and interface elements
Available colors:
- Yellow
- Orange
- Brown
Selection Color
Choose the color used for selected items in the cue playlist.
Available options:
- SYSTEM DEFAULT
- Yellow
- Orange
- Red
- Blue
- Green
- Purple
- Brown
Time Display
Choose how cue time is displayed for media cues and other cues with duration.
Available options:
- ELAPSED / REMAIN – Display both elapsed and remaining time
- ELAPSED ONLY – Display elapsed time only
- REMAIN ONLY – Display remaining time only
Artwork Image Display
Display embedded artwork images inside cue play buttons.
When enabled, multimedia cues display artwork embedded in supported media files (for example, album artwork in MP3 files).
Tiles View Grid Size
Configure the number of tiles displayed when using Tiles View.
The selected grid size determines how many cues are visible in the main interface.
The minimum grid size is 4 × 4, and the maximum is 10 × 10.
For additional information, see Interface Overview → Central Area → Tiles View.
Preview Window Size
Configure the preview window size used by visual cues.
Visual cues such as video, image, text, and live input cues can display a content preview directly inside the application.
Available options:
- DISABLED – No preview window
- SMALL – Compact preview window
- LARGE – Larger preview window
- FULL SCREEN – Full-screen preview
GO Auto Select Cue
Defines which cue becomes selected after pressing GO.
Available options:
- NEXT – Automatically selects the next cue in the playlist
- TRIGGERED – Selects the cue triggered by GO
This setting affects only cue selection and does not change playback behavior.
GO-STOP Mode
Enable or disable GO-STOP Mode.
When enabled:
- Pressing GO triggers the next cue
- Pressing GO again stops the currently triggered cue
- The next cue is automatically prepared
This workflow repeats throughout the playlist.
When disabled, pressing GO always triggers the next cue without stopping currently playing cues.
Big Stop Button
Display a large STOP button next to the GO button.
This layout provides faster access to emergency stopping during live performances.
For additional information, see GO Button in the Interface Overview section.
MIDI and OSC
Enable or disable MIDI and OSC features.
When disabled:
- MIDI and OSC features are hidden
- MIDI and OSC settings become unavailable
- MiX16 Show Cue behaves as if MIDI and OSC support is not present
This can simplify the interface when external control is not required.
MIDI Network Session
Enable or disable MIDI communication over a local network.
When enabled, MiX16 Show Cue can send and receive MIDI commands over LAN or Wi-Fi between compatible computers, tablets, mobile devices, software, or hardware that support Network MIDI.
This can be useful for:
- Wireless MIDI control between devices
- Sending MIDI between computers and tablets
- Connecting to MIDI software running on another device
- Integrating compatible network-enabled MIDI hardware
For example, MiX16 Show Cue can communicate with another computer running music software, a tablet used as a MIDI controller, or a device connected through Apple’s built-in Network MIDI system.
MIDI Same Input Command Time Limit
Ignore repeated incoming MIDI commands received within a specified time limit.
This helps prevent accidental duplicate triggering caused by:
- Accidental repeated presses on MIDI controllers
- Footswitch bounce
- Hardware glitches
- Repeated MIDI transmission
If the same MIDI command is received again within the selected time period, it is ignored.
The minimum value is 0.1 seconds, and the maximum value is 60 seconds.
OSC Automatic Cue Output
Automatically send predefined OSC information to the configured OSC Output IP Address and Port.
When enabled, MiX16 Show Cue continuously sends OSC information that can be received by any OSC-compatible software or device listening on the configured port.
Information may include:
- Application and project information
- GO button title
- Next cue name
- Playing cue information
- Cue playback status
- Cue time
- Master volume
- Lighting master
For a complete list of built-in OSC messages and ready-to-use OSC templates, see:
https://www.mix16showcue.com/mt-content/uploads/2026/06/mix16-show-cue-built-in-default-osc-commands-and-templates.pdf
This is useful for integration with OSC control panels, touch interfaces, external software, or custom show-control systems.
AirPlay
Enable or disable AirPlay support.
When enabled, compatible audio and video outputs can be routed using Apple AirPlay.
For live performances, wired outputs are recommended because AirPlay may introduce latency.
Art-Net IP Address
Set the IP address of your Art-Net to DMX device (for example: Showtec NET-2/5 Pocket, Enttec ODE Mk3, or similar).
The Art-Net device must be on the same local network (LAN) as the device running MiX16 Show Cue.
Multiple IP addresses can be entered by separating them with commas. DMX data will be sent to all specified devices simultaneously.
Alternatively, the broadcast address (255.255.255.255) can be used if supported by the Art-Net device.
Note
Broadcast is supported on macOS. Due to platform security restrictions, it is not supported on iPadOS and iOS.
Audio Waveform Timeline
Enable or disable visual audio waveform preview in the Timeline Editor.
When enabled, audio cues display a visual waveform representation of the audio file inside:
Cue Settings → Timeline
This can make editing cue start and end points easier.
Video Timeline
Enable or disable video frame preview in the Timeline Editor.
When enabled, video cues display preview frames (thumbnails) of the video inside:
Cue Settings → Timeline
This makes it easier to locate precise playback positions visually.
Live Input
Enable or disable Live Input cues.
When enabled, Live Input cues can use the device microphone and/or camera for real-time audio and video playback.
When disabled, Live Input cues are unavailable in the cue menu.
Important
If you are using a Bluetooth audio device for audio playback, Live Input should be disabled.Live Input requires a different audio mode because it uses the microphone and/or camera in real time. Bluetooth audio playback may not work as expected while Live Input is enabled.
Live Speech
Enable or disable Live Speech.
Live Speech allows cues to be triggered using spoken phrases.
Each cue can have a custom Live Speech Text phrase configured in Cue Settings. When the phrase is detected, MiX16 Show Cue can automatically trigger or prepare the cue.
To use Live Speech:
- Enable Dictation / Speech Recognition in the operating system settings
- Enable Live Input and Live Speech in MiX16 Show Cue settings
- Configure Live Speech Text for the desired cue
- Enable ON AIR from the Tools menu
- Tap or click the Live Speech icon in the main top toolbar next to ON AIR to start speech recognition
When the Live Speech icon is green, Live Speech is active and listening for configured phrases.
For detailed setup instructions, see the Live Speech Guide:
https://www.mix16showcue.com/mt-content/uploads/2026/06/mix16-show-cue-live-speech.pdf
Live Speech Language
Select the language used for speech recognition.
The selected language should match the language configured in the device Dictation / Speech Recognition settings for best accuracy.
Supported languages depend on the operating system and installed language packs.
Remote Control
Enable or disable support for compatible Apple media remote controls.
When enabled, MiX16 Show Cue responds to standard Apple media commands such as:
- Play
- Pause
- Stop
- Previous
- Next
This allows compatible Bluetooth remotes, multimedia keyboards, headphones, footswitches, or other Apple-compatible controllers to operate the application.
Remote Control Mode
Choose how remote control buttons behave.
Available modes:
- GO, PREV, NEXT CUE – Optimized for cue-based playback using the GO workflow
- PLAY/PAUSE, REW, FF – Traditional media transport controls for currently playing cues
Audio Cue Main Output
Select the stereo output used for audio cue playback.
When a multichannel audio device is connected, a stereo channel pair can be selected as the main cue output.
By default, SYSTEM DEFAULT output is used.
Audio Cue Headphones Output
Select a dedicated stereo output for headphone cue monitoring.
When enabled and supported by a multichannel audio device, audio cues display a headphones button in the playlist.
When the headphones button is enabled:
- Audio is routed to the selected Headphones Output
- Cue playback can be previewed privately
Pressing the button again routes audio back to the Main Output.
This feature applies to audio cues only.
Report
Enable or disable activity reporting, which logs actions performed during operation into a CSV report file.
If reporting is enabled, a Report icon appears in the main top toolbar. Tap or click the icon to open the current report log.
The report log automatically starts when a project is created or opened, and ends when:
- The application is closed
- A different project is opened
- A new project is created
Reports can be useful for:
- Show documentation
- Technical rehearsals
- Reviewing operator workflow
- Helping another technician recreate or operate the show later
Scriptor
Scriptor is a built-in script viewer, editor, and cue control tool designed for theatre productions, presentations, live performances, and other scripted events.
Scriptor allows you to display a script directly inside MiX16 Show Cue, helping operators follow the show while triggering cues from the same screen.
Script content can be:
- Written manually inside Scriptor
- Imported from an RTF (Rich Text Format) file
- Copied and pasted from other applications such as Microsoft Word, Apple Pages, or similar text editors
To show Scriptor, enable Scriptor from the Tools menu.

Scriptor appears alongside the cue playlist and displays script content in a dedicated panel.
This can be useful for:
- Theatre productions
- Presentations
- Church services
- Magic shows
- School performances
- Any scripted production where cues must follow written text
Scriptor Toolbar
The Scriptor toolbar provides quick access to editing and script actions.
Available toolbar buttons:
-
+ – Add an action link to the selected word or phrase.
-
− – Remove an action link from the selected word or phrase.
-
Delete icon – Delete the selected text.
-
Import (arrow and box) icon – Import an RTF (Rich Text Format) file into Scriptor.
-
Pencil icon – Enable or disable script editing.
When editing is disabled, the icon changes to a crossed pencil. Tap or click the button again to re-enable editing.
Action Links
Words or phrases inside the script can contain action links.
When tapped or clicked, an action link triggers a predefined action in MiX16 Show Cue, allowing cue playback and control directly from the script.
To create an action link:
- Select the desired word or phrase in the script
- Tap or click the + button
- Enter or select an action command
- Confirm the action
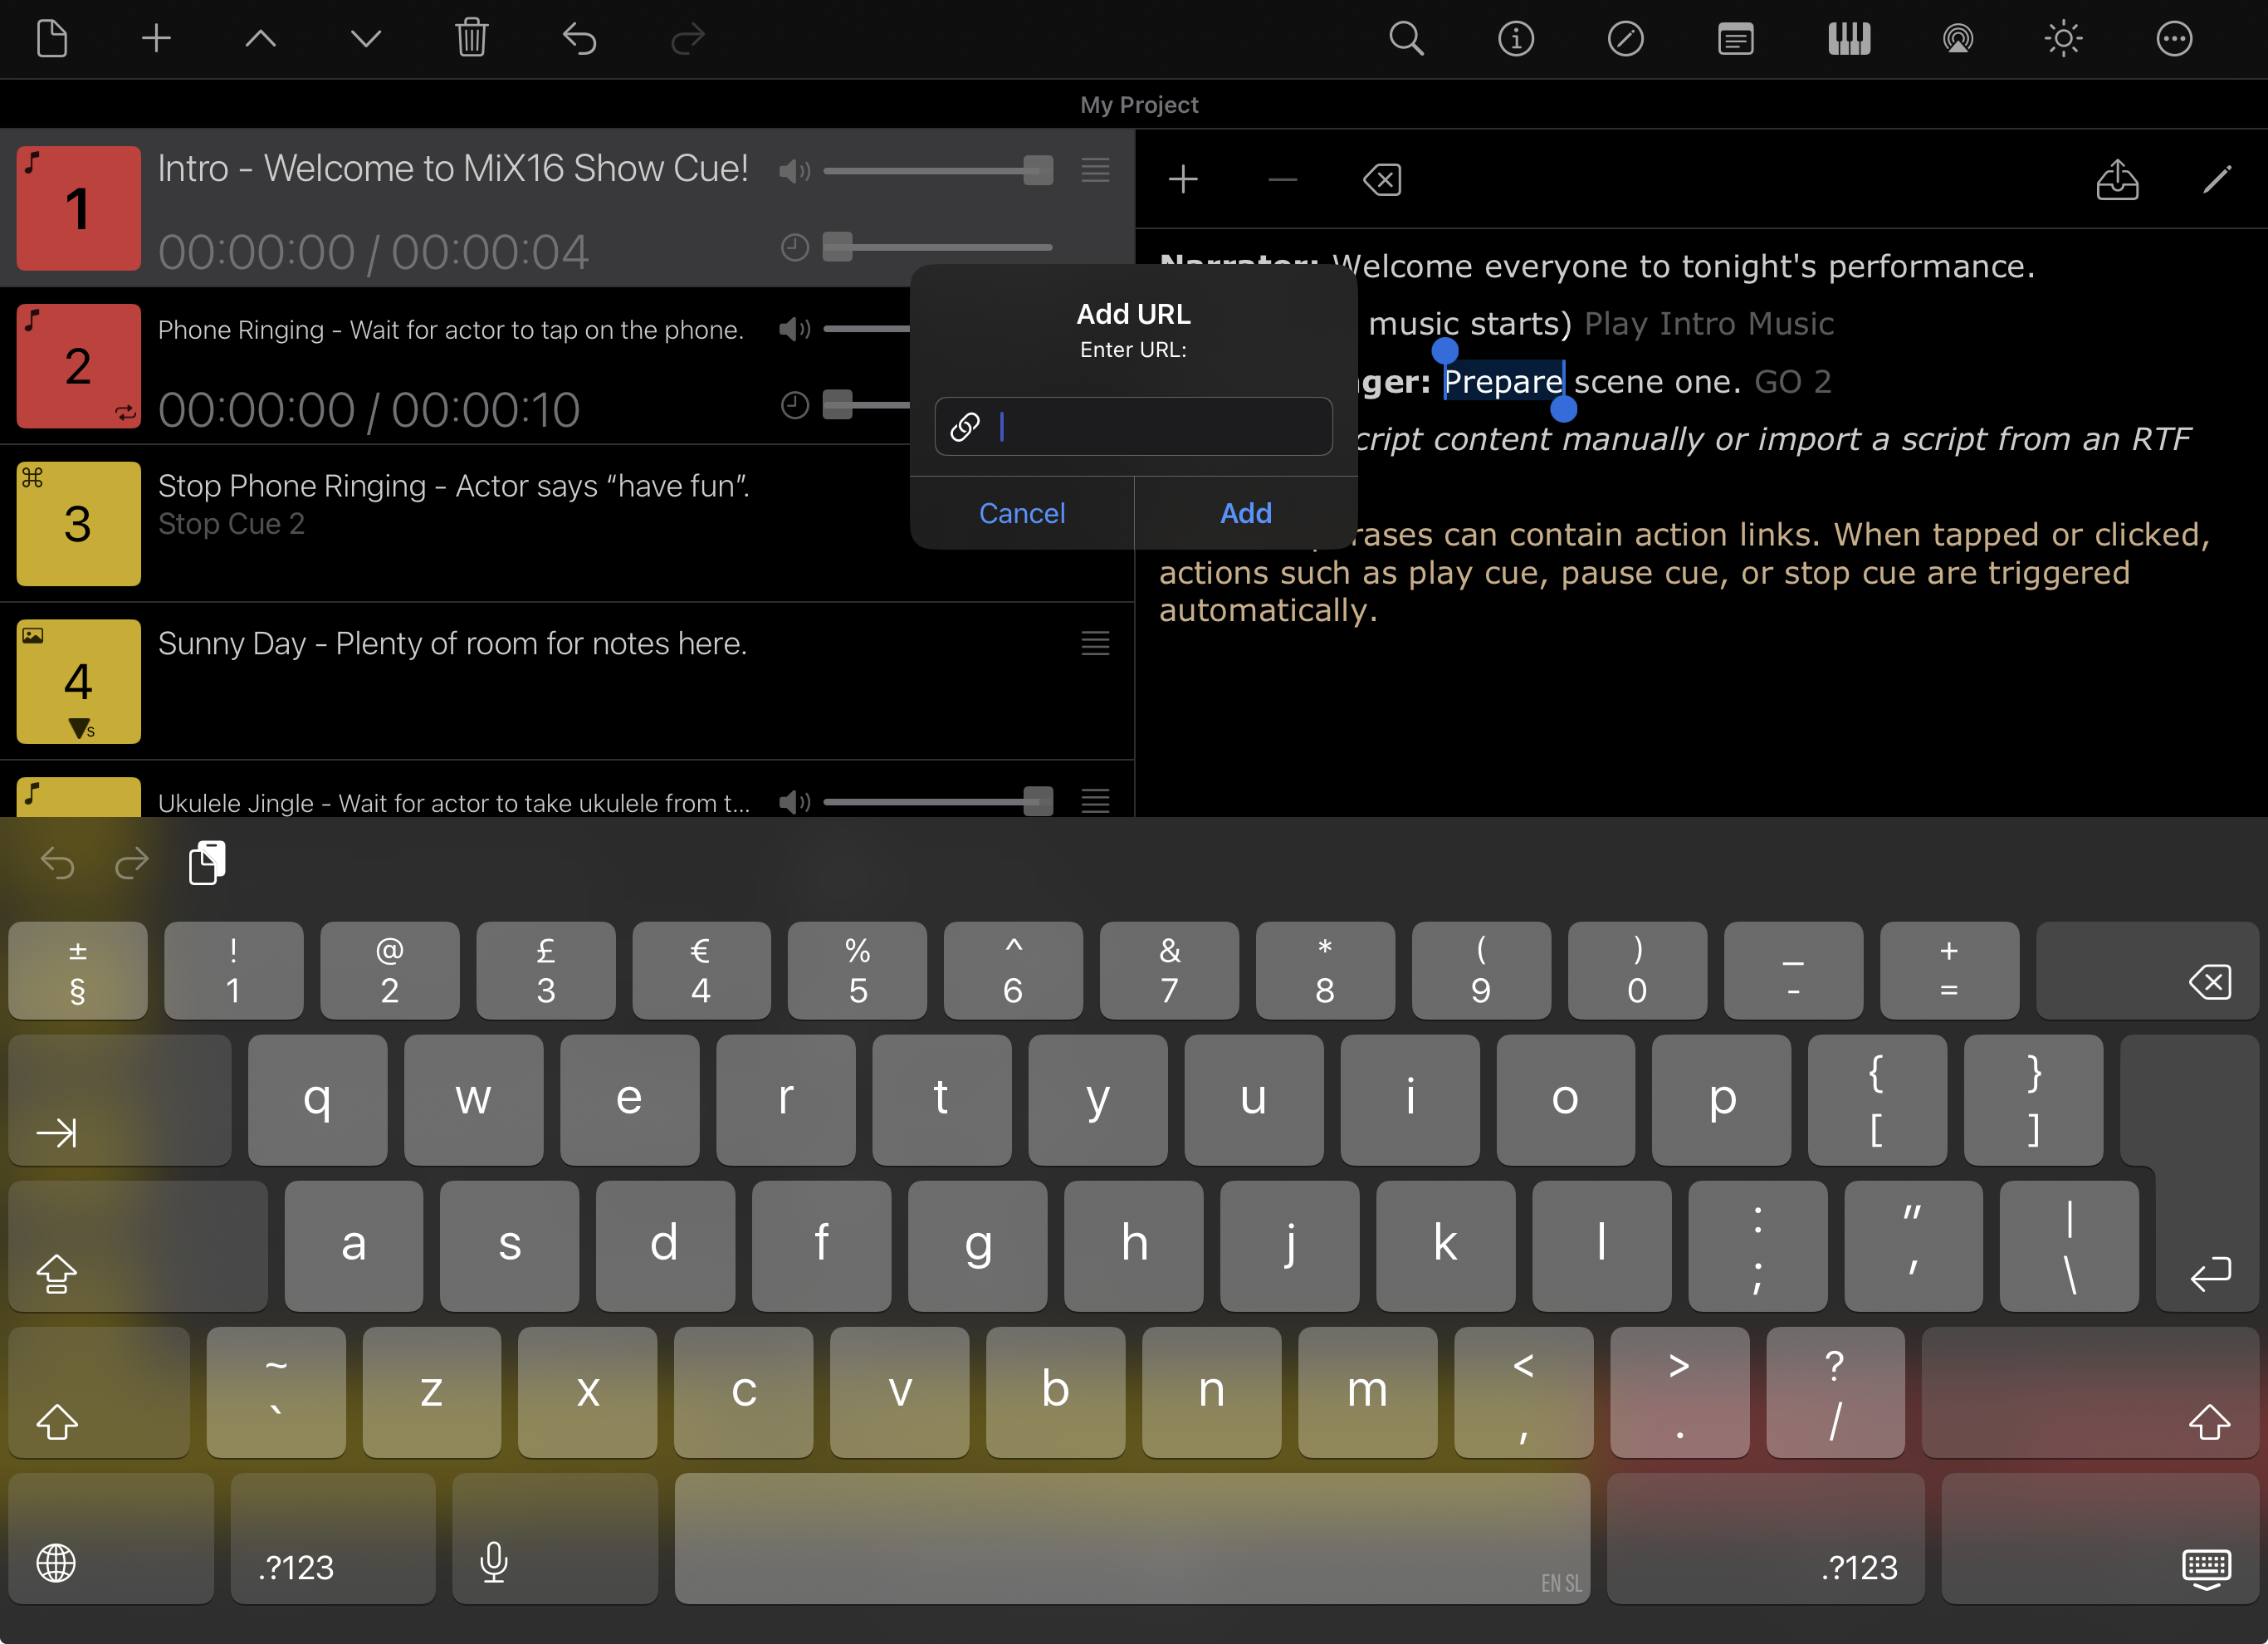
An option button is available next to the input field. Tap or click the button to display available actions.
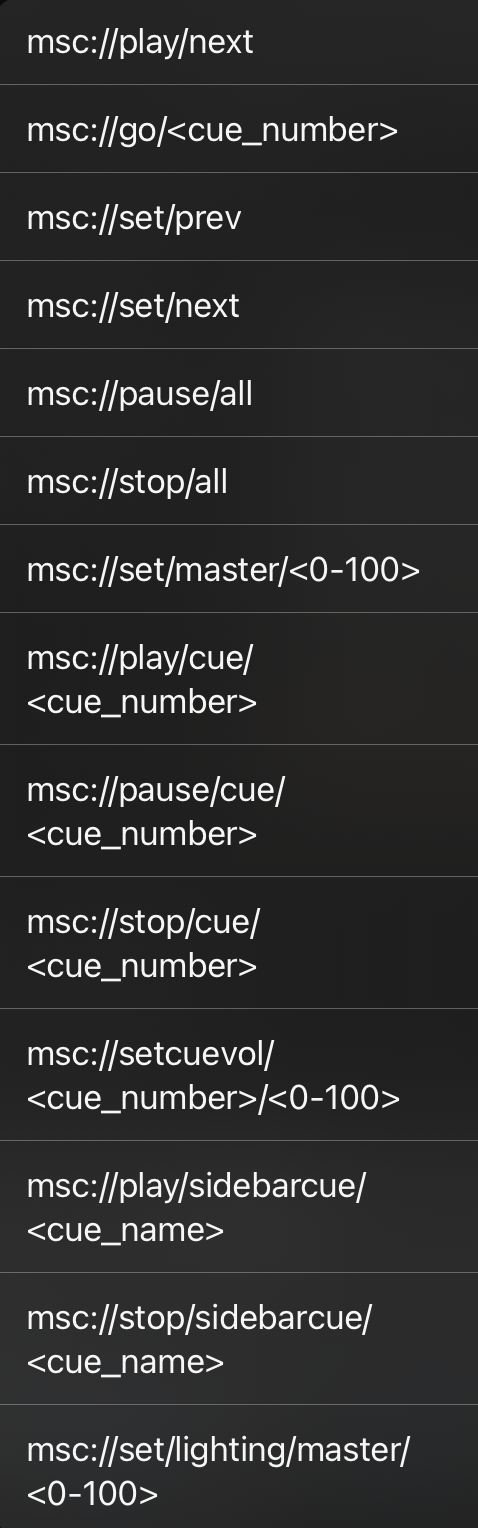
Available actions include:
- Play next cue
- GO to cue number
- Set previous cue
- Set next cue
- Pause all cues
- Stop all cues
- Set master volume
- Play cue
- Pause cue
- Stop cue
- Set cue volume
- Play sidebar cue
- Stop sidebar cue
- Set lighting master
Action links use the internal msc:// format.
For example:
msc://go/5
Sets GO to cue 5, then triggers GO.
This allows script text to become interactive, making it possible to control cue playback directly from words or phrases in the script.
Professional Use Cases
MiX16 Show Cue is ideal for:
- Theatre productions
- Concerts
- Bands
- Magic shows
- Weddings
- Schools
- Churches
- Solo performers
- Touring productions
Tips for Live Shows
- Rehearse with your cue list before performance
- Keep backups of projects (export to iCloud)
- Label cues clearly
Privacy & Data
MiX16 Show Cue Lite and MiX16 Show Cue Pro are commercial applications for iPadOS, iOS and macOS created by Gregor Krasevec.
MiX16 Show Cue Lite and MiX16 Show Cue Pro applications DO NOT collect any personal or any other information from the user.
MiX16 Show Cue Lite and MiX16 Show Cue Pro applications DO NOT use any third party software for tracking user activity, displaying advertisement or any other activity which is not compliant with the GDPR.
Support
- Website: https://www.mix16apps.com
- Email: info@mix16apps.com
Legal
© 2026 Gregor Krasevec. All rights reserved.
Apple, iPhone, iPad, and Mac are trademarks of Apple Inc.